What Makes This Version Stand Out
- Taste: The combination of brown sugar and cream cheese in the filling creates a depth of flavor that surpasses the usual simple sugar mix. The subtle vanilla in the glaze adds an unexpected layer of aroma that lingers on the tongue. The result is a roll that is sweet, buttery, and unmistakably cinnamon-forward.
- Texture: The dough is kneaded just enough to develop gluten, giving it a chewy interior while the surface remains tender. The butter and cream cheese in the filling melt into a silky, almost custard-like consistency that clings to the dough. The glaze provides a gentle crunch that balances the softness.
- Simplicity: Every ingredient is common in most kitchens, and the method requires only basic mixing and rolling. No fancy tools or hard-to-find spices are needed—just a reliable bowl, a rolling pin, and a good sense of timing.
- Uniqueness: The addition of a small amount of melted butter to the yeast mixture activates the yeast more efficiently, producing a lighter rise. The double layer of butter—one softened for the dough and one softened for the filling—adds a buttery richness that isn’t found in standard recipes.
- Audience: Whether you’re a seasoned baker or a newbie, this recipe is approachable. The step-by-step instructions and clear timing cues ensure that even those who have struggled with dough in the past can achieve success.
- Make‑Ahead Potential: The dough can be refrigerated for up to 24 hours, and the rolls can be frozen for up to a month. The glaze and filling can be prepped separately, allowing you to assemble the rolls just before baking.
Inside the Ingredient List
The Flavor Base
The warm milk and active dry yeast form the backbone of our dough, creating a soft, airy crumb that holds the cinnamon filling like a gentle hug. The milk’s warmth activates the yeast, which in turn releases carbon dioxide bubbles that make the dough rise. If you skip the yeast, the rolls will be flat and dense, lacking that signature puff that makes them so delightful. When choosing milk, opt for whole milk or a milk alternative that has a richer fat content; the fat helps keep the dough moist and flavorful.
The granulated sugar in the dough not only sweetens but also feeds the yeast, providing the energy it needs to grow. A pinch more sugar can lead to a slightly sweeter dough, but be careful not to overdo it, as too much sugar can inhibit yeast activity. If you prefer a lower-sugar option, you can substitute part of the granulated sugar with a natural sweetener like maple syrup, though this will alter the flavor profile slightly. Always keep the sugar in the dough at room temperature to ensure it dissolves evenly.
Unsalted butter, melted and added to the dough, gives a tender crumb and a subtle buttery aroma. The butter also coats the flour particles, limiting gluten development to keep the dough from becoming tough. If you’re using salted butter, reduce the added salt by a quarter to avoid an overly salty final product. For an extra touch of decadence, you can substitute half of the butter with coconut oil, which will impart a faint tropical note.
The salt in the dough is a flavor enhancer, balancing the sweetness and bringing out the richness of the butter and cinnamon. Salt also strengthens the dough by tightening gluten strands, giving the rolls a better structure. If you’re on a low-sodium diet, you can reduce the salt by a third, but the dough may not rise as well, so keep an eye on it during the proofing stage.
The eggs are the glue that holds everything together, adding richness and helping the dough rise. They also contribute to the golden color of the crust. If you’re vegan, you can replace eggs with flaxseed meal mixed with water or a commercial egg replacer. Remember that the egg substitute may slightly alter the texture, so experiment to find the best fit for your taste.
The Texture Crew
All-purpose flour is the star of the show, providing the structure needed for the dough to rise and hold the filling. Use a high-protein flour for a chewier roll, or a lower-protein flour for a softer crumb. If you want an extra airy texture, you can sift the flour before mixing to incorporate more air into the dough.
The softened butter in the filling is essential for creating a buttery, melt-in-your-mouth experience. It coats the cinnamon and brown sugar, preventing them from drying out during baking. If you prefer a lighter filling, you can reduce the butter by 25% and add a splash of milk to keep it moist. This tweak is great for those who are watching their calorie intake but still crave the buttery flavor.
Brown sugar in the filling is the sweet, caramel-like component that pairs perfectly with cinnamon. It adds moisture and a deep, molasses flavor that makes the rolls extra indulgent. If you’re looking for a healthier option, you can swap brown sugar for a natural sweetener like honey or maple syrup, but be mindful that the liquid content will increase, so adjust the butter accordingly.
Ground cinnamon is the star of the show, providing that warm, spicy aroma that makes cinnamon rolls unforgettable. Freshly ground cinnamon has a more robust flavor than pre-ground, so consider buying a small grinder for maximum freshness. If you’re sensitive to cinnamon’s heat, reduce the amount by half and increase the brown sugar to maintain sweetness.
The Unexpected Star
Cream cheese adds a silky, tangy richness that balances the sweetness of the filling. It also helps the glaze adhere better to the rolls, giving a smooth finish. If you’re lactose intolerant, you can use a dairy-free cream cheese or a tofu-based alternative, though the texture will be slightly different.
Powdered sugar is the sweetener of choice for the glaze, as it dissolves quickly and creates a glossy coat. The glaze’s vanilla extract adds a subtle aroma that enhances the overall flavor profile. If you’re craving a nutty twist, you can add a teaspoon of almond extract to the glaze for an extra layer of flavor.
The 1/4 cup of softened butter used in the glaze is a small but crucial component. It gives the glaze a buttery sheen and helps it set into a smooth, glossy finish. If you’re looking to cut calories, reduce the butter by 50% and replace it with a light butter alternative, but be prepared for a slightly less glossy glaze.
Everything’s prepped? Good. Let’s get into the real action—where the dough meets the heat, and the magic begins.
The Method — Step by Step
- In a small bowl, combine the warm milk with the active dry yeast and a pinch of granulated sugar. Stir gently until the mixture is frothy, which indicates that the yeast is alive and ready to work. This step is crucial; if the yeast is dead, the dough will never rise. Let the mixture sit for about five minutes until it becomes foamy—this is the first rise.
- In a large mixing bowl, whisk together the all-purpose flour, the remaining granulated sugar, and the salt. Gradually add the frothy yeast mixture, the melted butter, and the eggs, stirring continuously until the dough begins to pull away from the sides of the bowl. The dough should feel smooth and slightly tacky, not dry. If it’s too sticky, add a tablespoon of flour at a time.
- Turn the dough onto a lightly floured surface and knead for about eight to ten minutes, or until it becomes elastic and glossy. The goal is to develop enough gluten for structure while keeping the dough tender. During kneading, you’ll notice the dough’s texture shift from shaggy to a smooth, cohesive ball.
- Form the dough into a ball, place it in a greased bowl, and cover it with a clean kitchen towel. Allow it to rise in a warm place for about 90 minutes, or until it has doubled in size. During this period, the yeast produces carbon dioxide, which creates pockets that give the rolls their airy interior.
- Once the dough has doubled, punch it down to release any large air pockets. Turn it onto a lightly floured surface and roll it into a rectangle measuring about 16 by 12 inches. The rectangle should be even in thickness—roughly a half-inch—so that the rolls bake uniformly.
- In a small bowl, mix the softened butter, brown sugar, and ground cinnamon until well combined. Spread this filling evenly over the rolled dough, leaving a small border around the edges. The filling should be thick enough to stay in place but not so heavy that it pulls the dough down during baking.
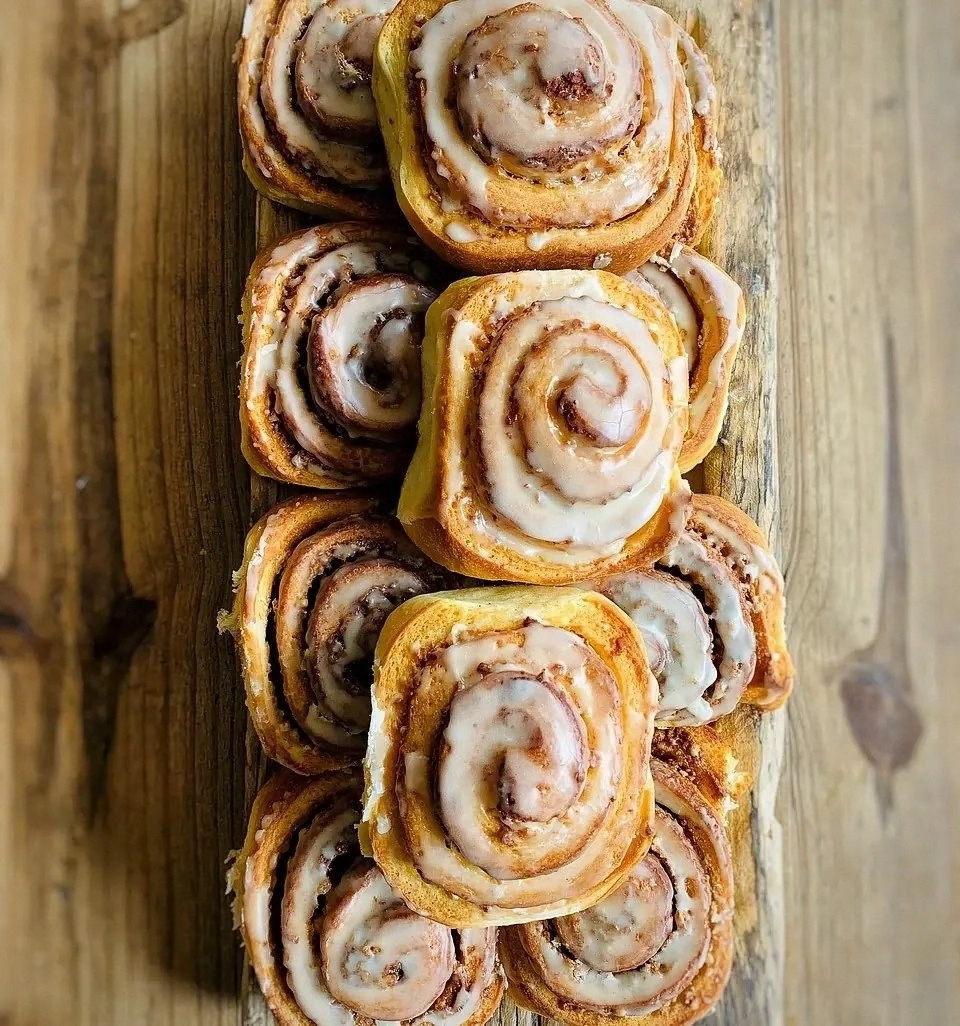
- Starting at the long side, carefully roll the dough into a tight log, ensuring the filling stays inside. Pinch the seam to seal it, and then cut the log into 12 equal slices, each about 1.5 inches thick. The slices should be uniform for even baking.
- Place the sliced rolls on a parchment-lined baking sheet, spacing them slightly apart to allow for expansion. Cover them loosely with a kitchen towel and let them rise for an additional 20 to 25 minutes, or until they puff up noticeably. This second rise is what gives the rolls their signature lightness.
- Preheat the oven to 375°F (190°C). Bake the rolls for 18 to 20 minutes, or until they turn a beautiful golden brown. The aroma that fills the kitchen at this point is a promise of the sweet, buttery experience to come.
- While the rolls are still hot, prepare the glaze by whisking together the powdered sugar, 1/4 cup softened butter, vanilla extract, and just enough milk to reach a pourable consistency. Drizzle the glaze over the warm rolls, allowing it to seep into the cracks between the layers. The glaze will set into a glossy, sweet coating that adds a final touch of decadence.
- Let the rolls cool for about five minutes before serving. This brief cooling period allows the glaze to set slightly, preventing it from sliding off when you bite into the warm, buttery layers. Serve them warm for the best experience, or let them cool completely for a more convenient snack.
That’s it—you did it. But hold on, I’ve got a few more tricks that will take this to another level. These insider tips will help you avoid common pitfalls, refine your technique, and ensure every roll is a masterpiece.
Insider Tricks for Flawless Results
The Temperature Rule Nobody Follows
Many bakers assume room temperature is always ideal, but the truth is that the dough’s environment can make or break the final product. Aim for a temperature of about 75°F (24°C) when letting the dough rise. If it’s cooler, the yeast will take longer to activate, leading to a denser roll. Conversely, if it’s too warm, the yeast can overpopulate, causing the dough to collapse. Use a thermometer or a warm spot near a window to maintain consistent temperature.
Why Your Nose Knows Best
Your sense of smell is a powerful indicator of readiness. When the dough has doubled, it should emit a sweet, yeasty aroma that is unmistakable. If the scent is faint or sour, the yeast may not be active enough. In that case, give it a few more minutes or add a teaspoon of sugar to feed the yeast. A quick sniff can save you from a batch of flat, disappointing rolls.
The 5-Minute Rest That Changes Everything
After you’ve sliced the rolls, give them a brief 5-minute rest before baking. This pause allows the dough to relax, preventing it from shrinking during the bake. It also gives the filling a chance to settle, ensuring even distribution. Skipping this step often results in unevenly cooked rolls with a slightly uneven glaze.
Use a Parchment Paper Trick
Line your baking sheet with parchment paper to keep the rolls from sticking and to make cleanup a breeze. The parchment also helps distribute heat evenly, ensuring a consistent golden crust. If you’re baking in a metal pan, the parchment will prevent the rolls from over-browning on the bottom.
Glaze Timing Is Key
The glaze should be applied while the rolls are still hot, but not immediately upon removal from the oven. Let the rolls sit for a minute or two; this allows the glaze to set into a glossy, sweet coating instead of running off. If you rush, the glaze may run off, leaving a sticky mess on the counter.
Keep the Dough Moist
If you notice the dough drying out during the first rise, lightly mist it with water and cover it again. This will create a humid environment that encourages yeast activity and keeps the dough tender. A dry dough will result in a crumb that’s tough and less flavorful.
Creative Twists and Variations
This recipe is a playground. Here are some of my favorite ways to switch things up:
Nutty Cinnamon Swirl
Add a handful of chopped pecans or walnuts to the filling for a crunchy texture. The nuts pair beautifully with the sweet, buttery layers, adding a nutty depth that complements the cinnamon. Toss the nuts with a pinch of brown sugar before adding them to the filling to caramelize slightly during baking.
Chocolate Chip Delight
Swap out the brown sugar for chocolate chips in the filling. The chocolate melts into the warm dough, creating pockets of molten sweetness. Keep the glaze unchanged to maintain the classic finish, or add a hint of cocoa powder to the glaze for a richer chocolate flavor.
Orange Zest Explosion
Mix a tablespoon of orange zest into the filling to add a bright, citrusy note that cuts through the sweetness. The zest’s oils release during baking, giving a fresh burst of flavor. Pair this twist with a glaze that includes a splash of orange liqueur for an extra kick.
Maple-Infused Rolls
Replace the granulated sugar in the dough with a tablespoon of pure maple syrup. The syrup adds a subtle, caramel-like sweetness that pairs well with the cinnamon. The glaze can be finished with a drizzle of maple syrup for a cohesive flavor profile.
Low-Carb Cinnamon Rolls
Use almond flour in place of half the all-purpose flour to reduce the carb count. Add a tablespoon of erythritol or another sugar substitute to the filling. This variation is perfect for those who want to indulge without the guilt.
Spiced Pumpkin Variation
Add a quarter cup of pumpkin puree to the dough for a moist, autumnal twist. Incorporate a pinch of nutmeg and cloves to the filling for a warm spice blend. The pumpkin adds a subtle sweetness that balances the cinnamon’s heat.
Storing and Bringing It Back to Life
Fridge Storage
Store freshly baked rolls in an airtight container at room temperature for up to 3 days. To keep them from drying out, line the container with parchment paper and place a damp paper towel on top. This moisture trap will maintain the rolls’ softness and prevent the glaze from hardening.
Freezer Friendly
For longer storage, wrap individual rolls tightly in plastic wrap and place them in a freezer bag. They can stay fresh for up to 3 months. When you’re ready to enjoy, let the rolls thaw at room temperature for 30 minutes before reheating.
Best Reheating Method
To revive frozen rolls, preheat your oven to 350°F (175°C) and bake them for 10 minutes, or until warm. For a crispier crust, place them on a baking sheet and bake for 5 minutes. Add a tiny splash of water to the bottom of the pan; the steam will keep the rolls moist and restore the original texture.