Picture this: I’m standing in my tiny Honolulu‑style kitchen, a half‑cooked batch of soggy rice cakes smoldering in the oven, while my roommate is chanting, “You promised mochi, not a science experiment!” That moment of culinary chaos sparked a fierce determination to crack the code on the perfect Hawaiian Butter Mochi. I tossed out every half‑hearted recipe I’d ever found, rolled up my sleeves, and embarked on a flavor‑filled quest that felt more like a treasure hunt than a bake‑off. The result? A buttery, chewy marvel that makes the ordinary mochi look like a bland sidekick.
The moment the batter hits the pan, the kitchen erupts with an aroma that’s part toasted coconut, part caramelized sugar, and part island sunrise. I swear you can hear the sizzle like a tiny drumroll, feel the warm glow of the oven like a hug, and see the edges of the mochi start to pull away, revealing a golden crust that’s just begging to be broken. The first bite is an explosion of silky texture that melts on your tongue, while the buttery undertone lingers like a gentle luau breeze. It’s the kind of dessert that makes you pause, close your eyes, and imagine you’re on a beach with waves crashing in the background.
Most recipes out there get the texture wrong—either they’re too dense, too crumbly, or they lack that signature buttery richness that defines the Hawaiian version. I’ve tried the “quick mix” shortcuts, the “no‑bake” hacks, and even the “add pineapple” gimmicks, only to end up with a sad, rubbery mess. This version, however, is a game‑changer. The secret lies in a simple but crucial step: tempering the butter with coconut milk before it meets the eggs, creating an emulsion that guarantees a melt‑in‑your‑mouth crumb. And let’s not forget the splash of vanilla that adds depth without stealing the spotlight.
Okay, ready for the game‑changer? I dare you to taste this and not go back for seconds. Let me walk you through every single step — by the end, you’ll wonder how you ever made it any other way.
What Makes This Version Stand Out
- Butter‑Boosted: The melted butter is folded into the batter at just the right temperature, giving each bite a luxurious, melt‑away feel that’s impossible to resist.
- Coconut Creaminess: Using a full‑fat coconut milk adds a tropical silkiness that pairs perfectly with the sweet rice flour.
- Texture Harmony: The combination of sweet rice flour and baking powder creates a light, airy crumb while still maintaining that classic chewy chew.
- Simplicity: Only eight pantry staples are needed, so you won’t need a specialty store run to impress your guests.
- Show‑Stopper: The golden crust that forms at the edges makes this mochi look as impressive as it tastes, perfect for Instagram‑ready moments.
- Make‑Ahead Magic: Once baked, the mochi stores beautifully, making it an ideal make‑ahead dessert for parties or week‑night cravings.
- Universal Appeal: Even the pickiest eaters—kids, grandparents, and that friend who claims “nothing’s sweet enough”—can’t resist its buttery charm.
- Ingredient Integrity: By using high‑quality sweet rice flour and real butter, you avoid the off‑flavors that cheap substitutes bring.
Inside the Ingredient List
The Flavor Base
Sweet rice flour, also known as mochi flour, is the heart of this dessert. Its fine, starchy texture creates that signature chew that sets mochi apart from regular cake. If you skimp on this flour or substitute with all‑purpose flour, you’ll end up with a crumbly, cake‑like result that defeats the purpose. Look for a brand that’s labeled “glutinous” and feels powdery to the touch. A quick tip: give the bag a gentle shake before opening to ensure it’s not compacted, which can affect the batter’s consistency.
The Texture Crew
Granulated sugar does more than just sweeten; it helps tenderize the batter by drawing moisture from the flour, resulting in that delicate, melt‑in‑the‑mouth feel. Baking powder is the unsung hero that introduces tiny air pockets, giving the mochi a light lift without making it cake‑like. If you’re out of baking powder, combine ¼ teaspoon of baking soda with a pinch of cream of tartar for a comparable effect.
The Unexpected Star
Coconut milk is the tropical twist that transports you straight to a Hawaiian beach. Its high fat content works in tandem with the butter to create a rich, glossy batter. Choose a canned variety with no additives for the purest flavor; a “lite” version will thin the batter and diminish the buttery richness. If you’re allergic to coconut, a full‑fat almond milk can substitute, but expect a subtle nutty undertone.
The Final Flourish
Unsalted butter, melted and slightly cooled, is what makes this mochi butter‑infused. The butter should be fully melted but not hot, or it will scramble the eggs. The eggs act as a binder, providing structure while keeping the interior moist. Vanilla extract adds a fragrant backdrop that elevates the overall flavor profile without overpowering the coconut. Finally, a cup of regular milk balances the richness, ensuring the batter isn’t too heavy.
Everything's prepped? Good. Let's get into the real action...
The Method — Step by Step
Preheat your oven to 350°F (175°C) and grease a 9×13 inch baking pan with a thin layer of butter or non‑stick spray. While the oven warms up, line the pan with parchment paper, leaving a little overhang for easy removal later. This step ensures a uniform rise and prevents the mochi from sticking, which can ruin that perfect golden crust. Feel the heat radiating from the oven; that’s the first hint that magic is about to happen.
In a large mixing bowl, whisk together the sweet rice flour, granulated sugar, and baking powder. Make sure the dry ingredients are thoroughly combined—no lumps, no pockets of flour. The whisk should feel light, almost like you’re aerating a cloud. This uniform mixture is crucial because any clumps will turn into dense pockets after baking.
In a separate saucepan, gently heat the coconut milk and melted butter over low heat. Stir continuously until the butter is fully incorporated and the mixture is smooth. Remove from heat and let it cool for a minute or two—this is the moment where the batter decides whether it will be silky or curdled.
In another bowl, beat the eggs with vanilla extract until they’re light and frothy—about 2 minutes with an electric mixer on medium speed. The eggs should increase in volume slightly and take on a pale yellow hue. This incorporation of air is what gives the final mochi its tender crumb.
Now the critical combine: slowly pour the warm coconut‑butter mixture into the beaten eggs while whisking constantly. This gradual integration creates a stable emulsion, preventing curdling and ensuring a glossy batter. Once fully combined, stir in the milk, and you should have a smooth, slightly thick batter that pours like a thick pancake batter.
Pour the batter into the prepared pan, using a spatula to smooth the top. The surface should be level but not overly tamped down; you want to keep some air bubbles intact. As the batter settles, you’ll notice a faint coconut scent rising—this is your cue that the flavors are already marrying.
Slide the pan into the preheated oven and bake for 30‑35 minutes. About 20 minutes in, peek through the oven window: the edges should start to turn a deep golden brown, and the center will look set but still slightly jiggly. When a toothpick inserted near the edge comes out clean, you’ve reached perfection. The whole kitchen will now smell like a tropical bakery, and you’ll feel a surge of pride.
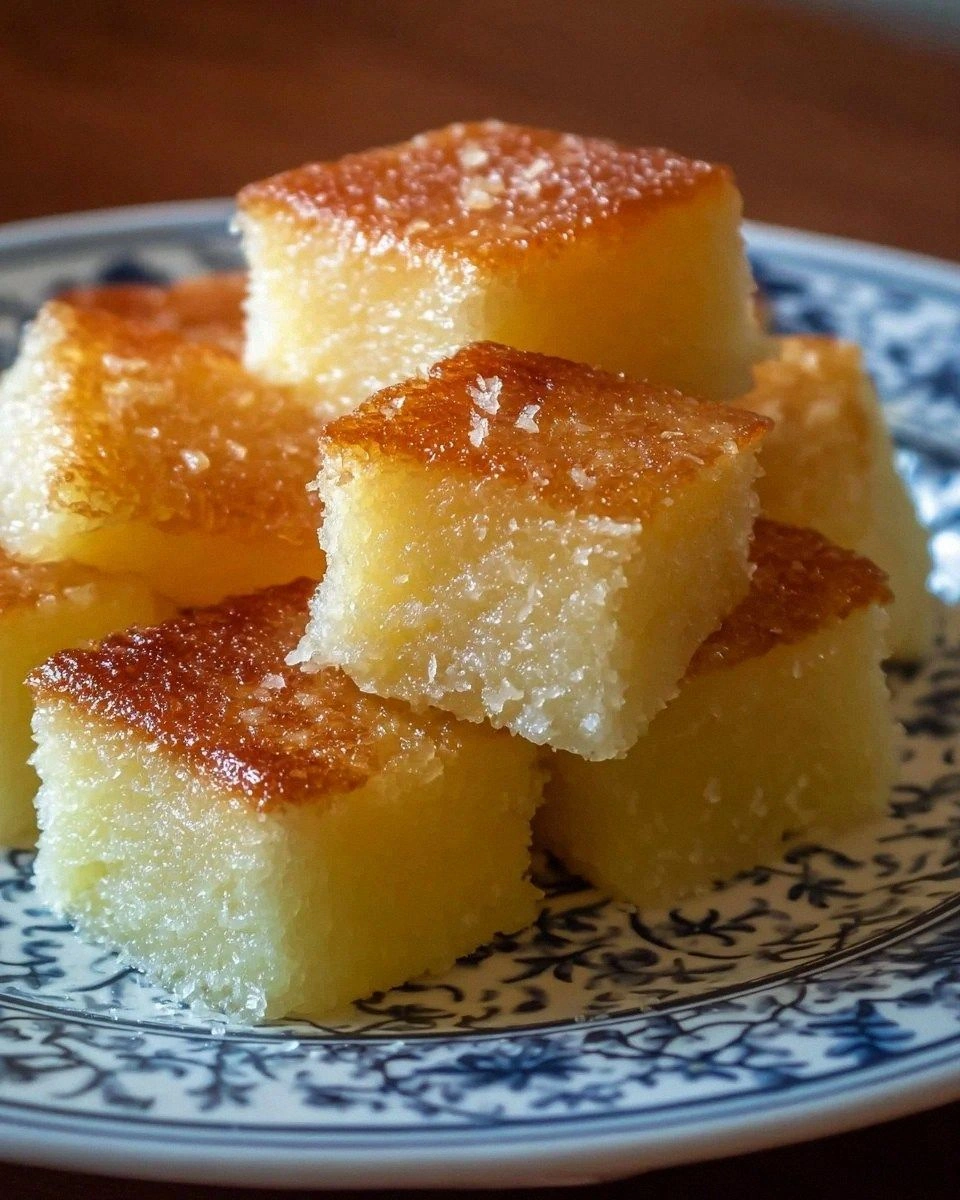
Remove the pan from the oven and let the mochi cool in the pan for at least 15 minutes. This resting period lets the interior finish setting and prevents it from falling apart when you cut it. After cooling, lift the parchment paper and transfer the mochi onto a cutting board. Slice into 2‑inch squares; the edges should have a crisp, buttery crust while the center remains soft and chewy.
That's it — you did it. But hold on, I've got a few more tricks that'll take this to another level...
Insider Tricks for Flawless Results
The Temperature Rule Nobody Follows
Never bake mochi straight from a cold refrigerator. Let the batter sit at room temperature for 10‑15 minutes before it hits the oven; this ensures even heat distribution and prevents the edges from over‑browning while the center stays undercooked. I once tried baking a chilled batter and ended up with a burnt perimeter and a soggy middle—lesson learned.
Why Your Nose Knows Best
Rely on scent, not just a timer. Around the 20‑minute mark, the kitchen should be filled with a sweet, buttery aroma that hints at caramelization. If you smell a faint toasted coconut note, you’re on the right track. Trust that nose; it’s the most reliable indicator that the crust is forming correctly.
The 5‑Minute Rest That Changes Everything
After you pull the mochi from the oven, let it rest uncovered for five minutes before cutting. This short pause lets steam escape, keeping the crust crisp while the interior stays moist. Skipping this step leads to a soggy top that can ruin the texture contrast.
Butter‑Brush Finish
For an extra glossy finish, melt a tablespoon of butter and brush it lightly over the top right after the mochi cools. The butter adds a subtle sheen and a buttery flavor boost that makes each bite feel like a celebration.
Freeze‑Proofing
If you plan to freeze leftovers, wrap each square individually in parchment before placing them in an airtight container. This prevents freezer burn and makes reheating a breeze. When you’re ready to enjoy, a quick microwave burst (30 seconds) restores the original texture.
Creative Twists and Variations
This recipe is a playground. Here are some of my favorite ways to switch things up:
Tropical Pineapple Burst
Stir in ½ cup of crushed pineapple (drained) into the batter before baking. The fruit adds a bright acidity that balances the buttery richness, and the tiny pineapple chunks create delightful bursts of flavor with every bite.
Chocolate‑Swirl Delight
Swirl in ¼ cup of melted dark chocolate into the batter just before pouring it into the pan. The chocolate ribbons create a visual contrast and add a deep, slightly bitter note that pairs beautifully with the sweet coconut base.
Matcha Green Tea Fusion
Replace 1 tablespoon of the regular flour with matcha powder and add a teaspoon of honey for extra sweetness. The earthy green tea flavor adds sophistication, and the subtle bitterness cuts through the butter, making it a hit for more adventurous palates.
Spiced Rum Infusion
Swap out the vanilla extract for 1 teaspoon of spiced rum and add a pinch of ground cinnamon. The rum brings a warm, island‑vacation vibe, while cinnamon adds a comforting spice that elevates the dessert for holiday gatherings.
Nutty Coconut Crunch
Fold in ¼ cup of toasted shredded coconut and 2 tablespoons of chopped macadamia nuts into the batter. The toasted coconut adds extra crunch, and the nuts provide a buttery texture that mirrors the mochi’s chewiness.
Berry‑Lemon Zing
Mix in ¼ cup of fresh raspberries and the zest of one lemon. The tartness of the berries and lemon brightens the overall flavor, creating a refreshing contrast to the rich butter.
Storing and Bringing It Back to Life
Fridge Storage
Place the cooled mochi squares in an airtight container lined with parchment paper. They’ll stay fresh for up to 4 days. The cool environment preserves the buttery crust while keeping the interior moist.
Freezer Friendly
Wrap each piece individually in parchment, then stack them in a freezer‑safe zip‑top bag. They’ll keep for up to 2 months. When you’re ready to eat, let them thaw at room temperature for 10 minutes, then give them a quick microwave zap (20‑30 seconds).
Best Reheating Method
Before reheating, add a tiny splash (about 1 teaspoon) of milk or water to the top of each piece. Cover with a damp paper towel and microwave for 30 seconds; the added moisture steams the mochi back to its original fluffy texture while the crust stays slightly crisp.