I still remember the first time I made this Banana Delight — it was a Tuesday night, I was wearing mismatched socks, and I had exactly three overripe bananas glaring at me from the fruit bowl like they were plotting a coup. I'd promised my neighbors I'd bring dessert to game night, but between work chaos and my dog deciding the couch was a chew toy, I'd completely forgotten. Classic move, right? So there I was, staring down those bananas, thinking "well, here goes nothing," and honestly? What came out of that kitchen was so ridiculously good that my neighbor Paula literally hid the last piece behind her coffee maker so nobody else would eat it. I'm not even making this up.
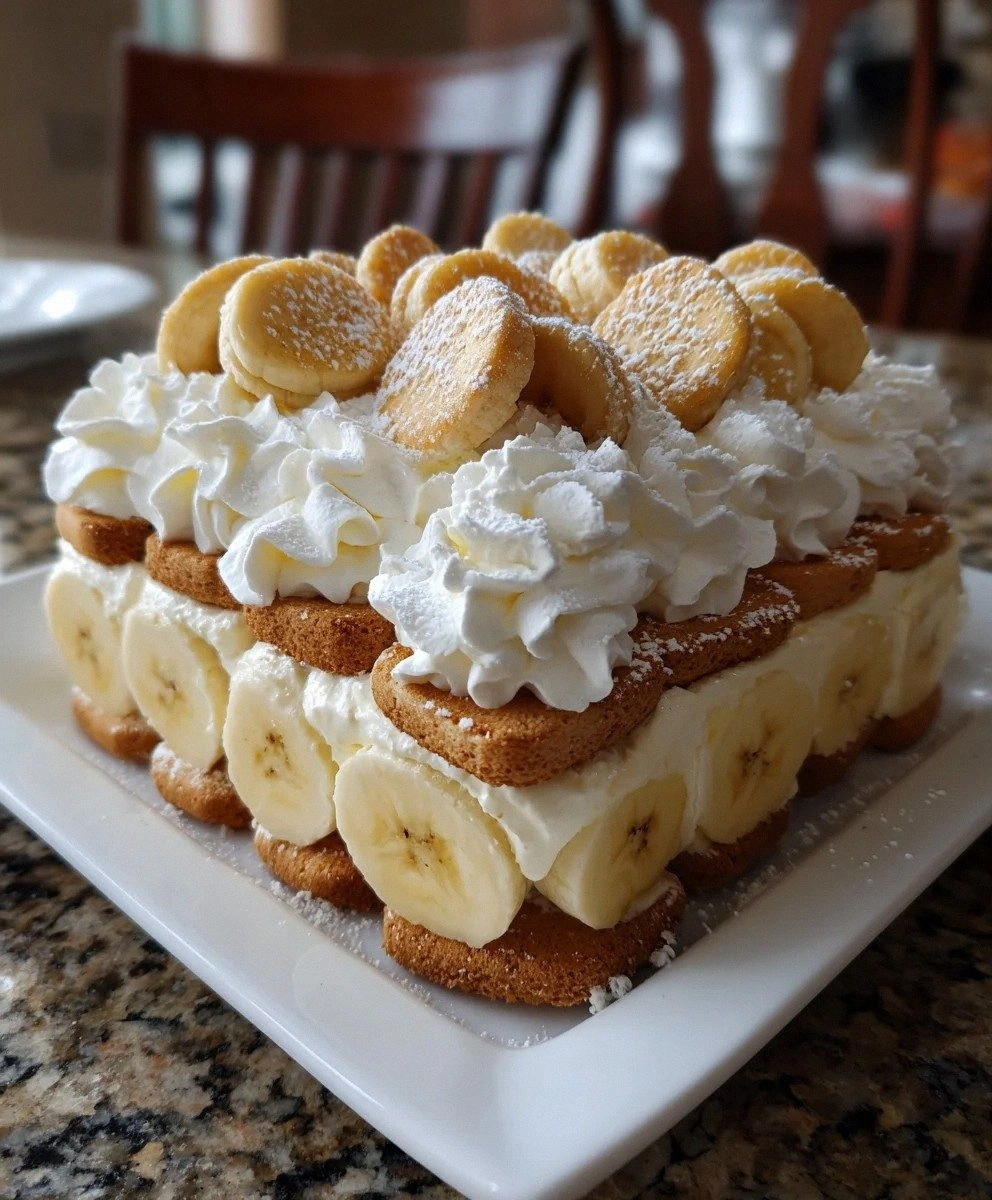
Now here's the thing — most banana desserts are either too mushy, too bland, or they taste like someone just mashed bananas into sugar and called it a day. But this? This is the banana dessert that made my banana-hating cousin ask for seconds. The secret isn't some fancy technique or expensive ingredient — it's about understanding how bananas actually work when they meet heat, sugar, and a few strategic friends in the kitchen. Picture this: layers of vanilla-kissed cream cheese that melt like silk across your tongue, banana slices that stay perfectly tender without turning to baby food, and a pudding layer so fluffy it practically floats off the spoon.
I'll be completely honest with you — I ate half the pan by myself during "quality control" testing. My roommate walked in to find me standing over the counter with a spoon in one hand and a look of pure bliss on my face that she described as "disturbingly intimate for a dessert." But hey, when something tastes this good, you don't apologize for it. You just make more and pretend the first batch never existed.
Let me walk you through every single step — by the end, you'll wonder how you ever made it any other way.
What Makes This Version Stand Out
Pudding Perfection: Most recipes dump dry pudding mix straight into the cream and hope for the best. That's amateur hour. We bloom the pudding mix with just enough cold milk to activate those starch molecules, then fold it into whipped topping so light it practically defies gravity. The result? Cloud-like layers that hold their shape but dissolve the moment they hit your tongue.
Banana Strategy: Here's where most people mess up — they slice their bananas too early and they turn brown and slimy faster than a politician breaking promises. We wait until the absolute last second, and we toss them with a tiny bit of lemon juice that keeps them golden and gorgeous without adding any tartness.
Texture Symphony: Vanilla wafers on the bottom aren't just there for show — they create this incredible textural contrast that makes every bite interesting. They start crisp, absorb just enough moisture to become cake-like, but maintain enough structure to give you that satisfying crunch. It's like edible architecture.
Make-Ahead Magic: This dessert actually gets better after a night in the fridge. The flavors meld together like old friends at a reunion party, and the textures settle into this perfect harmony that makes you close your eyes involuntarily when you taste it.
Crowd Psychology: I've served this at baby showers, poker nights, and that awkward office party where nobody knows what to bring. Every single time, someone asks for the recipe within the first three bites. It's got that universal appeal that makes people forget they're supposed to be polite about portions.
Ingredient Integrity: We're not using fake banana extract or that weird yellow pudding that tastes like childhood trauma. Real bananas, real vanilla, real cream cheese — the difference is so dramatic that once you taste it, you'll never go back to the shortcut version.
Ratio Mastery: The cream cheese layer isn't just a thin schmear — it's a proper, generous layer that balances the sweetness of the pudding. Every forkful gives you the perfect ratio of creamy, fruity, crunchy, and fluffy. It's like someone did the math on dessert happiness and solved for X.
Alright, let's break down exactly what goes into this masterpiece...
Inside the Ingredient List
The Flavor Foundation
Salted sweet cream butter isn't just for greasing the dish — it's your insurance policy against sticking and your first layer of flavor. When those vanilla wafers hit the buttered dish and start to warm up in the oven, they absorb just enough to become rich and toasty without getting greasy. Skip this step and you'll be chiseling dessert off the bottom of your dish like an archaeologist uncovering ancient pottery.
Vanilla wafers are the unsung heroes here. Don't get fancy with expensive artisan cookies — the classic ones have the perfect texture and just enough vanilla to complement without competing. I've tried this with butter cookies, graham crackers, even those fancy Belgian biscuits, and they all overwhelm the delicate banana flavor. Trust the humble vanilla wafer — it's been waiting its whole life for this moment.
The Star Attraction
Ripe bananas are non-negotiable, but there's a sweet spot that most people miss. You want them spotted like a leopard, not black like a banana that's given up on life. The spots indicate the starches have converted to sugars, but they haven't started fermenting yet. If your bananas smell like a brewery, they're too far gone. Picture this: when you press gently on the skin, it should yield slightly but still feel firm — like a confident handshake, not a limp fish.
The size matters too — medium bananas give you about half a cup each when sliced. Go for bananas that feel heavy for their size; they have less air and more actual fruit. And here's a pro tip: if your bananas are perfect but you're not ready to assemble, pop them in the fridge. The cold stops the ripening process like pressing pause on a movie.
The Creamy Dream Team
Cream cheese creates the backbone of this dessert, but it needs to be room temperature or you'll end up with lumps that no amount of mixing will fix. I learned this the hard way when I tried to rush it with cold cream cheese and ended up with something that looked like cottage cheese having an identity crisis. Let it sit out for at least an hour, or if you're impatient (hi, me), cut it into cubes and spread it on a plate — it'll soften in about fifteen minutes.
Pure vanilla extract is worth the splurge here. That artificial stuff tastes like a vanilla candle had a bad day. Real vanilla has over 200 flavor compounds that create this warm, complex background note that makes people say "what IS that?" in the best possible way. It's the difference between a painting and a photograph — both show the same thing, but one has soul.
The Sweet Science
Powdered sugar isn't just granulated sugar that's been to the gym — it contains cornstarch that helps stabilize the cream cheese layer and gives it that velvety texture. Try using regular sugar and you'll get a gritty filling that separates like a bad relationship. The fineness of powdered sugar also means it incorporates without aggressive mixing, keeping your cream cheese light and fluffy instead of dense and overworked.
Instant banana cream pudding mix is where we cheat nature without anyone being the wiser. It amplifies the banana flavor so dramatically that people will swear you used twice as many bananas as you actually did. It's like banana flavor concentrate, but in a good way — not that artificial candy banana that tastes like a prank. The key is using it as a flavor booster, not the main event.
Everything's prepped? Good. Let's get into the real action...
The Method — Step by Step
- Start by preheating your oven to 350°F — and yes, I know everyone says this, but here's why it matters for this dessert. When those vanilla wafers hit the warm oven, they need to toast evenly so they can stand up to the moisture from the cream layers. A cold oven will make them soggy before they get golden, and you'll end up with a base that disintegrates faster than my willpower at a bakery. While it's heating, generously butter your 9x13 dish using upward strokes that create tiny ridges — these will help the wafers grip the surface instead of sliding around like they're at an ice rink.
- Now comes the fun part: creating the wafer foundation. Arrange your vanilla wafers in neat rows, flat side down, like you're building a tiny edible tile floor. Don't just dump them in — take the extra thirty seconds to make them fit together like puzzle pieces. You'll need about 60 wafers total, but who's counting? (Okay, I am, because I once ran out three wafers short and the center collapsed like a dessert sinkhole.) Press down gently so they adhere to the butter, but don't crush them — think loving pat, not aggressive chiropractic adjustment.
- Slide that dish into the oven for exactly 8 minutes. Set a timer, because this is not the moment to check Instagram. You're looking for the edges to turn the lightest golden brown and for your kitchen to start smelling like vanilla cookies had a baby with butter. When you pull it out, the wafers should look like they got a gentle suntan — not a Jersey Shore tanning bed disaster. Let this cool completely while you move to the next step, because hot cookies plus cold cream equals a melty mess that would make a kindergartener's art project look sophisticated.
- In a large bowl, beat your room-temperature cream cheese until it's smoother than a pickup artist at last call. This should take about 2 minutes on medium speed — any longer and you're just showing off. Add the powdered sugar gradually, about a quarter cup at a time, letting each addition incorporate fully before adding the next. This prevents the sugar from flying out like confetti and creating sweet little landmines on your countertop that you'll be stepping on for days.
- Add the vanilla extract and beat for another 30 seconds — just enough time for those flavor compounds to distribute evenly. Now here's the critical part: fold in half of your whipped topping using a spatula and a gentle motion that goes down-across-up-turn. Pretend you're tucking in a baby, not mixing cement. The goal is to maintain the air bubbles that make this layer light and dreamy rather than dense enough to patch drywall.
- Spread this cream cheese cloud evenly over your cooled wafer base. Use an offset spatula if you have one, or the back of a spoon if you don't. Start in the middle and work your way out to the edges, creating a gentle slope up the sides of the dish. This creates a little berm that will hold your banana layer in place instead of letting it slide around like it's at a water park. Don't press too hard — you're not trying to squish the wafers into submission.
- Now for the moment of truth: slice your bananas. Use a sharp knife and make them about a quarter-inch thick — thick enough to taste the banana, thin enough to layer properly. Toss them immediately with a teaspoon of lemon juice using your hands (washed, please — we're not animals). This prevents browning without adding lemon flavor. Arrange them in overlapping rows like fish scales, covering every inch of the cream cheese layer. If you have extra bananas, snack on them — don't try to cram them in or you'll have structural integrity issues that would make an engineer weep.
- In a separate bowl, whisk your pudding mix with cold milk for exactly 2 minutes. Set a timer — under-mixing leaves powdery pockets that taste like disappointment, over-mixing makes it set up too thick to spread. You're looking for the consistency of thick paint that holds peaks but still flows. Let it stand for 5 minutes to set up properly. During this time, it transforms from liquid to something that could hold up a small car — this is the magic moment when starches hydrate and create that pudding texture we all know and love.
- Gently fold the remaining whipped topping into your set pudding using the same baby-tucking motion as before. This lightens the pudding so it doesn't squash your banana layer when you spread it. Think of it as pudding aerobics — we're getting it in shape without making it lose its identity. Spread this over your banana layer, again working from the center out. Create little swoops and swirls with your spatula — this isn't just functional, it's decorative. Those peaks and valleys will catch the light and make your dessert look like it came from a bakery where everything costs more than your car payment.
- Cover with plastic wrap, pressing it directly onto the surface to prevent a skin from forming. Refrigerate for at least 4 hours, but overnight is better — this is when all the flavors have their party and get to know each other. The wafers absorb moisture from the cream layers and transform into something cake-like, the banana flavor permeates everything, and the whole dessert becomes greater than the sum of its parts. I know waiting is torture, but good things come to those who don't attack their dessert with a spoon at 2 AM. (Okay, I totally do this sometimes, but I'm not proud of it.)
That's it — you did it. But hold on, I've got a few more tricks that'll take this to another level...
Insider Tricks for Flawless Results
The Temperature Rule Nobody Follows
Room temperature isn't just a suggestion — it's the difference between a smooth, professional-looking dessert and something that looks like it was assembled by toddlers. When your cream cheese is cold, it refuses to blend smoothly with the sugar, creating tiny lumps that no amount of mixing will fix. It's like trying to mix oil and water, except the oil is stubborn and judgmental about its life choices. I set everything out on the counter the night before I'm planning to make this, and it makes such a dramatic difference that my sister thought I'd taken a pastry class.
Why Your Nose Knows Best
Don't trust the timer alone — your nose is the most sophisticated piece of kitchen equipment you own. When those vanilla wafers are perfectly toasted, your kitchen will smell like a vanilla cookie factory had a baby with a butter sculpture. It's intoxicating in the best possible way. If you smell something more than lightly toasty, you've gone too far and your wafers will taste like disappointment with a side of burnt. Trust me, I've set off smoke alarms in three different apartments learning this lesson.
The 5-Minute Rest That Changes Everything
After you spread each layer, walk away for five minutes. Seriously. This lets everything settle and firm up slightly so your layers stay distinct instead of creating a marbled mess that looks like dessert gone wrong. I use this time to clean up the chaos I've created, because by this point my kitchen looks like a sugar bomb exploded. Plus, it gives you a moment to appreciate what you're creating instead of rushing through like you're on a cooking game show.
The Banana Selection Secret
Choose bananas that have brown spots but still feel firm when you squeeze them gently. If they feel soft or have any black areas, they're overripe and will turn to mush in your dessert. You want them sweet but structural — like they should be able to hold their shape when sliced, not collapse into banana soup. I've made this mistake with bananas that were more black than yellow, and the result was something that looked like banana pudding had a breakdown and never recovered.
The Overnight Miracle
This dessert transforms overnight from good to absolutely legendary. The wafers absorb moisture and become cake-like, the banana flavor permeates every layer, and something magical happens in that cold darkness that makes people close their eyes when they taste it. I once served this after only 2 hours of chilling and it was fine — people ate it, they smiled, nobody complained. But the next day? People were making involuntary happy noises and asking if I sold these professionally.
Creative Twists and Variations
This recipe is a playground. Here are some of my favorite ways to switch things up:
Chocolate Banana Delight
Replace half the vanilla wafers with chocolate wafers, and add 2 tablespoons of cocoa powder to your cream cheese mixture. The chocolate banana combination is what happens when two dessert superheroes team up to fight boring desserts. Top with chocolate shavings instead of extra wafers, and suddenly you've got something that tastes like a banana split married a chocolate truffle and had beautiful dessert babies.
Tropical Paradise Version
Add a layer of crushed pineapple (well-drained) between the banana and pudding layers, and replace the vanilla extract with coconut extract. Toast some coconut flakes and sprinkle them on top. This version tastes like vacation in dessert form — all the tropical vibes without the sunburn and overpriced cocktails. My aunt makes this for every family reunion, and there's always a silent but intense competition for corner pieces.
Peanut Butter Banana Heaven
Beat 1/3 cup of creamy peanut butter into your cream cheese layer. The peanut butter banana combo is scientifically proven to make people happier — it's like the dessert equivalent of a warm hug from someone who actually means it. Top with chopped peanuts for crunch, and suddenly you've got Elvis's favorite sandwich reimagined as a sophisticated dessert that would make him put down his guitar and grab a spoon.
Salted Caramel Dream
Drizzle caramel sauce between each layer and finish with a sprinkle of flaky sea salt on top. The sweet-salty thing happening here is so addictive it should probably be regulated. The salt intensifies all the other flavors while the caramel adds this rich, buttery note that makes people ask "what's in this?" with that particular tone that means they're trying to figure out if it's socially acceptable to lick their plate.
Berry Banana Fusion
Add a layer of fresh raspberries or sliced strawberries over the banana layer. The tart berries cut through the richness and add a pop of color that makes this look like it belongs in a bakery window. Plus, you can pretend it's healthy because fruit, right? I've served this version at brunches where people convinced themselves it counted as breakfast food.
Mini Trifle Version
Instead of making one big dessert, layer everything in small mason jars or wine glasses. This is perfect for parties where people want to feel fancy but also don't want to share their dessert. Each person gets their own individual portion, and you can make them ahead of time for stress-free entertaining. They're also incredibly Instagram-worthy, if you're into that sort of thing.
Storing and Bringing It Back to Life
Fridge Storage
This dessert will keep in the refrigerator for up to 4 days, though let's be real — it's never lasted that long in my house. Cover it tightly with plastic wrap pressed directly onto the surface to prevent it from absorbing weird fridge flavors. Nobody wants banana delight that tastes like last night's leftover pizza. If you're making it ahead for a party, it's actually best made 1-2 days in advance — the flavors meld together like they've been friends since kindergarten.
Freezer Friendly
You can freeze individual portions for up to 2 months, but here's the trick: wrap them in plastic wrap, then foil, then pop them into a freezer bag. It's like a dessert spacesuit that protects against freezer burn. Thaw overnight in the refrigerator, and add fresh banana slices on top after thawing because the frozen ones will look sad and brown. The texture changes slightly — the wafers become more cake-like — but honestly, some people prefer it this way.
Best Reheating Method
Here's the thing — you don't reheat this dessert. It's meant to be served cold, straight from the fridge. But if you've got leftovers that have been in the fridge and seem a little dense, let them sit at room temperature for 15-20 minutes before serving. This takes the chill off and lets the flavors wake up a bit. If you absolutely must warm it (though I question your life choices), a 10-second microwave burst on 50% power is all you get. Any more and you're making banana soup, which is not the goal here.