I still remember the first time I made these crack chicken tenders. It was a Tuesday night that felt like a Monday, the kids were bouncing off the walls, and I was staring at a pack of chicken breasts wondering how to make them exciting for the third time that week. My usual breaded tenders felt tired, the pantry was half-empty, and my stomach was growling louder than the toddler demanding snacks. That's when I started throwing things together like a culinary mad scientist, and what emerged from that chaotic kitchen session changed dinner in our house forever.
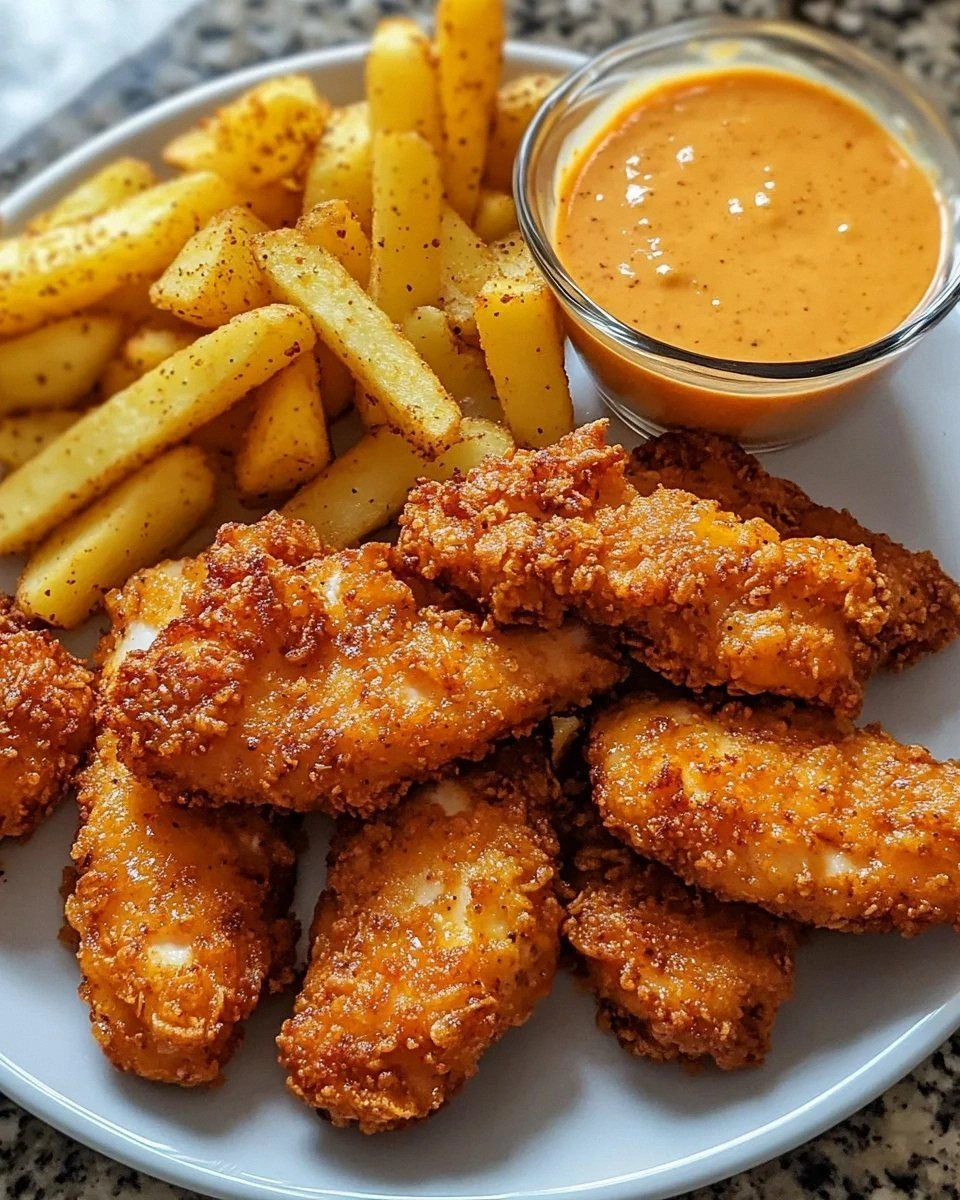
Picture this: golden-brown chicken tenders with edges so crispy they shatter like autumn leaves under your fork, revealing juicy meat that practically sings with flavor. But here's the kicker – I created this addictive sweet-spicy sauce that coats each tender like liquid gold, combining mayonnaise, sweet chili, sriracha, and honey in proportions that make your taste buds do a happy dance. The first batch disappeared in minutes, with my usually picky teenager actually fighting his dad for the last piece. My husband kept saying "just one more" until the plate was embarrassingly empty, and even the dog was giving me those hopeful eyes from under the table.
What makes these crack chicken tenders absolutely irresistible isn't just one thing – it's the perfect storm of textures and flavors that hits every single craving button in your brain. The coating is shatteringly crisp thanks to a buttermilk bath and a double-dredge technique I perfected after many failed attempts. The sauce achieves that magical balance where every bite starts sweet, turns tangy, then finishes with a gentle heat that makes you reach for another piece before you've even swallowed the first. Trust me when I say this is hands down the best version you'll ever make at home, and I've tested this recipe on the toughest critics – hungry teenagers after football practice.
Let me walk you through every single step — by the end, you'll wonder how you ever made it any other way.
What Makes This Version Stand Out
Crunch Factor: We're talking next-level crispy here, achieved through a buttermilk marinade that tenderizes while it flavors, plus a coating that combines flour, cornstarch, and panko for maximum crunch. Most recipes skip the cornstarch, but that little addition is what gives you those shatteringly crisp edges that stay crunchy even after the sauce goes on.
Sauce Magic: The crack sauce isn't just mayo and hot sauce thrown together – it's a carefully balanced blend where sweet chili sauce plays the lead role, supported by sriracha's heat and honey's sweetness. I dare you to taste this and not go back for seconds; it's that addictive combination that keeps everyone hovering around the kitchen island.
Family-Approved: Kids love the mild sweetness, adults appreciate the complex heat, and everyone fights over the crispy bits. I've served these at birthday parties, game nights, and fancy dinner parties – they disappear faster than free samples at Costco, and I'm always asked for the recipe.
Weeknight Friendly: Despite tasting like restaurant-quality food, these come together in under 45 minutes with ingredients you probably already have. No overnight marinades, no special equipment, just straightforward techniques that anyone can master on a busy Tuesday.
Make-Ahead Hero: The sauce actually improves after a day in the fridge, and you can prep the chicken up to the coating stage and refrigerate for up to four hours. Most recipes get this completely wrong by telling you to coat right before cooking, but a brief rest actually helps the coating adhere better.
Leftover Gold: If you somehow manage to have leftovers (and that's a big if), they reheat beautifully in the air fryer. The coating stays crisp, the meat stays juicy, and that sauce somehow tastes even better the next day.
Crowd Control: This recipe scales perfectly for parties – just double or triple the amounts, use a larger pot for frying, and watch them disappear. I've made these for fifty people at a backyard barbecue, and not a single tender survived past the first hour.
Inside the Ingredient List
The Flavor Base
The mayonnaise might seem like an odd starting point for a chicken coating, but it's the secret weapon that creates that crave-worthy flavor bomb. Mayo acts as the perfect carrier for all the other flavors, clinging to every nook and cranny of the chicken while adding richness without making things greasy. The sweet chili sauce brings that addictive sweet-heat combination that keeps you coming back for more – I use Frank's because it hits that perfect balance of sweetness and heat that makes your lips tingle but doesn't send you running for milk. The sriracha adds another layer of heat that's more complex than simple hot sauce, with its garlic undertones and vinegary bite that cuts through the richness of the mayo.
The Texture Crew
Here's where most recipes go wrong – they use just flour and call it a day. But we're building texture like a skyscraper here, layer upon layer of crunchy goodness. The all-purpose flour creates the base layer that helps everything else stick, while cornstarch is your secret weapon for that ultra-crispy coating that shatters when you bite into it. Buttermilk isn't just for flavor – its acidity tenderizes the chicken while the proteins help the coating adhere in a way that plain milk never could. The panko breadcrumbs are the final flourish, creating those irregular, jagged edges that get maximally crispy and hold onto sauce like tiny flavor sponges.
The Unexpected Star
Honey might seem out of place in a savory chicken recipe, but it's the ingredient that ties everything together in ways you won't expect. It balances the heat from the sriracha while adding depth to the sweet chili sauce, creating this three-dimensional flavor profile that hits every part of your palate. The honey also helps the sauce cling to the chicken better than sugar would, giving you that glossy, restaurant-quality finish that makes these tenders look as good as they taste. Don't even think about skipping it – I tried once with sugar and the whole thing fell flat like a soufflé in a thunderstorm.
The Final Flourish
Smoked paprika is my secret ingredient that makes people ask "what is that amazing flavor?" It's not just regular paprika – the smoking process adds this subtle campfire note that makes the chicken taste like it came off a backyard grill rather than from your kitchen. Garlic powder provides that savory backbone that makes the chicken taste like chicken, not just fried coating. Hot sauce appears twice in this recipe because it serves two different purposes – in the marinade it flavors the meat, but in the sauce it provides that finishing kick that makes your lips pleasantly warm without overwhelming the other flavors.
Everything's prepped? Good. Let's get into the real action...
The Method — Step by Step
- Start by making the crack sauce first, because it needs time for the flavors to meld together into something magical. In a medium bowl, whisk together the mayonnaise, sweet chili sauce, sriracha, and honey until it looks like liquid gold. Give it a taste – it should start sweet, then hit you with gentle heat that builds but doesn't overwhelm. Cover this beauty and park it in the fridge while you work on the chicken; trust me, this patience pays off in flavor dividends you can't imagine. The sauce actually improves as it sits, with the honey dissolving completely and the garlic from the sriracha infusing every molecule.
- Now for the chicken prep – this is where most people rush and ruin everything. Cut your chicken breasts into strips about the size of your thumb, keeping them uniform so they cook evenly. I like to cut them slightly on the diagonal, which gives you more surface area for crispy coating (and who doesn't want more crispy bits?). Place them in a bowl and season generously with salt and pepper – be bold here, because under-seasoned chicken is a crime against dinner. Let them sit for ten minutes while you set up your coating station; this brief rest allows the salt to start working its magic on the meat.
- Time to create your coating assembly line, and organization here is everything. Set up three shallow dishes: flour mixed with cornstarch, salt, pepper, garlic powder, and smoked paprika in the first; buttermilk mixed with egg and hot sauce in the second; and panko breadcrumbs in the third. This might seem like overkill, but each step builds upon the last to create that shatteringly crisp exterior. Keep a fork in each dish so you're not washing your hands every thirty seconds – nobody wants raw chicken hands on their breadcrumbs. Line a baking sheet with parchment paper for your coated tenders to rest on.
- Here's where the magic happens, and why most recipes get it completely wrong. Take each chicken strip and dredge it first in the flour mixture, pressing gently so every bit is coated – this dry layer helps the wet layer stick. Shake off the excess, then dunk it in the buttermilk bath, letting the excess drip off. Back into the flour mixture it goes for the second coat, pressing firmly so you get those nubbly bits that'll fry up into crispy perfection. Finally, roll it in the panko, pressing gently so the crumbs adhere but don't fall off in clumps.
- Heat your oil in a heavy-bottomed pot or deep skillet over medium-high heat – you're looking for 350°F, which is the sweet spot where the coating crisps without burning before the chicken cooks through. If you don't have a thermometer, test by dropping in a small piece of bread – it should sizzle immediately and turn golden in about 60 seconds. Don't overcrowd the pan; work in batches so the oil temperature stays consistent. That sizzle when the chicken hits the oil? Absolute perfection, and it should sound like applause from a very small, very enthusiastic audience.
- Fry each batch for 3-4 minutes per side, resisting the urge to flip too early – let the coating set and turn golden before you disturb it. The chicken is done when it's golden brown and floats to the surface, with an internal temperature of 165°F. Remove with a slotted spoon to a wire rack set over a baking sheet – not paper towels, which create steam and soggy bottoms. Keep them warm in a 200°F oven while you finish the remaining batches, because cold chicken tenders are a tragedy we won't allow in this kitchen.
- The final step is where this recipe goes from good to legendary. While the tenders are still hot from their oil bath, drizzle them with that crack sauce you made earlier. Don't drown them – you want to accent, not mask, that crispy coating. Serve the remaining sauce on the side for dipping, because some people (like my husband) believe everything's just a vehicle for sauce consumption. Garnish with sliced green onions if you're feeling fancy, or just pile them on a platter and watch them disappear faster than free pizza at a college party.
That's it — you did it. But hold on, I've got a few more tricks that'll take this to another level...
Insider Tricks for Flawless Results
The Temperature Rule Nobody Follows
Here's the thing that separates restaurant-quality tenders from sad, greasy ones – oil temperature discipline. Most people let the oil get too cool, which means the chicken absorbs oil like a sponge and ends up heavy and gross. Use a thermometer and maintain that 350°F like your life depends on it. Between batches, let the oil come back up to temperature, and if you're making a big batch, add fresh oil as needed because the coating bits that fall off will burn and make everything taste bitter. I learned this the hard way after serving gray, oil-logged tenders to my in-laws – never again.
Why Your Nose Knows Best
Your kitchen will tell you when these are cooking perfectly. When you first drop them in, you should hear vigorous bubbling and smell the toasty aroma of flour browning. If you smell burning or see the oil getting darker, your heat's too high. If the bubbling seems sluggish, it's too low. That perfect medium sizzle that fills your kitchen with the promise of crispy deliciousness? That's your cue that everything's working exactly as it should. I've cooked so many batches I can tell by sound when they're perfectly golden without even looking.
The 5-Minute Rest That Changes Everything
After you fry each batch, let them rest on the wire rack for exactly five minutes before saucing. This brief pause allows the coating to set completely, ensuring it stays crispy even after you add the sauce. If you've ever had tenders where the coating slides right off, it's because you skipped this crucial step. The steam needs time to escape, and the coating needs to cool slightly so it can handle the sauce without turning to mush. I know it's tempting to sauce and serve immediately, but good things come to those who wait.
The Double-Dredge Secret
That second trip through the flour mixture isn't just for extra crunch – it creates those nubbly, irregular surfaces that maximize crispy real estate. When you press the flour into the buttermilk-coated chicken, you're essentially creating little flour crags that fry up into golden peaks and valleys. This technique, borrowed from Korean fried chicken, gives you that shatteringly crisp texture that stays crunchy even after saucing. A friend tried skipping this step once – let's just say it didn't end well, and she ended up with sad, flat tenders that tasted like disappointment.
The Sauce Consistency Fix
If your sauce seems too thick to drizzle properly, don't just add water and dilute the flavor. Instead, whisk in a teaspoon of warm water at a time until you reach the consistency of heavy cream. Too thin? Stir in a tiny bit more mayonnaise. The sauce should coat a spoon but still be pourable – think the texture of honey that's been sitting in a warm kitchen. Getting this right is crucial because sauce that's too thick just sits on top like a condiment helmet, while sauce that's too thin soaks into the coating and kills your crunch.
Creative Twists and Variations
This recipe is a playground. Here are some of my favorite ways to switch things up:
The Nashville Hot Version
Replace the sweet chili sauce with extra hot sauce, add a teaspoon of cayenne to the flour mixture, and finish with a sprinkle of cayenne and brown sugar. The result is that famous Nashville hot chicken experience with the same crack-level addiction. Serve with pickles on white bread for authenticity, and watch spice lovers swoon while the mild crowd reaches for milk. I make these for game day and they're always the first thing gone.
The Honey BBQ Ranch Edition
Swap the sriracha for your favorite BBQ sauce, add a teaspoon of ranch seasoning to the flour mixture, and finish with a drizzle of honey. This version tastes like summer camp and state fairs had a delicious baby. Kids go absolutely nuts for these, and adults pretend they're "just having one" before polishing off a dozen. The BBQ sauce adds this smoky sweetness that plays beautifully with the honey, while the ranch seasoning gives you those herby notes that make it taste like you spent hours on the flavor.
The Buffalo Blue Cheese Bomb
Replace half the sweet chili sauce with Frank's Red Hot, crumble blue cheese into the sauce, and serve with celery sticks on the side. These are Buffalo wings reimagined as crispy tenders, and they're absolutely dangerous. The blue cheese melts slightly from the heat of the chicken, creating these pockets of tangy, creamy goodness in every bite. I serve these at Super Bowl parties and they're gone before the national anthem finishes.
The Asian Fusion Take
Add a tablespoon of gochujang to the sauce, swap the smoked paprika for Chinese five-spice in the coating, and finish with sesame seeds and scallions. This version has this incredible umami depth that makes the original seem one-dimensional. The gochujang brings this fermented chili flavor that's more complex than straight hot sauce, while the five-spice adds warm, aromatic notes that make your kitchen smell like a night market. These disappear faster than you can say "third helping."
The Garlic Parmesan Dream
Omit the honey from the sauce, add minced garlic and grated Parmesan, and finish with fresh parsley. This version is like garlic bread met chicken tenders and had a beautiful romance. The Parmesan adds this nutty, salty element that makes the sauce more savory than sweet, while the fresh garlic (added after the sauce is mixed so it stays raw and punchy) gives you that vampire-repelling kick. My Italian neighbor claims these are better than her nonna's chicken parm, which is high praise indeed.
The Coconut Curry Twist
Replace half the mayo with coconut milk, add curry powder to the flour mixture, and finish with lime zest and cilantro. This version transports you straight to a beach in Thailand, with the coconut adding this tropical richness that plays beautifully against the curry's warmth. The lime zest at the end brightens everything up and cuts through the richness like a ray of sunshine. These are perfect for when you want comfort food but also crave something that tastes like vacation.
Storing and Bringing It Back to Life
Fridge Storage
Lucky enough to have leftovers? Store them in an airtight container in the fridge for up to three days, but here's the key – don't sauce them all if you think you might have extras. Keep the sauce separate and only dress what you'll eat immediately. The unsauced tenders will stay crispier in the fridge, and you can reheat them without that sad, soggy coating situation that happens when sauce meets refrigeration. Layer them between sheets of parchment paper so they don't stick together into one giant chicken block that requires a chisel to separate.
Freezer Friendly
These tenders freeze beautifully for up to two months, making them perfect for meal prep or those nights when cooking feels impossible. Freeze the cooked, unsauced tenders on a baking sheet first, then transfer to freezer bags once they're solid – this prevents them from freezing into one big chicken iceberg. When you're ready to eat, reheat from frozen in a 400°F oven for 15-20 minutes, flipping halfway through. They won't be quite as crispy as fresh, but they'll still be miles better than any frozen chicken tenders from the grocery store.
Best Reheating Method
Forget the microwave – that's how you end up with rubbery chicken and sad coating. Instead, reheat in a 375°F oven for 8-10 minutes, or better yet, use your air fryer at 375°F for 5-6 minutes. The air fryer is like a time machine for crispy food, bringing these back to almost-fresh glory. Add a tiny splash of water to the sauce before reheating – it steams back to its original creamy consistency. If you're reheating sauced tenders, do it in the oven and add the sauce after they're warm to prevent that dreaded soggy coating situation.