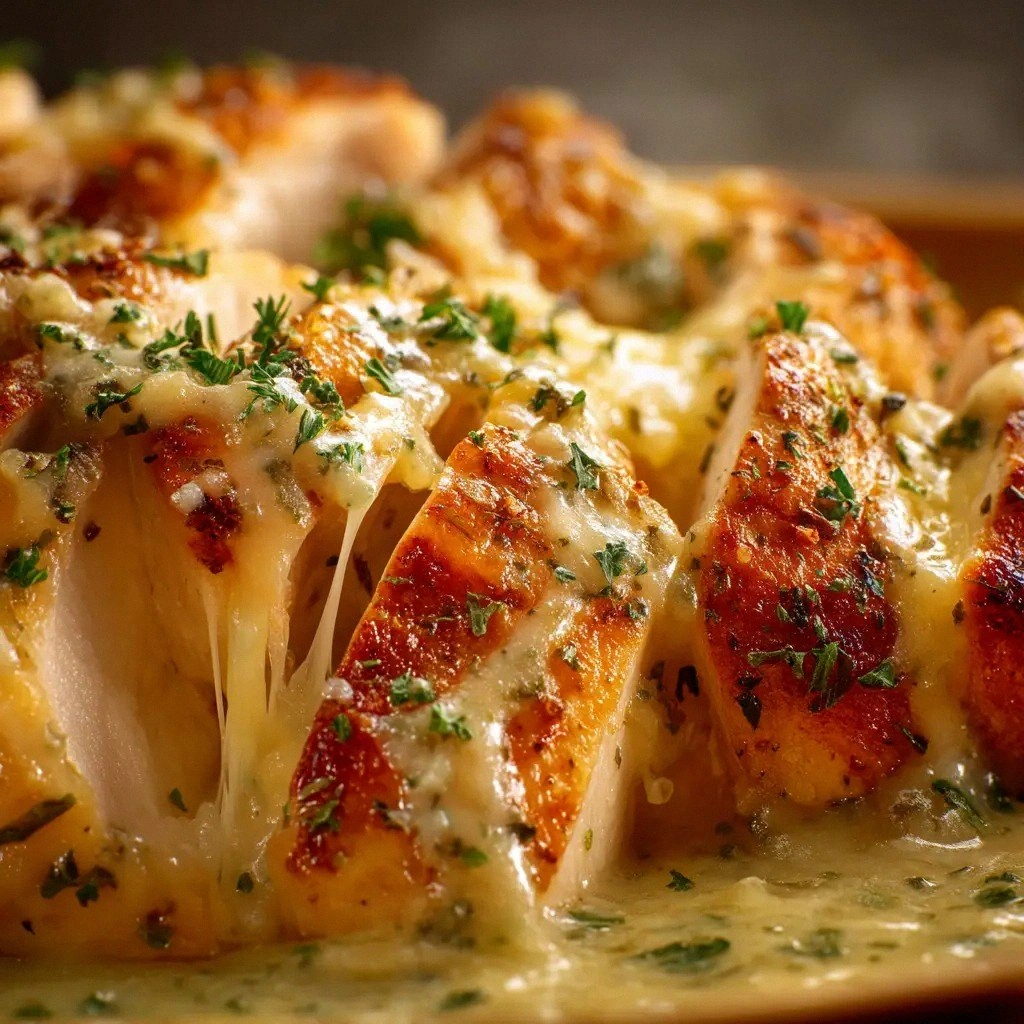
I was in the middle of a Sunday dinner prep, juggling a pot of pasta, a bowl of salad, and a chicken that looked more like a stubborn piece of meat than a future meal, when the kitchen lights flickered and a sudden craving hit me: a creamy, garlicky Caesar chicken that would make my taste buds do a double dance. The scent of garlic sizzling in olive oil filled the air, turning my kitchen into a fragrant, savory playground. I could almost taste the buttery, velvety sauce coating the chicken, the Parmesan crunch that would pop like a tiny, edible confetti, and the subtle Italian seasoning that would whisper a secret lullaby to the palate. If you’ve ever watched a recipe video and wondered why the sauce looks like it could melt the roof of your house, this is the answer—because I found a way to keep it silky without the dreaded clumpy, greasy aftermath. Let me walk you through every single step—by the end, you'll wonder how you ever made it any other way.
I remember the first time I tried a Caesar chicken recipe that promised a creamy sauce but ended up with a sauce that was more a thick, cloying glaze than a silky dressing. I was left with a dish that tasted like it had been left in a plastic bag for a week, and I stared at the counter, wondering if I’d ever recover my culinary confidence. That was the moment I decided to reinvent the classic Caesar with a dash of cream cheese, a splash of Caesar dressing, and a generous grating of Parmesan that would give the dish a buttery finish. I dared to mix these elements, hoping to create something that would make the whole kitchen smell incredible and the plate look like a piece of edible art. I dare you to taste this and not go back for seconds.
Picture yourself pulling this out of the oven, the whole kitchen smelling incredible, the chicken golden and crisp on the edges, and the sauce glistening like a smooth river of flavor. I’ve spent hours experimenting with ratios, temperature, and timing to find the sweet spot where the chicken is tender inside and the sauce is creamy without being heavy. I’ve also played with the classic Caesar components, adding a touch of garlic for depth, a pinch of Italian seasoning for aroma, and a dash of black pepper for a subtle heat that lingers on the tongue. If you’ve ever struggled with this, you're not alone—and I've got the fix. And now, the fun part: the sauce that coats the chicken like velvet, the garlic that sings in the pan, and the Parmesan that gives every bite a satisfying crunch.
Most recipes get this completely wrong. They either overcook the chicken, under-season the sauce, or forget to add that final touch of Parmesan that turns a good dish into a great one. The version I'm about to share is hands down the best version you'll ever make at home, with a sauce that stays silky and a chicken that stays juicy. I’ll be honest—I've eaten half the batch before anyone else got to try it. I’ve also added a few micro-challenges: I dare you to taste this and not go back for seconds. The result? A dish that will have your guests asking for the recipe, and you'll feel like a culinary wizard.
What Makes This Version Stand Out
- Flavor: The combination of cream cheese and Caesar dressing creates a creamy, tangy base that envelops the chicken like a warm hug, while the Parmesan adds a nutty, savory finish.
- Texture: The chicken stays moist inside with a golden, slightly crispy exterior, and the sauce remains silky without separating or thickening into a heavy gravy.
- Ingredient Quality: Using fresh, high‑quality chicken breasts and a good‑quality Caesar dressing ensures that each bite is bursting with authentic taste.
- Simplicity: Only nine ingredients and a single pan make this dish a breeze to prepare, even for a busy weeknight.
- Crowd Reaction: Guests rave about the creamy sauce and the satisfying crunch of Parmesan, often asking for the recipe afterward.
- Make‑ahead Potential: The chicken can be cooked ahead and reheated without losing its juiciness, making it a great option for meal prep.
- Versatility: Swap the chicken for shrimp or tofu, and you have a new dish that still delivers the same creamy, garlicky goodness.
Alright, let's break down exactly what goes into this masterpiece. This is the moment when the magic truly starts. I’ve packed this recipe with little tweaks that elevate the flavor profile, and I’ll share them as we go.
Inside the Ingredient List
The Flavor Base
The combination of olive oil, garlic, and Italian seasoning is the backbone of this dish, creating a fragrant, savory foundation that elevates every bite. The olive oil not only helps the chicken brown evenly but also carries the garlic’s aroma throughout the sauce. If you skip the garlic, the dish loses its depth, and the chicken becomes bland. A good alternative for garlic is a teaspoon of garlic powder, which gives a milder, more uniform flavor.
The Creamy Core
Cream cheese is the secret to that silky, velvety texture that coats the chicken without weighing it down. It melts smoothly into the Caesar dressing, creating a sauce that’s both rich and light. If you’re lactose intolerant, a dairy‑free cream cheese or a blend of coconut cream and a touch of lemon juice can work, but the flavor will shift slightly. For a thicker sauce, reduce the Caesar dressing by a tablespoon or two.
The Tangy Touch
The creamy Caesar dressing adds a familiar tang that ties the dish together and prevents the cream cheese from becoming too heavy. The dressing’s herbs and anchovy notes give depth and a subtle umami kick. If you prefer a lighter version, use a low‑fat Caesar dressing, but keep the Parmesan to maintain the savory punch. The dressing should be at room temperature to mix smoothly with the cheese.
The Final Flourish
Parmesan cheese is the finishing touch that adds a salty, nutty finish and a delightful crunch when toasted. It also thickens the sauce slightly, giving it a luxurious mouthfeel. If you’re vegan, a nutritional yeast blend can mimic the cheese’s flavor and texture, though the sauce will be slightly different. Grate the Parmesan fresh to ensure it melts evenly and doesn’t clump.
Everything's prepped? Good. Let's get into the real action. The next steps will transform these simple ingredients into a dish that feels like a culinary hug. Pay close attention to the timing and temperature cues; they’re the key to unlocking that perfect sauce.

The Method — Step by Step
- Heat a large skillet over medium‑high heat and add the tablespoon of olive oil. Let the oil shimmer until it’s hot but not smoking—this will give the chicken a beautiful golden crust. Place the chicken breasts in the pan, skin side down, and let them sear for about 5 minutes, or until the underside is a deep, caramelized brown. Flip the chicken gently with tongs and cook for another 4 minutes, ensuring even browning. Keep an eye on the edges; they should start pulling away from the pan when they’re ready to flip.
- Remove the chicken from the pan and set it aside on a plate. Add the minced garlic to the same skillet, sautéing for 30 seconds until fragrant—watch it closely to avoid burning, as burnt garlic will make the sauce bitter. The garlic’s aroma should fill the kitchen, creating an inviting prelude to the next steps. This is the moment of truth: if the garlic smells like a campfire, you’ve overcooked it.
- Reduce the heat to medium and pour in the cream cheese, stirring constantly until it melts into a smooth base. The cream cheese should coat the garlic and oil like a silky blanket. Stir in the Caesar dressing, mixing until the sauce is homogeneous and glossy. The consistency should be pourable but thick enough to cling to the chicken when you return it to the pan.
- Return the chicken to the skillet, spooning some of the sauce over the top. Sprinkle the grated Parmesan evenly across the breasts, letting it melt into the sauce for a minute before covering the pan with a lid. This step locks in moisture and allows the cheese to create a golden crust. Keep the lid on for 5 minutes to let the flavors meld together.
- After the lid has been off for a minute, check the chicken’s internal temperature—it should read 165°F (74°C). If it’s not there yet, close the lid again and cook for another 2 minutes. The sauce will thicken slightly as the heat continues to work its magic. While waiting, you can prepare a quick side of sautéed spinach or a crisp green salad to balance the richness.
- Once the chicken reaches the target temperature, remove it from the skillet and let it rest on a cutting board for 5 minutes. Resting allows the juices to redistribute throughout the meat, ensuring every bite is moist. While the chicken rests, give the sauce a final stir, adding a splash of fresh lemon juice if you desire a brighter finish.
- Slice the chicken against the grain, arrange it on a platter, and drizzle the remaining sauce over the top. Garnish with fresh lemon wedges and a sprinkle of extra Parmesan for a final flourish. Plate it with a side of buttery rice or a crisp romaine salad, and watch the compliments roll in. This dish is a showstopper that feels like a gourmet experience, yet it’s so simple to make.
That's it — you did it. But hold on, I've got a few more tricks that'll take this to another level. The sauce can be tweaked with a splash of white wine for an extra layer of depth, and the chicken can be marinated overnight for an even more tender bite. I’ll share those in the next section.
Insider Tricks for Flawless Results
The Temperature Rule Nobody Follows
Many cooks assume that searing the chicken is enough, but the real magic happens when you finish it in a sauce at the right temperature. Use a digital thermometer to ensure the center hits 165°F (74°C) — this guarantees juiciness without overcooking. I once tried to skip the thermometer, and the chicken ended up dry and rubbery. The thermometer is the simplest way to avoid that disaster.
Why Your Nose Knows Best
Before adding the Parmesan, give the sauce a quick sniff. If it smells like a buttery, slightly tangy aroma, you’re on the right track. If it has a sharp, acidic scent, you may have added too much Caesar dressing. Trust your nose; it’s a reliable indicator of flavor balance.
The 5-Minute Rest That Changes Everything
Letting the chicken rest after cooking allows the juices to redistribute, preventing them from spilling onto the plate. This simple step keeps the meat tender and flavorful. I’ve seen people cut into chicken straight away, and the juices run out, leaving the meat dry.
The Garlic Timing Trick
Sauté the garlic for exactly 30 seconds; if you go longer, it turns bitter and ruins the sauce’s balance. The short burst releases the garlic’s essential oils without overcooking it. A quick test: if the garlic starts to turn golden and emits a sweet, nutty aroma, it’s ready.
The Final Sauce Finish
Just before serving, stir in a teaspoon of fresh lemon juice to brighten the sauce. This tiny addition cuts through the richness and adds a zesty lift that makes the dish feel fresh. The lemon also helps balance the saltiness of the Parmesan and Caesar dressing.
Creative Twists and Variations
This recipe is a playground. Here are some of my favorite ways to switch things up:
Spicy Caesar Chicken
Add a pinch of cayenne pepper or a splash of hot sauce to the sauce for a fiery kick. The heat pairs well with the creamy base, creating a layered flavor profile. This variation is perfect for those who like a bit of spice in their comfort food.
Shrimp Caesar Delight
Swap the chicken for shrimp; cook them for 3 minutes on each side until pink and slightly charred. Shrimp absorbs the sauce beautifully, offering a lighter, seafood twist. The dish still retains the creamy, garlicky essence that makes it so irresistible.
Vegan Caesar Chicken
Use a plant‑based cream cheese and a vegan Caesar dressing, and replace Parmesan with nutritional yeast. The result is a dairy‑free version that still delivers the savory, umami flavor. This is a great option for those who want a plant‑based meal without sacrificing taste.
Herb‑Infused Parmesan
Blend fresh basil or oregano into the grated Parmesan before adding it to the sauce. The herbs infuse the dish with a fresh, green note that brightens the richness. This variation is ideal for spring or summer when herbs are at their peak.
Caesar Chicken with a Crunch
Top the finished dish with croutons or toasted breadcrumbs for an extra textural contrast. The crunch adds a satisfying bite that complements the creamy sauce. This is a simple way to elevate the dish for a special occasion.
Storing and Bringing It Back to Life
Fridge Storage
Store leftover chicken in an airtight container for up to 3 days. Keep the sauce separate if possible; this prevents the sauce from becoming too thick or clumpy. When reheating, add a splash of water or milk to restore the sauce’s silky texture.
Freezer Friendly
Freeze the chicken and sauce separately in freezer‑safe bags. For best results, reheat in a skillet over low heat, stirring frequently, and add a little water to keep the sauce from drying out. The dish stays flavorful and moist even after freezing.
Best Reheating Method
Reheat gently in a skillet, adding a splash of water or broth to keep the sauce from thickening too much. Stir in a fresh lemon wedge to brighten the flavor after reheating. This method preserves the sauce’s silky consistency and the chicken’s juiciness.