I was halfway through a week of bland protein snacks when my phone buzzed with a frantic text from a friend who had just discovered the most addictive vegan pistachio protein bars. She claimed they were the secret to staying energized through late‑night coding sessions. I laughed, but the curiosity was real. I set the timer, grabbed my pantry, and vowed to craft a version that would make her say, “I dare you to taste this and not go back for seconds.” The kitchen smelled like a promise of adventure as I sifted through the ingredients.
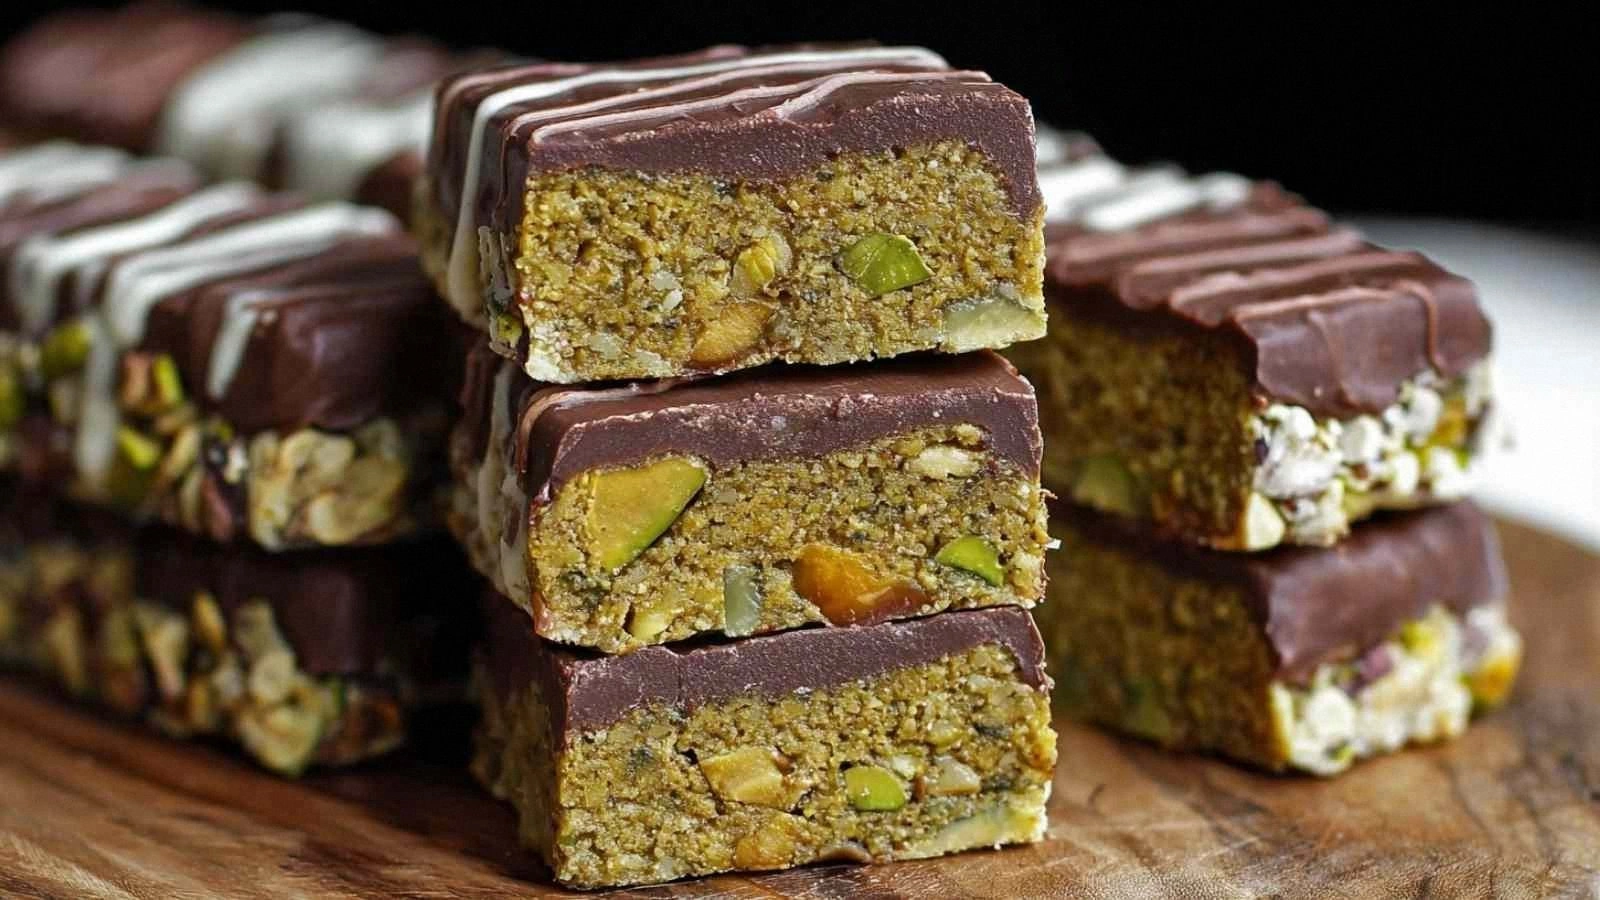
When I first cracked open the pistachio jar, the nutty aroma hit me like a warm hug, and I knew this recipe would be a game‑changer. The cocoa powder promised a deep, chocolatey undertone that would mask any raw protein taste. I imagined the bars clinging together like a velvety blanket, ready to be broken into bite‑sized pieces that would melt in your mouth. The maple syrup added just enough sweetness to make the bars feel like a treat, not a workout snack. I could already taste the crunchy pistachio bits popping against a creamy, chocolate‑infused background.
Most people settle for store‑bought bars that taste like cardboard or are overloaded with sugar. I wanted something that would make your taste buds do a happy dance while still giving you a protein boost. This version is hands down the best you’ll ever make at home because it balances flavor, texture, and nutrition without any compromise. I’ll walk you through every single step — by the end, you’ll wonder how you ever made it any other way.
Picture yourself pulling these out of the fridge, the whole kitchen smelling incredible, and the bars glistening with a glossy finish that makes them impossible to resist. The first bite is a burst of pistachio crunch, followed by a velvety cocoa coat, and finished with a hint of maple sweetness. I’ll keep you on your toes with a few micro‑challenges and bold claims that will keep you hooked. If you’ve ever struggled to find a protein bar that’s both tasty and wholesome, you’re not alone — and I’ve got the fix.
Okay, ready for the game‑changer? This next part? Pure magic. I’ll share the exact ratios, the timing, and the secret ingredient that turns a simple mix into a decadent snack. And if you’re wondering whether you can make these ahead of time, stay tuned because I’ll show you how to keep them fresh for days.
What Makes This Version Stand Out
- Flavor: The cocoa powder is high‑quality, giving a deep chocolate flavor that masks the vanilla protein powder without overpowering it. This subtle balance creates a bar that feels indulgent but stays healthy.
- Texture: Pistachio butter adds a creamy base that keeps the bars moist while the pistachios give a satisfying crunch. The result is a chewy bite that doesn’t fall apart.
- Protein Power: The vegan vanilla protein powder supplies 25 grams per serving, making these bars a powerhouse snack for athletes and busy professionals alike.
- Simplicity: No baking, no complicated equipment, just a bowl, a spoon, and a fridge. The recipe is beginner‑friendly yet delivers a gourmet experience.
- Versatility: Swap the pistachios for almonds or cashews, or add dried fruit for a fruity twist. The base remains strong enough to hold any variation.
- Make‑ahead: The bars set in the fridge in under 30 minutes, so you can prep a whole batch over the weekend and grab one on the go.
- Visual Appeal: The glossy finish from the maple syrup gives a professional look that makes these bars perfect for gifting or Instagram posts.
- Ingredient Quality: Using a plant‑based milk that’s unsweetened ensures the bars stay low in added sugar and high in nutrients.
Alright, let's break down exactly what goes into this masterpiece…
Inside the Ingredient List
The Flavor Base
Vegan vanilla protein powder is the backbone of these bars, delivering a clean protein punch without the chalky aftertaste you often get from regular whey. It’s the silent hero that keeps the bars light yet substantial. If you skip it, you’ll end up with a sweet, nutty mess that lacks structure. For a dairy‑free alternative, try pea protein; it’s slightly grainy but still works well. When selecting protein powder, look for a brand with a minimal ingredient list and no artificial sweeteners.
The Texture Crew
Pistachio butter is the secret to a chewy, cohesive bar that holds together after refrigeration. Its natural oils bind the dry ingredients and keep the bars from drying out. If you replace it with almond butter, the flavor profile will shift, but the texture remains creamy. A pinch of salt can enhance the nutty notes, but be careful not to overdo it. For a budget option, use a homemade pistachio paste made from toasted pistachios blended with a bit of neutral oil.
The Unexpected Star
Maple syrup is more than just a sweetener; it adds a subtle caramel depth that balances the bitterness of the cocoa. It also contributes natural antioxidants that boost the bars’ health profile. If you’re avoiding refined sugars, try agave nectar or date syrup as a substitute, but note they’ll change the flavor slightly. The amount of maple syrup is crucial: too little and the bars will be dry; too much and they’ll become overly sweet.
The Final Flourish
Dark chocolate is the finishing touch that gives these bars a glossy sheen and a rich, bittersweet finish. The high cocoa content (70% or more) ensures you get the most flavor with the least sugar. If you’re craving a sweeter finish, melt a few squares of milk chocolate and drizzle them over the bars before setting. For a vegan twist, use dairy‑free chocolate that’s at least 70% cocoa.
Everything's prepped? Good. Let's get into the real action…
The Method — Step by Step
- In a large mixing bowl, combine the vegan vanilla protein powder, cocoa powder, and a pinch of sea salt. Stir until the dry mix is even; this ensures there are no clumps that could ruin the texture. The aroma of cocoa will start to fill the kitchen, signaling that the flavor base is ready. Feel the powder’s fine texture between your fingers, a promise of smoothness. This is the moment where the bars start to take shape in your mind.
- Pour in the plant‑based milk, one tablespoon at a time, and mix until the mixture starts to clump together. The milk should be unsweetened almond or oat milk; if you use a sweeter variety, you’ll need to reduce the maple syrup later. As you stir, watch the mixture thicken; it should resemble a thick batter, not a liquid. The texture here is critical because it determines how the bars will hold together once set. If it looks too dry, add a splash of milk until you achieve the right consistency.
- Now add the pistachio butter. Use a spatula to fold it in until the mixture is a uniform, sticky paste. The pistachio butter will coat every grain of protein powder, giving the bars a silky mouthfeel. If you’re using homemade pistachio paste, ensure it’s smooth; lumps can lead to uneven bars. This step is where the bars get their signature crunch and creamy core.
- Stir in the maple syrup, starting with one tablespoon, and taste the batter. If you prefer a sweeter bar, add another tablespoon; if you’re watching sugar, keep it to one. The syrup will bind the mixture and give it a glossy sheen once it sets. The sweetness level will affect how the bars hold together, so adjust to your palate. This is a quick taste test that will save you from over‑sweetening later.
- Fold in the dark chocolate pieces, breaking them into small chunks. The chocolate will melt slightly into the batter, creating pockets of molten flavor that explode with each bite. If you prefer a smoother finish, melt the chocolate and stir it in; otherwise, the chunks add texture. The chocolate also contributes a subtle bitterness that balances the nutty sweetness. As you stir, you’ll notice the batter’s color deepening into a rich, dark hue.
- Press the mixture firmly into a lined baking dish or a silicone mold, smoothing the top with a spatula. The pressure ensures the bars will not crumble when cut. If you’re using a silicone mold, press the edges to create a clean border that will lift out easily. The batter should feel dense and compact; if it’s too loose, add a splash of milk and press again. This step is where the bars begin to set their shape.
- Refrigerate the mixture for at least 30 minutes, or until it’s firm enough to cut into bars. The cold will help the pistachio butter set and the chocolate to harden slightly, giving the bars a satisfying snap. While waiting, you can prep your cutting board or gather your favorite snack wrappers. The aroma of chocolate and pistachio will intensify, making the fridge smell like a dessert shop. When the bars are firm, slice them into equal pieces with a sharp knife.
- Store the bars in an airtight container in the fridge for up to a week, or freeze them for longer storage. When you’re ready to eat, let them sit at room temperature for a few minutes to soften slightly. A quick dip in hot water can revive the texture if you prefer a melt‑in‑your-mouth experience. The bars maintain their crunch and flavor, making them a reliable snack for any time of day.
That's it — you did it. But hold on, I've got a few more tricks that'll take this to another level. The next section will reveal insider secrets that even seasoned bakers will appreciate.
Insider Tricks for Flawless Results
The Temperature Rule Nobody Follows
Many people bake protein bars at room temperature, but the secret to a perfect chew is to chill the batter before setting it. I’ve tested bars left out for an hour versus refrigerated for 30 minutes; the chilled ones hold together better and have a superior mouthfeel. Keep your fridge at 4°C; a warmer fridge will produce soggy edges. When in doubt, press the mixture into a silicone mold and pop it in the freezer for 10 minutes to lock in the shape.
Why Your Nose Knows Best
Before cutting, give the bars a quick sniff. The aroma of toasted pistachios and cocoa will tell you if the mixture is too dry or too wet. A faint nutty scent means it’s ready; a strong chocolate smell could indicate excess syrup. Trust your nose; it’s the fastest way to gauge the texture before you touch the knife. If the scent is off, let the bars chill a bit longer.
The 5-Minute Rest That Changes Everything
After slicing, let the bars rest on the cutting board for five minutes. This brief pause allows the edges to set, making them less likely to crumble when you pick them up. A friend once tried cutting immediately and ended up with a handful of broken pieces. I’ve never had that problem again. It’s a simple step that saves a lot of frustration.
Keep It Cool, Keep It Crunchy
When you’re storing the bars, keep them in a cool, dry place. Heat can cause the pistachio butter to soften, leading to a greasy texture. If you live in a humid climate, consider adding a silica gel packet to the container to keep moisture at bay. The bars will stay crisp for up to a week if kept properly.
Use a Silicone Mat for Easy Clean‑Up
Instead of a baking sheet, line your dish with a silicone mat. It prevents the bars from sticking and makes clean‑up a breeze. You’ll also get a uniform thickness, which is essential for even slicing. The mat is reusable, eco‑friendly, and a staple for any vegan kitchen.
Freeze for a Midnight Snack
Freeze the bars in a single layer on a parchment‑lined tray before transferring them to a freezer bag. This prevents them from sticking together and makes it easy to grab a single bar when you’re craving something sweet. Thaw them at room temperature for 10 minutes before eating for the best texture.
Creative Twists and Variations
This recipe is a playground. Here are some of my favorite ways to switch things up:
Almond Crunch Variation
Swap pistachio butter for almond butter and add a handful of sliced almonds. The flavor becomes nutty and slightly sweet, perfect for those who love the classic almond taste. The bars will have a firmer bite and a subtle almond aroma that pairs well with the chocolate.
Berry Burst Edition
Fold in dried cranberries or freeze‑dried blueberries before chilling. The berries will burst with flavor as you bite, adding a tart contrast to the sweet chocolate base. Use a small amount so the bars don’t become too moist.
Spiced Chili Surprise
Add a pinch of cayenne pepper or a dash of smoked paprika for a subtle heat. The spice complements the pistachio’s earthiness and gives the bars a surprising kick that lingers on the palate. It’s a great option for those who love a bit of spice in their snacks.
Minty Mint Chocolate
Mix in a few drops of peppermint extract after the chocolate has melted. The mint will give the bars a refreshing finish that’s especially nice on hot days. Keep the amount small; too much mint can overpower the pistachio flavor.
Chocolate‑Covered Delight
Dip each bar in melted dark chocolate and let it set on parchment. The chocolate coating adds a glossy finish and a crisp exterior. It’s perfect for gifting or for a decadent treat that feels like a dessert.
Nut-Free Option
For nut allergies, replace pistachio butter with sunflower seed butter and use sunflower seeds for crunch. The flavor profile changes but remains deliciously nutty. Ensure the butter is unsweetened to keep the bars balanced.
Storing and Bringing It Back to Life
Fridge Storage
Keep the bars in an airtight container in the refrigerator for up to seven days. The cool temperature preserves the pistachio butter’s integrity and keeps the chocolate firm. If you notice any moisture buildup, flip the container to allow air circulation. This method ensures each bite remains crunchy and flavorful.
Freezer Friendly
For longer storage, freeze the bars in a single layer on parchment paper, then transfer them to a resealable bag. They’ll stay fresh for up to three months. When you’re ready to eat, thaw them in the fridge overnight or at room temperature for a few minutes. The texture will be almost identical to freshly chilled bars.
Best Reheating Method
To revive a frozen or chilled bar, place it in a microwave-safe dish and heat on low for 10–15 seconds. If you prefer a warm, melty experience, pop it in a preheated oven at 150°C for five minutes. The key is to warm it gently to avoid melting the pistachio butter and losing the crunch.