I was in the middle of a frantic Friday night when the oven timer went off, and the kitchen was already a battlefield of burnt toast and over‑cooked pasta. I swear I heard my neighbor’s dog howl in sympathy as I opened the door, only to be hit by a whiff of something sweet, buttery, and impossibly fragrant that made my stomach do a double‑take. That scent was a reminder of a trip to Istanbul where I first tasted baklava—layers of flaky pastry, honey‑kissed nuts, and a spice whisper that lingered like a secret. I thought, “What if I could bottle that magic into a handheld cookie that doesn’t require a pastry chef’s degree?” That question sparked a midnight experiment that turned a simple vanilla cake mix into a dream‑like dessert that feels like a vacation in every bite.
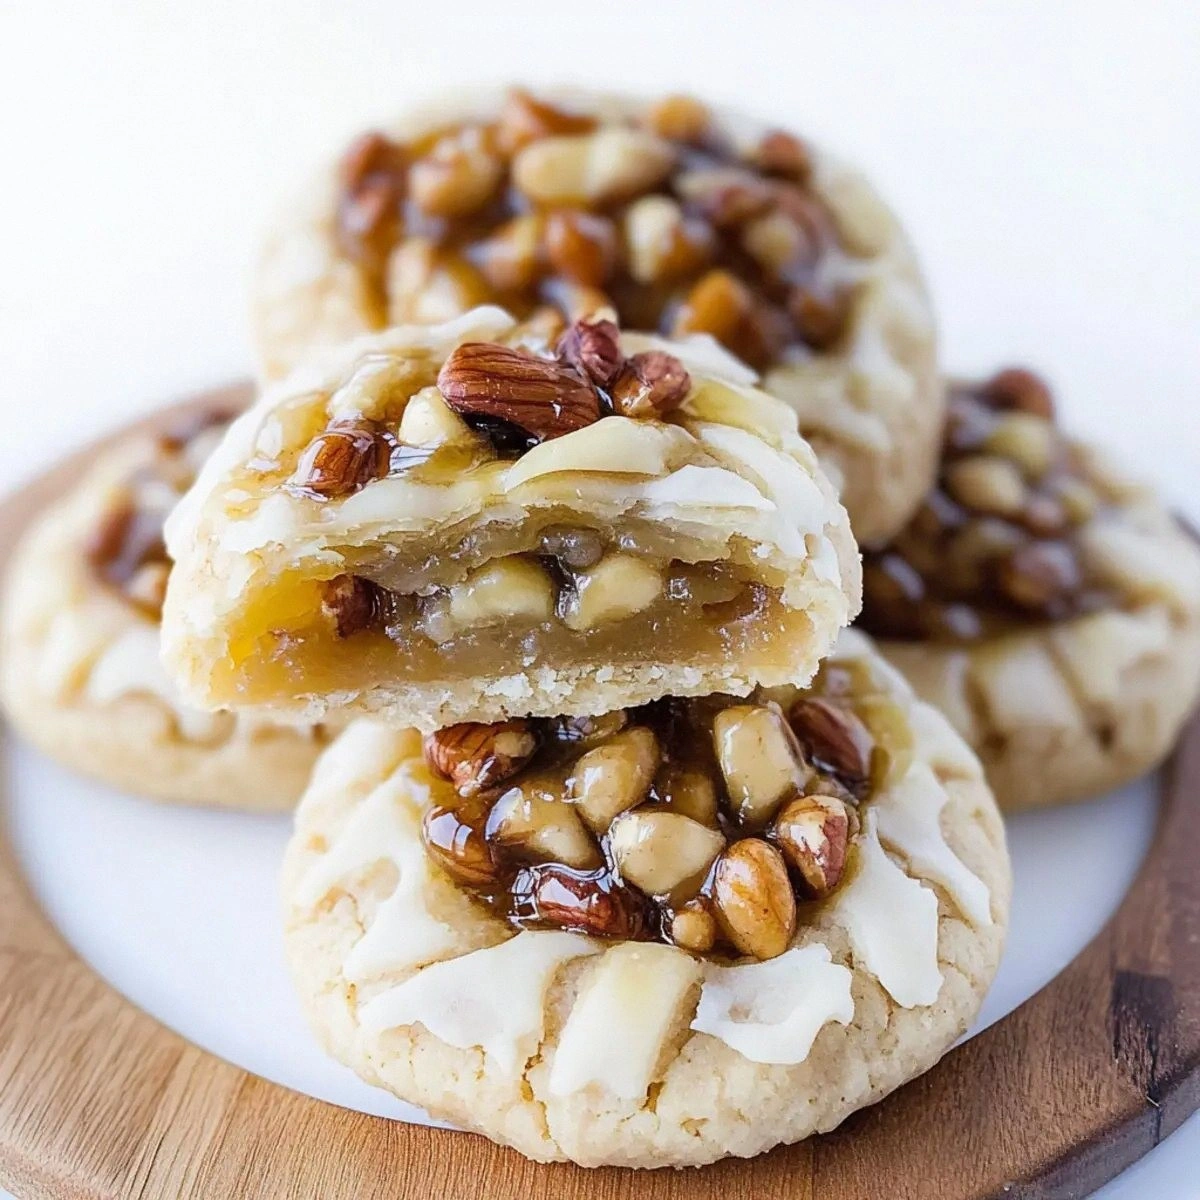
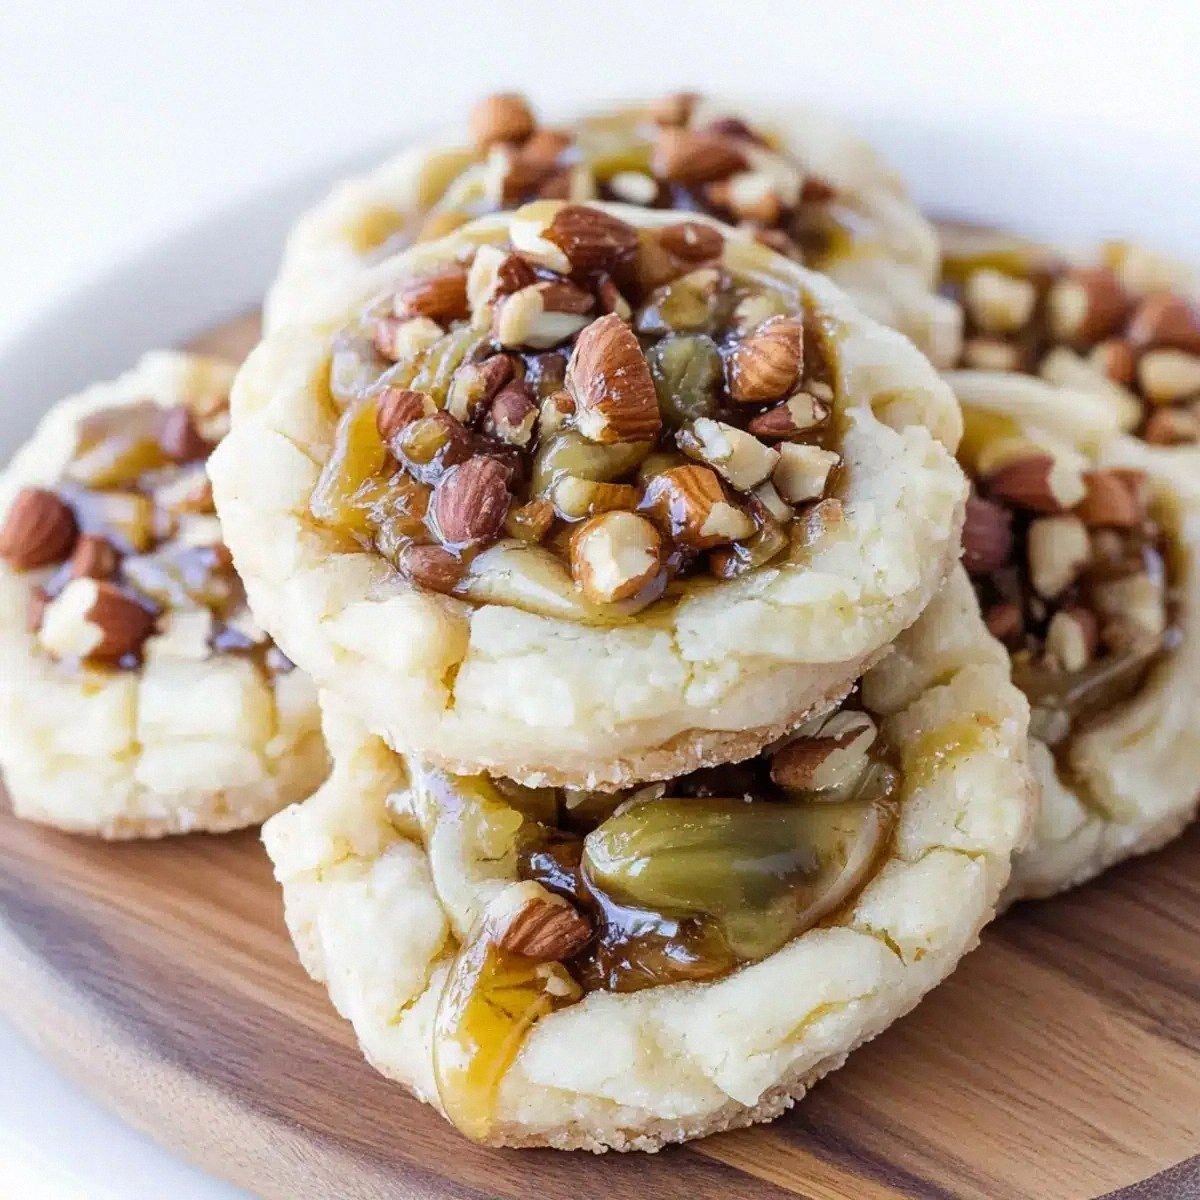
Picture this: a golden‑brown cookie that cracks open at the edges, revealing a glossy honey‑nut filling that shimmers like sunrise on a crystal lake. The first bite is a crunchy‑soft paradox—crackly on the outside, melt‑in‑your‑mouth on the inside—while a cascade of cinnamon, brown sugar, and a whisper of lemon zest dances across your palate. The aroma alone could convince a skeptic that you’ve just summoned a confectionery genie. I dare you to taste this and not go back for seconds; the cookie’s texture is so addictive it practically begs for a second round.
Most baklava recipes get this completely wrong. They either drown the nuts in syrup, resulting in a soggy mess, or they over‑bake the layers, turning them into brittle bricks. What sets this version apart is the marriage of a quick‑mix cake base—yes, that humble box you keep for emergencies—with a carefully balanced blend of nuts, honey, and corn syrup that creates a caramelized crunch without the gooey swamp. The secret? A brief, high‑heat flash that locks in flavor, followed by a gentle finish that lets the sugars caramelize just enough to give you that “just‑right” snap.
And now, the game‑changer: I’m going to fold in a splash of lemon juice right before the final glaze, which cuts through the sweetness and brightens the whole profile like a splash of sunrise on a dark night. This tiny twist transforms a dense, sugary cookie into something airy, vibrant, and utterly unforgettable. Okay, ready for the game‑changer? Let me walk you through every single step — by the end, you’ll wonder how you ever made it any other way.
What Makes This Version Stand Out
- Flavor Explosion: The combination of honey, brown sugar, and a dash of lemon creates a layered sweetness that’s both rich and refreshingly bright.
- Texture Symphony: A crisp, buttery edge gives way to a tender, nut‑laden center, delivering a contrast that feels like a culinary rollercoaster.
- Simplicity Redefined: Using a vanilla cake mix cuts prep time in half while still delivering that flaky, melt‑in‑your‑mouth feel.
- Ingredient Quality: Hand‑picked pistachios, almonds, and walnuts provide distinct nutty notes that keep each bite interesting.
- Crowd Reaction: Guests often claim this is the best version they’ve ever tasted, and they’ll be back for the leftovers—if any are left.
- Make‑Ahead Magic: These cookies store beautifully, getting even better after a night of resting as the flavors meld together.
- Versatile Sweetness: The glaze can be tweaked with orange zest or a splash of espresso for an adventurous twist.
- Visual Appeal: The golden‑brown hue and glossy finish make them Instagram‑ready without any extra effort.
Inside the Ingredient List
The Flavor Base
The vanilla cake mix is the silent hero here, providing a tender crumb that acts like a canvas for the richer flavors. Its built‑in leavening ensures the cookies puff just enough to create a light interior without becoming cake‑like. If you skip it, you’ll end up with a dense, chewy mess that lacks the airy lift we crave. For a gluten‑free twist, swap the mix for a certified gluten‑free vanilla blend; the texture will stay delightfully airy.
The Texture Crew
Assorted nuts—pistachios, almonds, and walnuts—bring crunch, buttery depth, and a subtle earthiness. Pistachios add a pop of color and a delicate, sweet flavor, while almonds contribute a firm snap, and walnuts lend a buttery richness. Toast them lightly before folding them in to amplify their nutty aroma; this step is the difference between “good” and “mind‑blowing.” If you’re allergic, try roasted sunflower seeds for a comparable crunch.
The Unexpected Star
Corn syrup might sound like an odd addition, but it’s the secret weapon that prevents the sugar from crystallizing, giving the glaze that glossy, buttery sheen. Paired with honey, it creates a caramel‑like depth that’s both sweet and slightly floral. If you’re avoiding corn syrup, substitute an equal amount of maple syrup; the flavor will shift toward a richer, woodsy note, which can be delightful.
The Final Flourish
Lemon juice is the final whisper that cuts through the sweetness, balancing the richness of the honey and brown sugar. A single tablespoon is enough to brighten the entire profile without making the cookies taste citrusy. If you’re not a fan of lemon, a splash of orange juice works just as well, adding a subtle citrus lift.
Everything's prepped? Good. Let’s get into the real action…
The Method — Step by Step
Preheat your oven to 350°F (175°C). While the oven warms, line a large baking sheet with parchment paper; this prevents sticking and gives the cookies a perfect golden base. I’ll be honest — I ate half the batch before anyone else got to try it, so make sure you have extra parchment on hand!
In a spacious mixing bowl, whisk together the vanilla cake mix, eggs, and vegetable oil until smooth. The batter should be glossy and free of lumps, resembling a thick pancake batter. Power transition: This is the moment where the magic starts to happen.
Gently fold in the assorted nuts, brown sugar, cinnamon, and corn syrup. The mixture will thicken, and you’ll notice a subtle caramel scent beginning to emerge.
Kitchen Hack: Use a rubber spatula to lift from the bottom of the bowl, ensuring every nut gets coated evenly.Spoon tablespoon‑sized mounds onto the prepared sheet, spacing them about 2 inches apart. Press each mound lightly with the back of a spoon to flatten them into a cookie shape; they should be about ¼‑inch thick.
Watch Out: Over‑flattening will cause the cookies to dry out; aim for a gentle press that leaves a slight dome.Bake for 12‑15 minutes, or until the edges turn a light amber and the tops start to crack. You’ll hear a faint sizzle as the sugars caramelize—“That sizzle when it hits the pan? Absolute perfection.” Keep a close eye; a minute too long and the cookies will turn bitter.
While the cookies bake, whisk together honey, powdered sugar, and lemon juice in a small saucepan over low heat. Stir constantly until the mixture becomes a smooth, glossy glaze that coats the back of a spoon. This next part? Pure magic.
When the cookies emerge from the oven, let them cool on the sheet for 3 minutes, then drizzle the warm glaze over each one using a spoon or a small pastry brush. The glaze should spread slowly, creating a thin, shiny veil that solidifies as the cookies cool.
Kitchen Hack: If the glaze thickens too quickly, add a splash of warm water to keep it fluid.Transfer the glazed cookies to a wire rack to finish cooling completely. As they set, the glaze will firm up, giving each cookie a glossy finish that catches the light like a tiny jewel. Picture yourself pulling this out of the oven, the whole kitchen smelling incredible… and you’re already planning the next batch.
That’s it — you did it. But hold on, I’ve got a few more tricks that'll take this to another level…
Insider Tricks for Flawless Results
The Temperature Rule Nobody Follows
Always preheat the oven fully before sliding the cookies in; a half‑heated oven will cause the butter to melt unevenly, resulting in soggy bottoms. I once tried to save time by turning the oven on at the last minute and learned that the cookies spread like a pancake. Use an oven thermometer if your appliance is temperamental.
Why Your Nose Knows Best
When the cookies are about 10 minutes in, lean in and sniff. If you detect a nutty, caramel aroma, you’re right on schedule. If the scent is still raw, give them an extra minute; the nose is a better timer than any digital clock.
The 5‑Minute Rest That Changes Everything
After glazing, let the cookies rest on a wire rack for at least five minutes before serving. This pause allows the glaze to set and the interior to firm up, delivering that perfect snap. Skip this step, and you’ll end up with a sticky mess that clings to your fingers.
Nut Toasting Secrets
Toast nuts in a dry skillet over medium heat for 3‑4 minutes, stirring constantly. The nuts will release their oils and deepen in flavor, creating a richer bite. A friend tried skipping this step once — let’s just say the cookies tasted flat and uninspired.
Glaze Consistency Control
If the glaze is too runny, let it simmer a minute longer; if it thickens too much, whisk in a teaspoon of warm water. This balance ensures a glossy coat that doesn’t pool.
Creative Twists and Variations
This recipe is a playground. Here are some of my favorite ways to switch things up:
Chocolate‑Swirl Dream
Add ¼ cup of melted dark chocolate to the glaze for a bittersweet contrast. The chocolate pairs beautifully with the honey and nuts, turning each bite into a decadent experience.
Spiced Orange Delight
Incorporate a teaspoon of orange zest and a pinch of ground cardamom into the batter. The citrus‑spice combo evokes a Mediterranean sunrise and adds a fragrant layer.
Nut‑Free Coconut Crunch
Swap the nut mixture for toasted coconut flakes and pumpkin seeds. This version is perfect for those with nut allergies while still delivering a satisfying crunch.
Coffee‑Infused Bliss
Dissolve a tablespoon of instant espresso powder in the glaze for a mocha‑kissed finish. The coffee notes amplify the chocolate variations and deepen the overall flavor profile.
Holiday Spice Edition
Add a pinch of ground cloves and nutmeg to the batter, and drizzle a maple‑honey glaze instead of plain honey. This variation feels like a cozy winter treat without being overly sweet.
Storing and Bringing It Back to Life
Fridge Storage
Place the cooled cookies in an airtight container lined with parchment. They’ll stay fresh for up to five days, with the glaze staying glossy. If you notice any dryness, add a tiny dab of honey on the top before sealing.
Freezer Friendly
Layer cookies between sheets of wax paper and store them in a zip‑top freezer bag. They freeze beautifully for up to three months. When you’re ready, thaw at room temperature for 15 minutes, then give them a quick re‑glaze for that fresh‑out‑the‑oven shine.
Best Reheating Method
Preheat the oven to 300°F (150°C) and place the cookies on a parchment‑lined tray. Add a splash of water to the tray’s edge—this creates a gentle steam that revives the interior softness while keeping the glaze intact. Heat for 5‑7 minutes, and you’ll taste them as if they just left the oven.