I burned an entire tray of chocolate chip cookies the night before Valentine's Day, and in my panic, I discovered something magical. The smoke alarm was screaming, my kitchen smelled like a campfire, and I had promised my best friend I'd bring dessert to her couple's dinner party. In that moment of desperation, I grabbed a box of brownie mix, a bag of marshmallows, and some graham crackers, thinking I'd just slap something together. What emerged from that chaotic experiment were these Valentine S'mores Brownie Bites that had everyone fighting over the last piece like it was the last lifeboat on the Titanic.
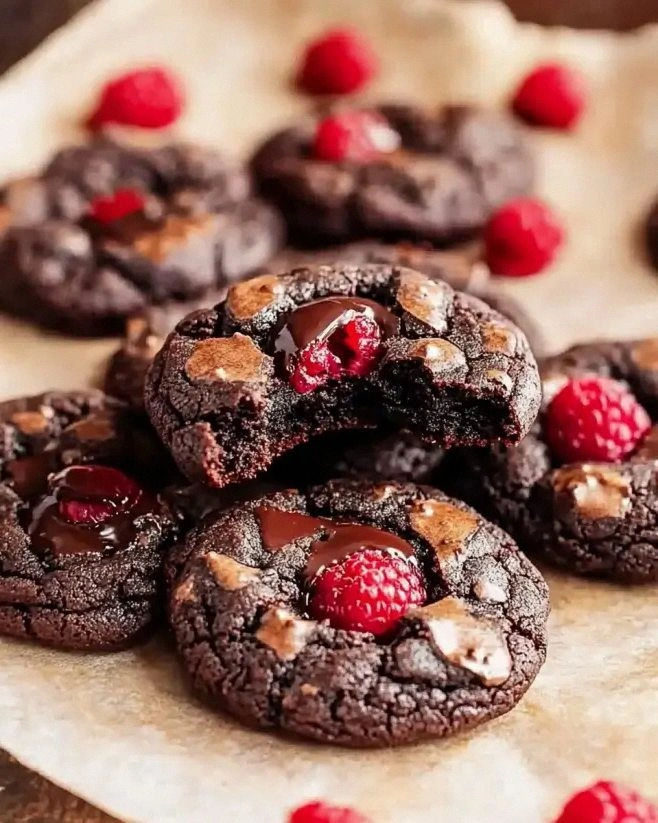
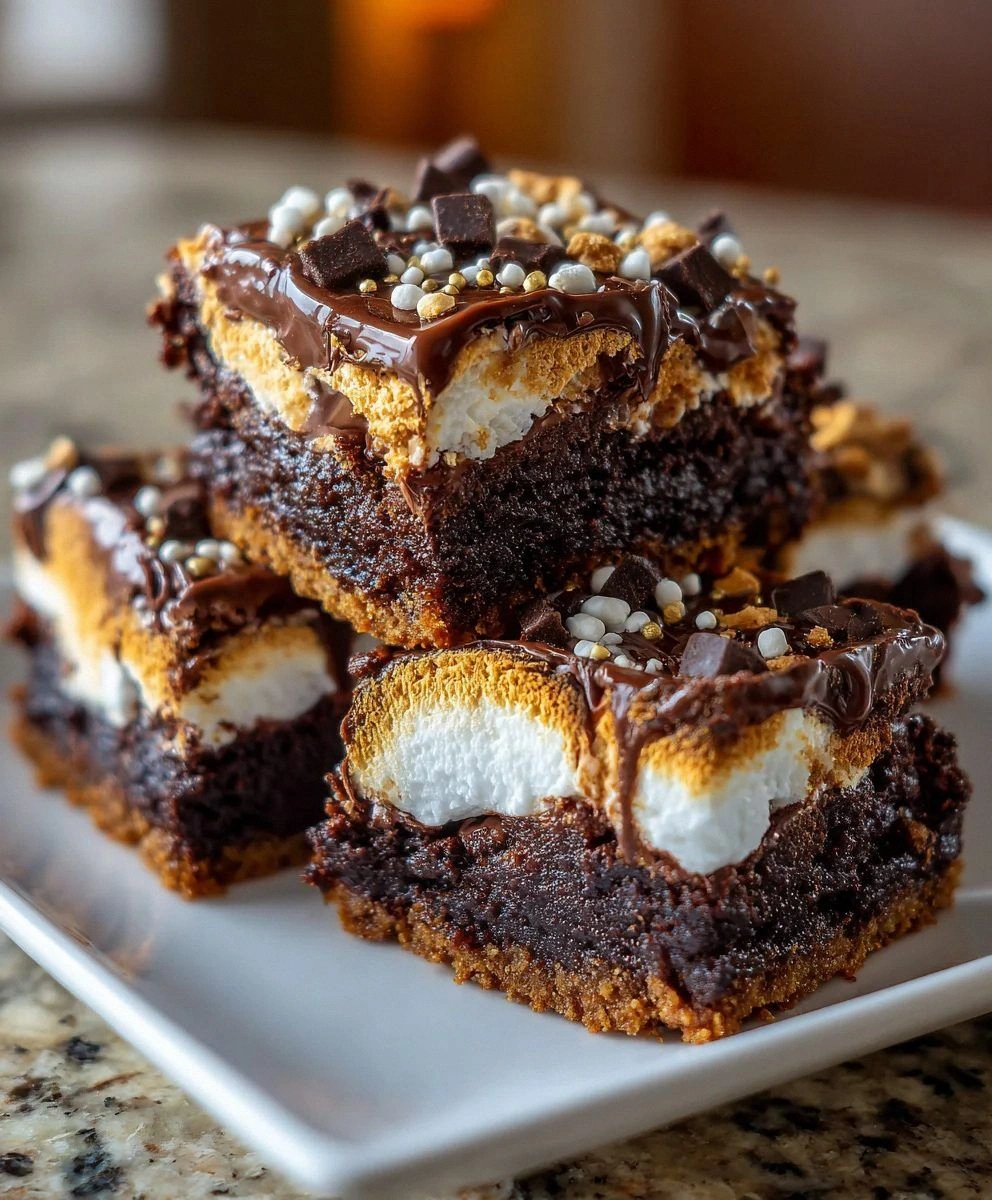
Picture this: a fudgy brownie base that melts on your tongue like silk, topped with a pillowy marshmallow layer that stretches into Instagram-worthy strings when you pull them apart, all encased in a crisp chocolate shell with hints of graham cracker crunch. The first bite tastes like summer camp and sophisticated chocolate shop had a beautiful baby. Your teeth sink through layers of texture — the snap of chocolate coating, the give of marshmallow, the dense chew of brownie, and the sandy crunch of graham cracker all in one perfect little package.
I dare you to taste one of these and not immediately reach for another. I've watched grown adults turn into competitive children, strategizing how to get the biggest piece, the one with the most marshmallow pull, the perfect chocolate-to-brownie ratio. The best part? They look like you spent hours tempering chocolate and baking from scratch, when really you spent most of your time watching Netflix while the brownie base cooled. This recipe is my secret weapon for potlucks, bake sales, and yes, Valentine's Day, because nothing says "I love you" like giving someone permission to eat dessert with their hands and get chocolate all over their face.
Here's what makes this version different from every other s'mores brownie recipe floating around the internet: we're not just dumping marshmallows on top and calling it a day. We're creating distinct layers that each serve a purpose, using temperature and timing to achieve that perfect contrast between gooey and set, soft and crisp. Stay with me here — this next part is pure magic. We're going to toast the graham cracker crumbs first to intensify their flavor, use two types of chocolate for depth, and employ a freezing technique that keeps the marshmallow layer from disappearing into the brownie. By the end of this, you'll wonder how you ever made it any other way.
What Makes This Version Stand Out
Texture Symphony: Most recipes give you either a soggy mess where the marshmallow dissolves into the brownie, or a rock-hard sugar brick that could break teeth. This version creates four distinct textures: the crisp chocolate shell shatters like thin ice, the marshmallow layer stays cloud-soft, the brownie remains dense and fudgy, and the graham cracker adds sandy crunch throughout. Each bite is a journey through contrasts that keeps your taste buds dancing.
Flavor Depth: We're not just relying on sweet here — the toasted graham cracker crumbs bring nutty, almost caramel notes, while semi-sweet chocolate balances the sugar bomb that usually plagues s'mores desserts. The brownie base gets a hit of espresso powder to amplify the chocolate flavor without making it taste like coffee. It's like turning up the saturation on your favorite photo, but for your mouth.
Stress-Free Showstopper: Using a quality boxed brownie mix isn't cheating — it's smart strategy. It gives you consistent results every time while you focus on the fancy parts that make people think you're a pastry wizard. Plus, these bites are designed to be made ahead, frozen, and pulled out when you need to impress without the stress sweats.
Portion Control (Sort Of): The individual serving size means everyone gets their own perfect ratio of chocolate to marshmallow to brownie. No fighting over corner pieces, no sad middle pieces with barely any topping. Each bite-sized piece is engineered for maximum impact, which also means you can justify eating three because they're "so small."
Instagram Gold: That marshmallow pull when you break them apart? Pure social media catnip. The glossy chocolate coating catches the light like jewelry, and the pop of Valentine's sprinkles makes them look like edible confetti. Your phone will eat these up before you do.
Make-Ahead Magic: These actually improve after a day in the fridge, letting the flavors meld and the textures settle. You can make the components separately over a week, assemble when convenient, and they'll keep for ages in the freezer. It's like having a secret weapon stashed away for dessert emergencies.
Alright, let's break down exactly what goes into this masterpiece...
Inside the Ingredient List
The Foundation: Brownie Base
The boxed brownie mix is your best friend here, but not all mixes are created equal. Splurge on the good stuff — Ghirardelli or Duncan Hines will give you that rich, fudgy base that tastes homemade. The mix already contains the perfect ratio of sugar to cocoa to flour, taking the guesswork out of achieving that dense, chewy texture that holds up to all the toppings we're piling on. Don't go for the "family size" boxes unless you want to make enough brownie bites to feed a small army. The standard box makes exactly the right amount for a 9x13 pan, which we'll cut into perfect bite-sized cubes.
Here's where it gets interesting: we're doctoring up that mix like we're running a dessert speakeasy. Replace the water with strong coffee to deepen the chocolate flavor without making it taste like mocha. Swap the oil for melted butter for richness that'll make your knees weak. Add an extra egg yolk for chewiness that stretches like taffy. These tiny tweaks transform a humble box mix into something that'll have people swearing you spent hours slaving over melted chocolate and cocoa powder.
The Texture Crew: Graham and Chocolate
Graham cracker crumbs are the unsung heroes here — they provide structure, absorb excess moisture, and bring that campfire nostalgia that makes s'mores so addictive. Fresh crumbs work better than the pre-ground ones because they maintain some texture. You want sandy, not dusty. Pulse them in a food processor until they look like beach sand with a few pebbles mixed in. Those larger pieces create pockets of crunch that contrast beautifully with all the soft elements.
The semi-sweet chocolate chips aren't just for coating — we're using them strategically. Mini chips melt more evenly than regular ones, creating that smooth, glossy finish that makes these look professional. We're adding a tablespoon of coconut oil to help the chocolate set with a satisfying snap, plus it gives the coating a slight sheen that catches the light like lacquered furniture. Don't substitute with milk chocolate here — you need the bitterness to balance all the sweetness from the marshmallow and brownie.
The Star: Marshmallow Magic
Here's where most recipes go wrong — they use regular marshmallows that dissolve into a sticky mess. We're using marshmallow fluff for the smooth, creamy layer that stays put, plus mini marshmallows pressed into the top for visual appeal and that classic s'mores texture. The fluff spreads like frosting, creating an even layer that won't slide off when you add the chocolate coating. The mini marshmallows toast slightly under the broiler, developing those caramelized spots that taste like summer nights around a fire.
If you can't find fluff, make your own by melting regular marshmallows with a bit of corn syrup — it keeps them pliable instead of turning them into concrete. The key is working quickly while it's warm, like you're handling edible lava. Spread it in an even layer using an offset spatula dipped in hot water — the heat prevents sticking and gives you glass-smooth results.
The Final Flourish: Sprinkles and Such
Valentine's sprinkles aren't just decorative — they add tiny pops of sugar that dissolve on your tongue like flavored snow. Use a mix of shapes and sizes for texture: jimmies for color, nonpareils for crunch, and maybe some heart-shaped quins for the cute factor. Add them while the chocolate is still wet so they adhere properly, but don't go overboard. You want sophisticated sparkle, not kindergarten craft project.
Everything's prepped? Good. Let's get into the real action...
The Method — Step by Step
- Start by preheating your oven to 325°F — lower than the box suggests because we want fudgy, not cakey. Line your 9x13 pan with parchment paper, leaving wings on the sides for easy removal later. Mix your doctored-up brownie batter according to the box, but with our secret ingredients: replace water with cold coffee, swap oil for melted butter, and add that extra yolk. Pour the batter into the pan and smooth the top with an offset spatula dipped in water — this prevents sticking and gives you a level surface for the layers to come. The batter should look glossy and thick, like liquid fudge that promises good things to come.
- While the brownie bakes, toast your graham cracker crumbs in a dry skillet over medium heat. This is the step that separates amateur hour from dessert destiny. Stir constantly for 3-4 minutes until they turn a shade darker and smell like you're standing outside a bakery. They'll go from pale and bland to golden and nutty — it's like magic happening in your pan. Don't walk away here — they burn faster than your ex's new relationship after your breakup.
- When the brownie is done (a toothpick should come out with moist crumbs, not wet batter), let it cool completely. I mean completely — not warm, not room temperature, but cold. This usually takes about two hours, but you can speed it up by placing the pan in the fridge. Warm brownie plus marshmallow equals a swampy mess that'll make your layers slide around like they're on a waterbed. Patience here pays off in clean layers later.
- Here's where it gets fun: spread your marshmallow fluff in an even layer over the cooled brownie. Use an offset spatula warmed in hot water — the heat prevents the fluff from sticking and tearing your brownie surface. Work quickly and confidently, like you're frosting a cake in a timed competition. The layer should be about 1/4-inch thick, enough to provide that classic marshmallow flavor without making these impossible to bite through. If you hit any bare spots, just dab on more fluff — it self-levels as it sits.
- Press mini marshmallows into the fluff in a decorative pattern — I like to make rows, but random scattering looks charming too. Don't push them in too deep or they'll disappear into the layer. You want about half of each marshmallow showing so they toast properly later. This is your chance to be artistic, so channel your inner dessert designer. The marshmallows should look like they're floating on a cloud of fluff, ready for their close-up.
- Now for the game-changer: place the pan under the broiler for 30-45 seconds. Watch it like a hawk — this is not the time to check Instagram. The marshmallows should puff up and turn golden brown in spots, like they've been kissed by a campfire. Rotate the pan if your broiler has hot spots. You're looking for that perfect toasted color that makes them taste like summer nights and childhood memories. Remove immediately — they go from perfect to burnt in the blink of an eye.
- Let the toasted marshmallow layer cool for 10 minutes, then place the entire pan in the freezer for 30 minutes. This is the secret step that makes everything work — it sets the marshmallow layer so it won't melt when you add the warm chocolate. Frozen marshmallow cuts cleanly, giving you those perfect edges that make people think you're a professional. Don't skip this unless you want chocolate swirls that look like abstract art gone wrong.
- While your brownie chills, melt your chocolate chips with the coconut oil. Use a double boiler or microwave in 30-second bursts, stirring between each burst. The chocolate should be smooth and glossy, like liquid velvet. If it's too thick, add another teaspoon of oil — you're looking for a consistency that coats a spoon but still drips off in a steady stream. Test it by drizzling some on parchment — it should set within 5 minutes.
- Remove the brownie from the pan using the parchment wings and cut it into 1-inch squares. Use a sharp knife dipped in hot water, wiping between cuts for clean edges. Work quickly — you want those squares to stay cold. If they start to warm up, pop them back in the freezer for 5 minutes. Each square should be perfectly portioned, with visible layers of brownie, marshmallow, and toasted top.
- Set up your dipping station: brownie squares on the left, melted chocolate in the middle, parchment-lined tray on the right. Drop a square into the chocolate, flip it with a fork, then lift it out, letting excess drip off. Tap the fork on the bowl edge — the chocolate should fall off in ribbons, not globs. Place on the parchment and immediately add sprinkles while the chocolate is still wet. Work assembly-line style: dip three, sprinkle three, repeat.
That's it — you did it. But hold on, I've got a few more tricks that'll take this to another level...
Insider Tricks for Flawless Results
The Temperature Rule Nobody Follows
Here's the thing about chocolate work — temperature is everything. Your chocolate should be between 88-90°F for dipping, which is warmer than you think. Too cool and it'll be thick and gloppy, creating those sad, lumpy coatings that look like they've been through a war. Too hot and it'll be thin and runny, pooling around the bottoms like chocolate puddles. A simple test: drop a bit on your wrist — it should feel warm but not hot, like a baby's bottle. If you've ever struggled with chocolate that looks dull or streaky, this is why. Keep a thermometer handy and thank me later when your brownie bites look like they came from a professional chocolatier.
Why Your Nose Knows Best
Don't trust the timer — trust your nose. When the graham cracker crumbs smell like you're standing in a bakery, they're done. When the marshmallows smell like campfire smoke under the broiler, pull them out. When the brownies smell like they're on the edge of burning but not quite there, that's perfect fudgy territory. Your sense of smell is more reliable than any recipe timing because ovens vary, ingredients vary, but that toasty aroma never lies. A friend tried skipping this step once — let's just say her house still smells like burnt sugar every time she turns on the oven.
The 5-Minute Rest That Changes Everything
After you dip each brownie bite, let it sit for exactly 5 minutes before moving it or adding more sprinkles. This is when the chocolate starts to set but isn't fully hard. If you move them too soon, you'll get fingerprints and smudges that ruin that professional look. If you wait too long, the sprinkles won't stick. Set a timer and walk away — resist the urge to fiddle. This is the difference between dessert that looks homemade versus bakery-worthy. Plus, those 5 minutes give you time to dip the next batch, creating a rhythm that turns you into a chocolate-dipping machine.
The Freezer Is Your Friend
Every component of this recipe benefits from a quick chill. Freeze your brownie cubes before dipping — the cold helps the chocolate set faster, creating a thicker coating. Freeze your fully assembled bites before serving — it firms up the marshmallow layer so it doesn't squish out when you bite into it. Even freeze your sprinkles for 10 minutes before using — cold sprinkles stick better to wet chocolate. Your freezer is like a time machine for desserts, pausing everything at the perfect moment. Just don't freeze the chocolate-dipped pieces for more than an hour or you'll get condensation spots when they thaw.
Creative Twists and Variations
This recipe is a playground. Here are some of my favorite ways to switch things up:
The Campfire Classic
Swap the semi-sweet chocolate for dark chocolate with 70% cacao, and add a pinch of smoked salt to the graham cracker crumbs. The smoke flavor intensifies the campfire vibe while the dark chocolate keeps it sophisticated. Press a tiny piece of toasted marshmallow into the top of each bite for that authentic charred look. These taste like you're sitting around a fire in the Adirondacks, even if you're actually in a studio apartment.
The Valentine's Luxe
Use white chocolate instead of semi-sweet, but add a teaspoon of raspberry powder to turn it pink. Replace the graham cracker with crushed vanilla wafers, and use heart-shaped cookie cutters instead of cutting squares. Add edible gold leaf to a few pieces — they're the ones you give to your sweetheart while keeping the plain ones for yourself. The white chocolate-raspberry combo tastes like expensive Valentine's candy from a fancy chocolatier.
The Peanut Butter Cup Remix
Stir two tablespoons of peanut butter into your brownie batter, then use crushed peanut butter cookies instead of graham crackers. Dip in milk chocolate instead of semi-sweet, and top with chopped peanuts for crunch. The peanut butter flavor pairs with the marshmallow like they were born to be together. Warning: these disappear faster than the original version, if that's even possible.
The Mint Chocolate Dream
Add 1/2 teaspoon of peppermint extract to your brownie batter, and use chocolate mint cookies ground up for the crumb layer. Dip in dark chocolate and top with crushed candy canes for a year-round peppermint patty vibe. The mint cuts through all the richness, making these dangerously easy to eat. They're like Thin Mints and s'mores had a beautiful baby that grew up to be cooler than both parents.
The Salted Caramel Upgrade
Drizzle homemade caramel (store-bought works too, I won't tell) over the marshmallow layer before adding the chocolate coating. The caramel soaks into the brownie slightly while staying chewy in the middle. Sprinkle with fleur de sel instead of regular sprinkles for that sweet-salty balance that makes people close their eyes when they eat it. The caramel adds a chewy element that makes these even more addictive, if that's scientifically possible.
The Tropical Escape
Add 1/4 cup of toasted coconut to the graham cracker crumbs, and use coconut oil instead of butter in your brownie mix. Dip in dark chocolate and top with toasted coconut flakes. The tropical flavors transport you to a beach somewhere, even if you're eating these in February while wearing three sweaters. They're like a vacation in dessert form, minus the sunburn and overpriced cocktails.
Storing and Bringing It Back to Life
Fridge Storage
These bites keep beautifully in the fridge for up to a week — the cold actually improves the texture, making the chocolate snap and the brownie dense like fudge. Store them in an airtight container between layers of parchment paper to prevent them from sticking together. The marshmallow layer stays soft but not sticky, creating that perfect contrast. If they absorb any fridge odors (looking at you, leftover garlic pasta), just let them sit at room temperature for 10 minutes before serving — the chocolate coating protects most of the flavor, but they're like sponges for strong smells.
Freezer Friendly
These freeze like champions for up to three months, making them perfect for emergency dessert situations or surprise guests. Freeze them in a single layer first, then transfer to a freezer bag once solid — this prevents them from becoming a chocolate monolith. Thaw in the fridge overnight or at room temperature for 30 minutes. The chocolate might bloom (get white spots) but it doesn't affect the taste, just the appearance. Pro tip: hide a bag in the back of your freezer behind the frozen peas — they're less likely to get discovered by dessert thieves.
Best Reheating Method
While these are fantastic cold, you can bring them back to that fresh-baked magic with a quick warm-up. Microwave for 5-7 seconds — just enough to soften the chocolate slightly and make the marshmallow layer gooey again. Don't overdo it or you'll have chocolate soup. Alternatively, let them sit at room temperature for 20 minutes before serving. The chocolate regains its snap, the marshmallow softens, and the brownie returns to that perfect fudgy texture. Add a tiny splash of water to the container before microwaving — it steams them back to perfection without drying out the brownie.