I was in the middle of a chaotic Tuesday night, juggling a burnt lasagna, a squeaky dishwasher, and a craving that refused to be ignored. My roommate dared me to make something that would make even the most hardened pastry snob weep with joy, and I shouted back, “Challenge accepted.” The kitchen smelled like burnt garlic and regret, but the thought of a warm, caramel‑kissed custard tart was like a lighthouse in a storm. I rummaged through the pantry, found a lone package of puff pastry, and set out to create what would become my most obsessive bake ever.
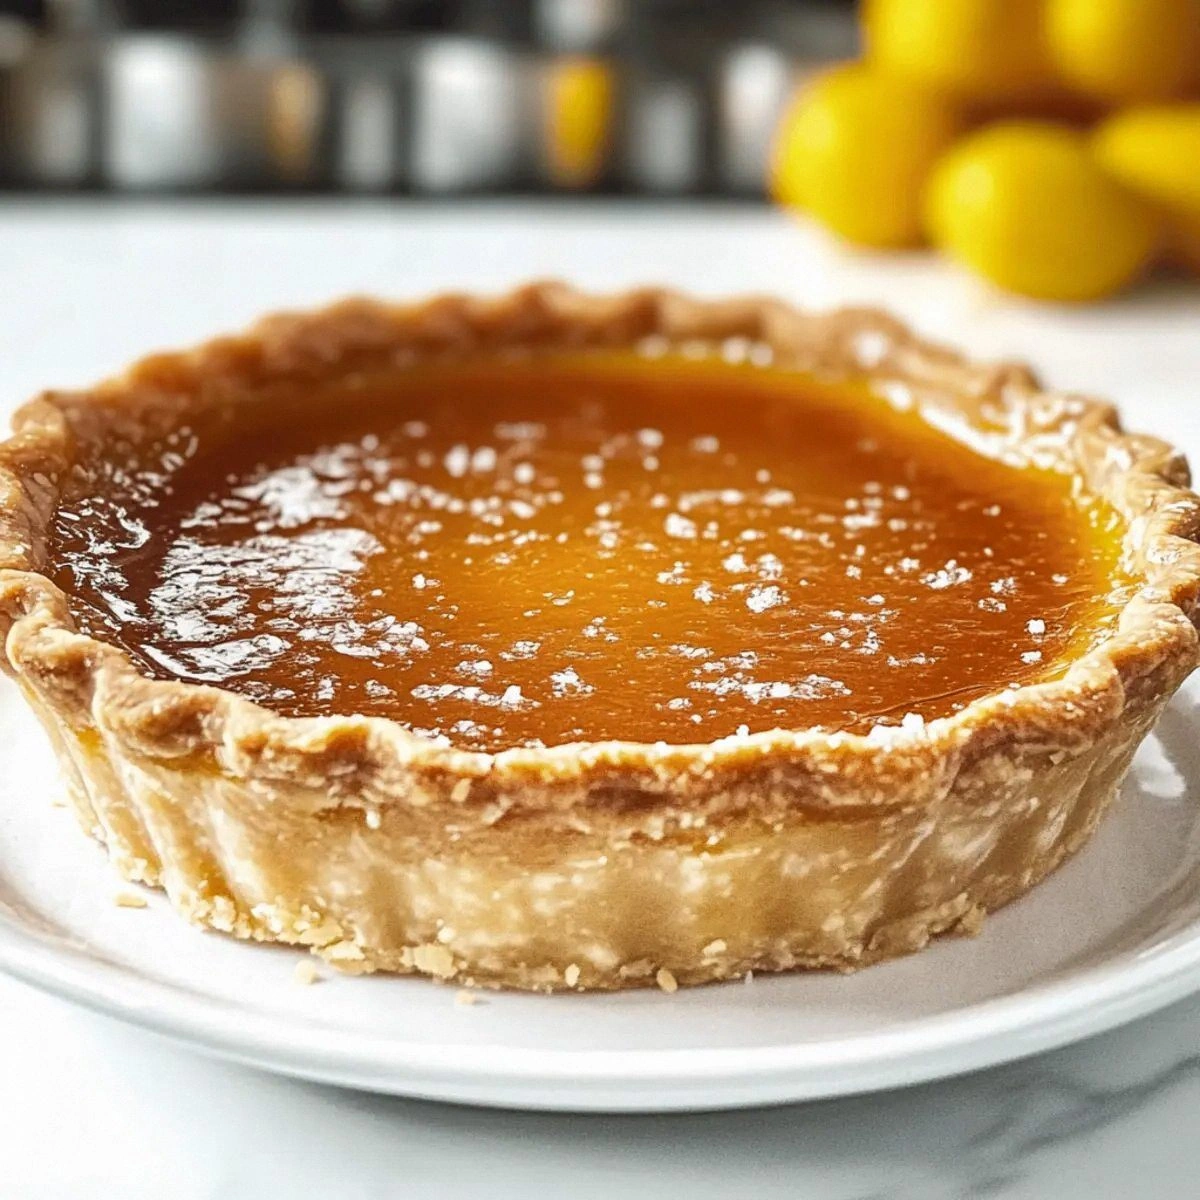
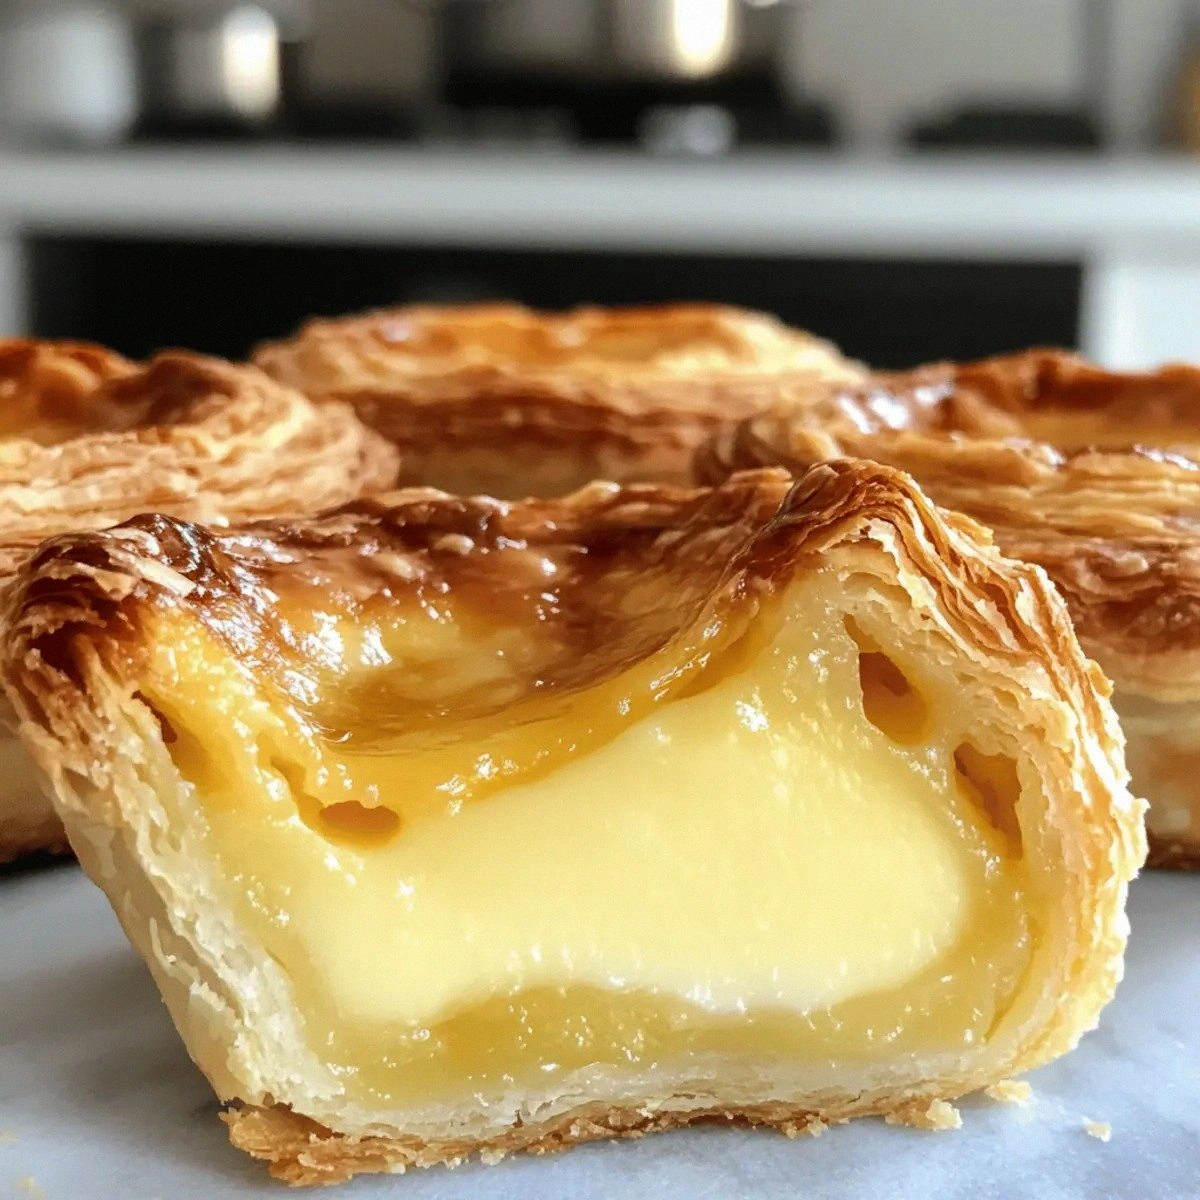
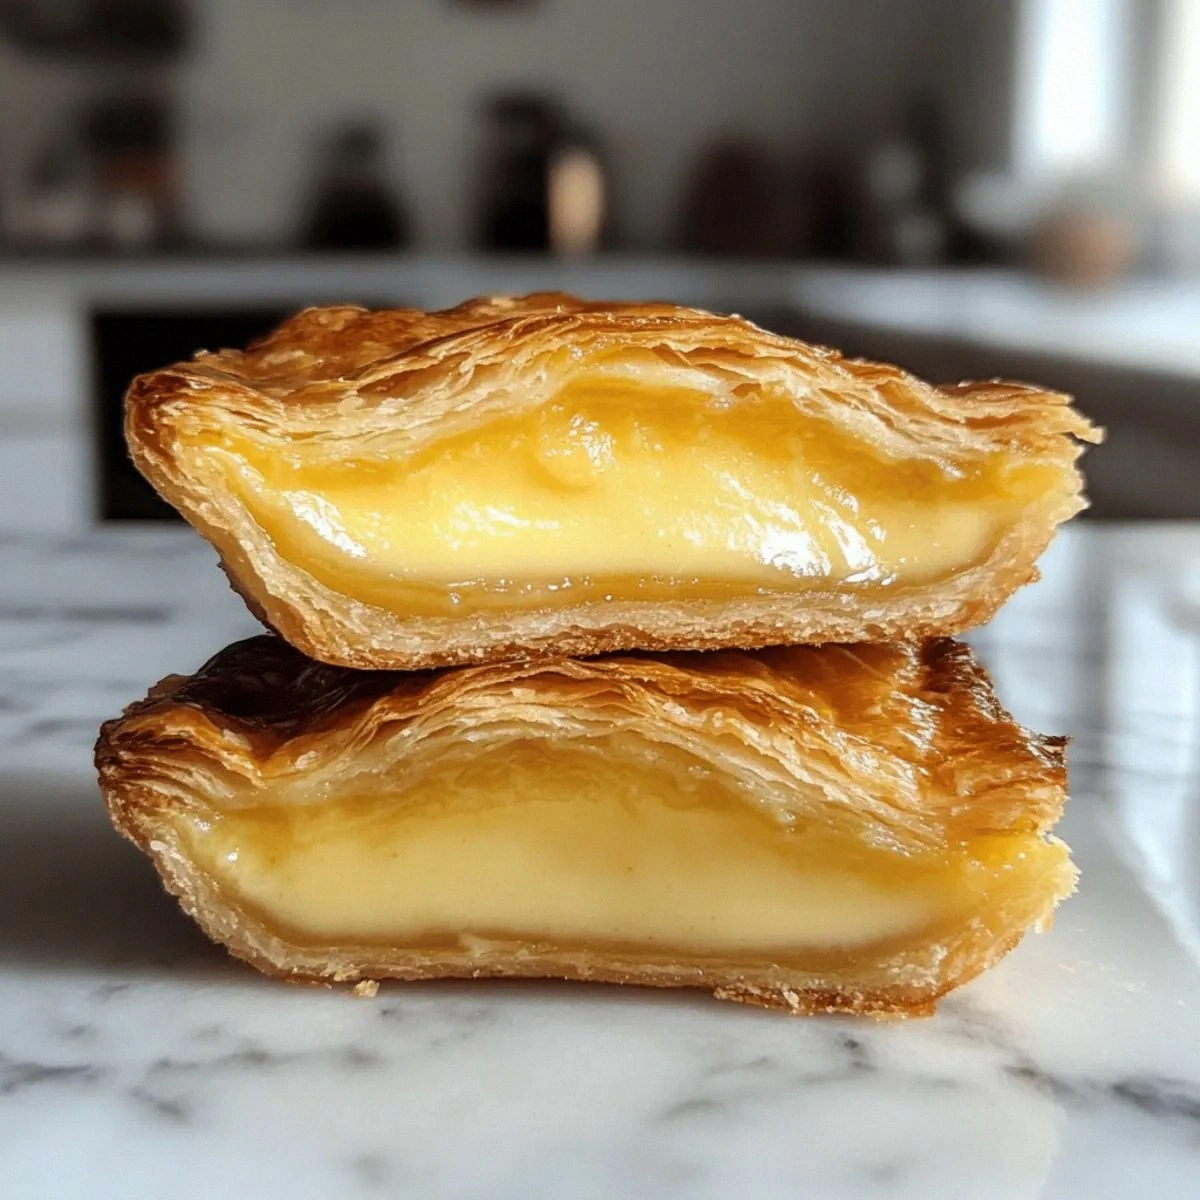
Picture this: a golden‑brown shell that crackles under your fork, revealing a silky, amber‑colored custard that glitters like sunrise on a calm sea. The first bite hits you with a buttery crunch that instantly gives way to a buttery‑rich, slightly citrusy cream that lingers on the tongue like a whispered secret. You can almost hear the faint sigh of the custard as it settles, and the faint whisper of cinnamon dances in the background, teasing your senses. The whole experience is a symphony of textures and flavors that makes you forget the burnt lasagna disaster entirely.
Most recipes for pastéis de nata either drown the custard in sugar or leave the pastry soggy, turning the whole thing into a sad, soggy mess. I’ve tried a dozen versions, and every time I ended up with a custard that was either too runny or a crust that fell apart like wet paper. That’s why this version is a game‑changer: it balances the custard’s creaminess with a perfectly flaky puff pastry, and it does so without any fancy equipment. The secret? A quick flash‑bake at blistering heat and a dash of lemon zest that cuts through the richness like a cool breeze on a hot day.
I’m about to hand you the exact technique that will transform a simple package of puff pastry into a masterpiece that could easily pass for a bakery’s best‑selling item. There’s a tiny twist involving a splash of heavy cream that makes the custard set like silk, and a sprinkle of ground cinnamon that adds a warm, comforting finish. Let me walk you through every single step — by the end, you’ll wonder how you ever made it any other way.
What Makes This Version Stand Out
- Texture: The puff pastry rises into a crisp, airy shell that shatters like delicate glass, while the custard stays luxuriously smooth, creating a contrast that’s pure perfection.
- Flavor: A subtle citrus zing from lemon zest balances the sweet vanilla, and the whisper of cinnamon adds depth without overpowering the buttery base.
- Simplicity: Only nine ingredients, all pantry‑friendly, and no need for a custard torch or a professional pastry bag.
- Speed: From prep to plate in under an hour, making it ideal for last‑minute gatherings or an indulgent weeknight treat.
- Visual Impact: The caramelized tops look like tiny golden suns, instantly drawing eyes and appetites alike.
- Make‑Ahead Potential: The tarts keep beautifully in the fridge for two days, and a quick re‑heat restores that fresh‑out‑of‑the‑oven magic.
- Ingredient Quality: Using real heavy cream and fresh lemon zest elevates the custard from ordinary to unforgettable.
- Universal Appeal: Whether you’re serving coffee‑break guests or a formal dessert table, these tarts win over every palate.
Inside the Ingredient List
The Flavor Base
Heavy cream is the heart of the custard, providing that luxurious, melt‑in‑your‑mouth richness that you associate with classic Portuguese tarts. If you skimp on the cream, the custard turns rubbery and loses its signature silkiness. For a dairy‑free twist, you can substitute a high‑fat coconut cream, but expect a subtle coconut undertone that will change the flavor profile.
Whole milk adds the necessary liquid balance, ensuring the custard isn’t overly dense. Skipping the milk or swapping it for skim milk will result in a thin, watery custard that can’t hold its shape during the high‑heat bake. When buying milk, opt for a fresh, full‑fat variety; the extra fat helps the custard set beautifully.
The Texture Crew
All‑purpose flour is the silent hero that stabilizes the custard, preventing it from curdling when it meets the scorching oven. Without the flour, the custard would separate, leaving you with a grainy, unappetizing mess. A gluten‑free alternative like cornstarch works in a pinch, but you’ll need to use a little less because it’s more potent.
Granulated sugar not only sweetens the custard but also aids in caramelization, giving the tops that signature amber hue. Using brown sugar adds a deeper molasses note, but it can also darken the custard too quickly, so keep an eye on the oven.
The Unexpected Star
Lemon zest is the surprise element that cuts through the richness, delivering a bright, aromatic punch that makes the flavor sing. If you forget the zest, the custard can feel heavy and one‑dimensional. Always use fresh zest; pre‑grated dried zest loses its essential oils and won’t provide the same zing.
Ground cinnamon adds a warm, comforting finish that pairs perfectly with the citrus. A pinch too much can dominate the flavor, so measure carefully. You can experiment with a pinch of nutmeg for a holiday twist, but remember that cinnamon is the classic match.
The Final Flourish
Puff pastry is the canvas that holds everything together. Its layers create the flaky, buttery shell that defines a great pastel de nata. If you use a low‑fat, low‑quality pastry, you’ll end up with a soggy, doughy bottom that ruins the whole experience. Look for a brand that promises at least 12 layers and keep the pastry cold until you’re ready to bake.
Vanilla extract rounds out the flavor, adding a sweet, aromatic background note that ties the citrus and cinnamon together. Real vanilla beans would be even more luxurious, but a good quality pure extract works just fine.
Everything's prepped? Good. Let's get into the real action…
The Method — Step by Step
Preheat your oven to a blistering 475°F (245°C). If you have a pizza stone, place it on the middle rack now; the stone will give the tart bottoms that coveted, ultra‑crisp base. While the oven heats, line a 12‑cup muffin tin with the puff pastry squares, pressing gently so they hug the sides of each cup. I dare you to taste this and not go back for seconds—the pastry will puff up dramatically, creating a little pocket for the custard.
In a medium saucepan, combine the heavy cream, whole milk, and half of the granulated sugar. Heat over medium‑low, stirring occasionally, until the mixture just begins to steam—do not let it boil. You’ll hear a gentle hiss, the sound of the sugar dissolving, and the aroma will start to turn buttery. This step is crucial because overheating will scorch the dairy, leaving a bitter aftertaste.
While the milk‑cream mixture warms, whisk together the egg yolks, the remaining sugar, flour, vanilla extract, lemon zest, and ground cinnamon in a large bowl. The mixture should look thick and glossy, with the flour fully incorporated but no lumps. This next part? Pure magic. The flour will coat the yolks, creating a protective barrier that prevents curdling later.
Once the milk‑cream is steaming, slowly pour it into the yolk mixture while whisking constantly. This tempering process is like a dance—steady, rhythmic, and you must keep the motion smooth to avoid scrambling the eggs. The custard will thicken instantly, turning a pale amber color. That sizzle when it hits the pan? Absolute perfection.
Kitchen Hack: Transfer the custard to a fine‑mesh sieve before filling the pastry shells; this removes any stray flour lumps and guarantees a silky texture.Let the custard rest for five minutes; during this time, the flavors meld, and the mixture becomes easier to pipe. If you’re in a hurry, you can speed this up by placing the bowl over an ice bath, but don’t chill it too much or it will become difficult to spread.
Using a spoon or a pastry bag, fill each puff pastry cup about three‑quarters full with the custard. The tops should be slightly exposed; this allows the caramelization to form a beautiful, glossy crust. Picture yourself pulling this out of the oven, the whole kitchen smelling incredible…
Place the muffin tin on the preheated pizza stone (or directly on the oven rack) and bake for 12‑15 minutes, or until the custard is set but still slightly wobbling in the center and the tops are deeply browned with tiny cracks. You’ll know it’s done when the edges start pulling away from the pastry and the tops have a caramelized sheen.
Watch Out: Do not over‑bake; the custard will become rubbery and the pastry may burn. Keep a close eye after the 10‑minute mark.When the tarts are beautifully caramelized, remove them from the oven and let them cool in the tin for five minutes. Then, gently lift each tart out with a thin spatula and transfer to a wire rack. The cooling step lets the custard finish setting and prevents the pastry from becoming soggy.
Serve warm, dusted with a light sprinkle of extra cinnamon if you like, or enjoy them straight out of the oven. The first bite should crack the flaky crust, revealing a glossy, custardy center that melts on your tongue. This is hands down the best version you'll ever make at home, and if anyone doubts it, just watch them go back for a second round.
That's it — you did it. But hold on, I've got a few more tricks that'll take this to another level...
Insider Tricks for Flawless Results
The Temperature Rule Nobody Follows
Your oven’s temperature gauge is often off by 10‑15 degrees, which can make or break the caramelization. Invest in an inexpensive oven thermometer and set the heat to exactly 475°F. If you notice the tops browning too quickly, lower the temperature by 10 degrees and extend the bake by a minute or two. This tiny adjustment ensures the custard stays creamy while the tops achieve that perfect amber glow.
Why Your Nose Knows Best
The moment the custard starts to caramelize, a sweet, almost burnt‑sugar aroma fills the kitchen. Trust that scent more than the timer; when you smell that deep, caramel note, the tarts are ready to pull out. Over‑reliance on the clock can lead to over‑baking, turning the custard into a rubbery surprise. Let your nose be the final judge.
The 5‑Minute Rest That Changes Everything
After baking, let the tarts rest for exactly five minutes on a wire rack. This short pause allows the custard to firm up just enough so it doesn’t ooze when you bite in, while still preserving that melt‑in‑your‑mouth feel. Skipping this step results in a soggy bottom and a custard that slides out of the pastry like a runaway train.
Freeze‑Then‑Bake for Extra Crispness
If you have extra time, pop the assembled, uncooked tarts (filled with custard) in the freezer for 20 minutes before baking. The cold pastry will steam less, resulting in a crisper bottom and a higher rise. This technique is especially useful when making a large batch for a party.
The Secret of the Lemon Zest
Always zest the lemon right before you add it to the custard. The essential oils evaporate quickly, and a fresh zest delivers a punch of citrus that dried zest can’t match. If you accidentally zest too much, balance it with an extra pinch of sugar to keep the sweetness in harmony.
Don’t Over‑Whisk the Egg Yolks
When whisking the yolks with sugar and flour, stop as soon as the mixture looks glossy. Over‑whisking incorporates too much air, which can cause the custard to puff up unevenly in the oven, creating unsightly bubbles. Keep the motion gentle and purposeful.
Creative Twists and Variations
This recipe is a playground. Here are some of my favorite ways to switch things up:
Chocolate‑Swirl Delight
Add a tablespoon of melted dark chocolate to the custard before filling. The chocolate creates marbled ribbons that melt into the caramelized top, offering a bittersweet contrast that chocolate lovers will adore.
Berry‑Infused Bliss
Stir in a quarter cup of raspberry puree into the custard for a tangy burst. The bright red hue looks stunning against the golden crust, and the slight tartness balances the richness beautifully.
Spiced Chai Variation
Replace the ground cinnamon with a chai spice blend (cardamom, ginger, cloves, and a pinch of black pepper). This gives the tarts an exotic warmth that’s perfect for chilly evenings.
Nutty Crunch Surprise
Fold in a tablespoon of finely chopped toasted almonds into the custard. The nuts add a subtle crunch that contrasts the smooth custard, and the toasted flavor deepens the overall profile.
Vegan Coconut Dream
Swap heavy cream for full‑fat coconut cream, use a plant‑based puff pastry, and replace egg yolks with silken tofu blended with a bit of turmeric for color. The result is a dairy‑free tart that still boasts that iconic caramelized top.
Storing and Bringing It Back to Life
Fridge Storage
Place the cooled tarts in an airtight container and store them in the refrigerator for up to 48 hours. The custard will firm slightly, but the pastry remains pleasantly crisp if you keep it covered loosely with parchment to avoid moisture buildup.
Freezer Friendly
If you want to make a big batch, freeze the baked and cooled tarts on a parchment sheet, then transfer them to a zip‑top freezer bag. They’ll keep for up to three months. When you’re ready to serve, let them thaw in the fridge for an hour, then re‑heat.
Best Reheating Method
Preheat your oven to 350°F (175°C). Place the tarts on a baking sheet, add a tiny splash of water (about a teaspoon) to the bottom of the sheet, and cover loosely with foil. Heat for 8‑10 minutes; the water creates gentle steam that revives the custard’s silkiness while the foil protects the crust from over‑browning. Remove the foil for the last two minutes if you crave extra crispness.