I was standing in my kitchen at 2 a.m., half‑asleep, staring at a bowl of plain cocoa batter that looked more like a sad mud puddle than a promise of dessert. I had just tried to copy a “quick chocolate cupcake” from a random blog, and the result was a dry, crumbly nightmare that could double as a building material. I dared my roommate to taste it, and she politely declined, eyes wide with the kind of horror only a bad bake can inspire. That night, I made a pact with myself: I would never let another cupcake betray my cravings again.
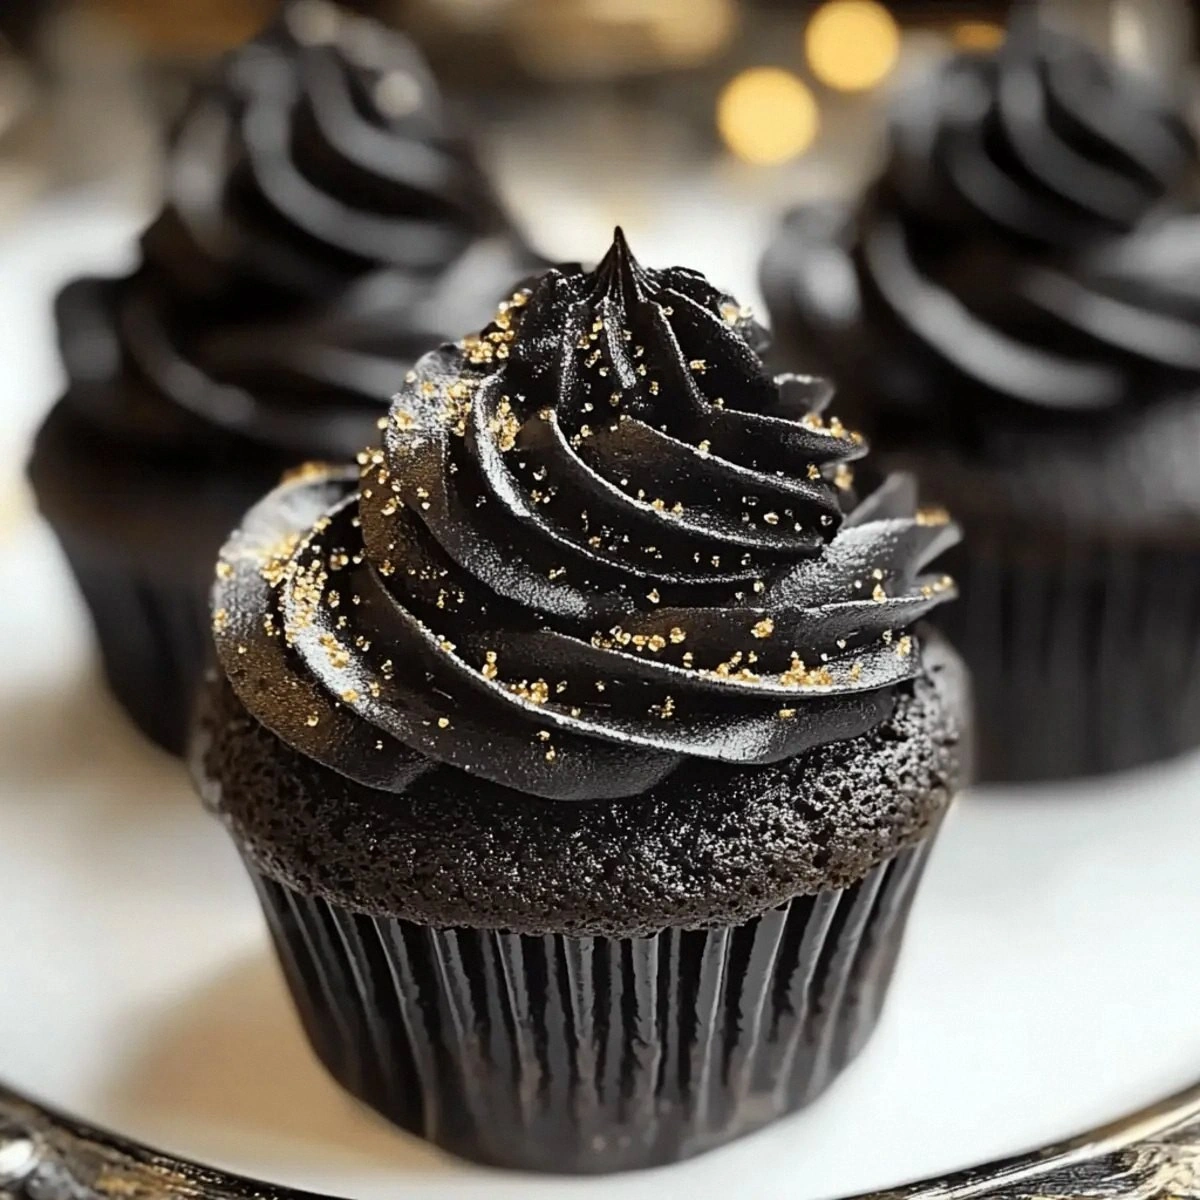
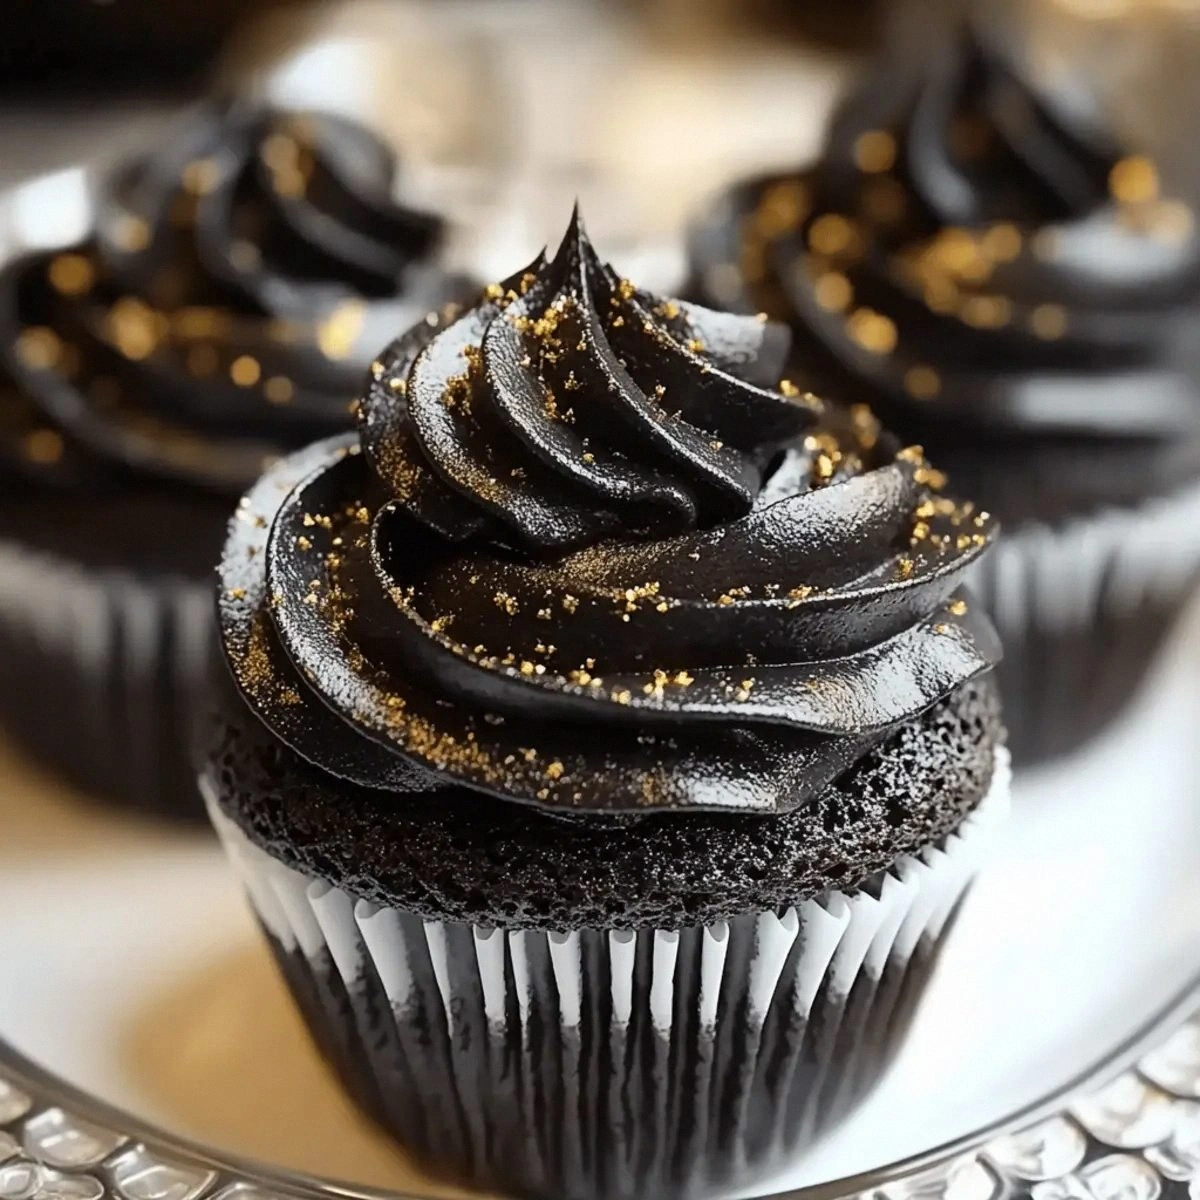
Fast forward three weeks, a rainy Thursday, and a sudden craving for something dark, silky, and just a little bit sinful. I rummaged through my pantry, grabbed a handful of cocoa, a splash of buttermilk, and a tiny bottle of black food coloring that I’d bought on a whim for a Halloween cocktail. The kitchen filled with the sweet, earthy perfume of chocolate mingling with the buttery scent of melted butter, and the oven’s low hum became the soundtrack to a culinary breakthrough. When the first batch emerged, the tops were glossy as midnight silk, the crumb was as tender as a cloud, and the frosting—oh, the frosting—was a tangy, buttery hug that made the whole thing feel like a secret love affair.
What makes these cupcakes different from every other “black velvet” you’ve seen on Instagram? First, the batter is a perfect marriage of cocoa and buttermilk, creating a chemical reaction that keeps the crumb unbelievably moist. Second, the addition of a few drops of black food coloring isn’t just for show; it deepens the chocolate flavor and gives the cupcakes a dramatic, almost theatrical look. Third, the dual‑frosting strategy—silky cream cheese frosting paired with a light vanilla buttercream—creates a flavor contrast that makes each bite feel like a surprise party in your mouth. I’ll be honest — I ate half the batch before anyone else got a chance to try them, and I’m still not sorry.
Picture yourself pulling these cupcakes out of the oven, the whole kitchen smelling like a boutique chocolate shop on a rainy day, the steam rising in soft curls as the frosting softens into a glossy sheen. I dare you to taste this and not go back for seconds. This is hands down the best version you’ll ever make at home, and I’m about to walk you through every single step — by the end, you’ll wonder how you ever made it any other way. Okay, ready for the game‑changer?
What Makes This Version Stand Out
- Moisture: The buttermilk reacts with the cocoa and baking soda to create tiny air pockets that keep the crumb soft for days. Even a day later, the cupcakes still feel like they were just out of the oven.
- Depth of Flavor: Unsweetened cocoa paired with a dash of black food coloring intensifies the chocolate notes, giving you a taste that’s richer than any store‑bought mix.
- Texture Contrast: A light, airy crumb meets a luxuriously creamy cream cheese frosting, while the vanilla buttercream adds a sweet, buttery finish.
- Simplicity: Only ten pantry staples and two frosting batches are needed—no exotic ingredients, no fancy equipment, just a trusty mixer and a good oven.
- Crowd Reaction: Friends call them “the black velvet bomb” and beg for the recipe after the first bite. Expect endless requests.
- Make‑Ahead Potential: Freeze the cupcakes unfrosted, then thaw and frost when you need them. The texture holds up beautifully.
- Visual Drama: The deep midnight hue looks stunning on a platter, making them perfect for celebrations or a low‑key indulgence.
- Ingredient Quality: Using high‑quality cocoa powder and real butter makes the flavor sing, while the buttermilk ensures that signature melt‑in‑your‑mouth texture.
Inside the Ingredient List
The Flavor Base
All‑Purpose Flour is the backbone of any cake, providing structure while still allowing the batter to rise. Using 1.5 cups ensures a tender crumb without turning the cupcakes dense. If you substitute cake flour, you’ll get an even softer texture, but you’ll need to reduce the amount by about 10 % to avoid a gummy result. Choose a flour that feels heavy in your hand; cheap bleached flour can sometimes taste flat.
Unsweetened Cocoa Powder brings the deep, earthy chocolate flavor that defines these cupcakes. One cup is a generous amount, but it also adds a natural bitterness that balances the sugar. For a richer taste, opt for a Dutch‑process cocoa, which has been alkalized and offers a smoother finish. If you only have sweetened cocoa on hand, cut the sugar by half to keep the sweetness in check.
The Texture Crew
Granulated Sugar does more than sweeten; it helps aerate the batter when creamed with the oil and eggs, creating those airy pockets we love. One cup is the sweet spot for a balanced flavor. If you prefer a less sweet cupcake, you can trim the sugar down to ¾ cup, but expect a slightly less tender crumb.
Baking Soda and Baking Powder are the dynamic duo of leavening. The soda reacts with the acidity of the buttermilk, giving the cupcakes their rise, while the powder provides an extra lift for an even crumb. Both are measured at one teaspoon each; swapping them for double‑acting powder alone can make the cupcakes rise too quickly and then collapse.
Salt isn’t just a flavor enhancer; it amplifies the chocolate and balances the sweetness. One teaspoon might sound like a lot, but it’s essential for depth. If you’re on a low‑sodium diet, you can halve it, but you’ll notice a flatter taste.
The Unexpected Star
Buttermilk is the secret weapon that keeps these cupcakes moist for days. Its acidity reacts with the baking soda, creating carbon dioxide bubbles that give the cupcakes that airy lift. One cup is perfect; if you don’t have buttermilk, mix 1 cup of milk with 1 tablespoon of lemon juice or white vinegar and let it sit for five minutes.
Vegetable Oil replaces butter in the batter for a tender crumb that stays soft even after cooling. Half a cup is enough to coat each crumb with moisture without making the cupcakes greasy. For a richer flavor, you can substitute half the oil with melted unsalted butter, but keep an eye on the texture.
Eggs act as binders and add richness. Two large eggs are just right; they create a glossy batter that traps air. If you’re vegan, replace each egg with ¼ cup of unsweetened applesauce or a commercial egg replacer, but expect a slightly different texture.
The Final Flourish
Vanilla Extract provides a fragrant backdrop that lifts the chocolate without overpowering it. Two teaspoons are enough to perfume the batter. If you have a vanilla bean, split it, scrape the seeds, and use the pod in the buttermilk for an even more aromatic experience.
A few drops of Black Food Coloring are purely aesthetic, but they also deepen the chocolate flavor by adding a touch of mineral richness. Don’t overdo it—just enough to turn the batter a deep midnight hue.
The two frosting components are where the magic truly happens. A batch of Cream Cheese Frosting adds a tangy, velvety contrast, while a batch of Vanilla Buttercream brings a light, sweet finish. Together they create a flavor duet that keeps you reaching for more.
Everything's prepped? Good. Let’s get into the real action…
The Method — Step by Step
Preheat your oven to 350°F (175°C) and line a 12‑cup muffin tin with paper liners. While the oven warms, give the liners a quick spray of non‑stick spray; this tiny step prevents any sticking drama later on. When the heat settles, you’ll hear a faint “whoosh” from the oven, a promising sign that the air inside is ready to cradle your cupcakes.
In a large bowl, whisk together the flour, cocoa powder, baking soda, baking powder, and salt. Sift this mixture three times to ensure there are no clumps—this is the moment where the batter becomes a velvety dark river. The scent of cocoa should already be intoxicating, and the texture will feel like fine sand.
In a separate bowl, combine the granulated sugar, vegetable oil, and the black food coloring. Beat with a handheld mixer on medium speed until the sugar begins to dissolve and the mixture takes on a glossy, almost metallic sheen.
Kitchen Hack: Add a pinch of instant coffee granules to the sugar‑oil mix; it amplifies the chocolate flavor without adding a coffee taste.Add the eggs, one at a time, to the sugar‑oil mixture, beating well after each addition. Then stir in the vanilla extract. The batter should look glossy and slightly thick, like a dark silk ribbon. If you pause to sniff, you’ll notice a sweet, buttery aroma that hints at the final product.
Now comes the crucial wet‑dry marriage. Gently fold the dry ingredients into the wet mixture in three additions, alternating with the buttermilk. Start and end with the dry mix. Use a rubber spatula and a gentle hand—over‑mixing will develop gluten and ruin the tender crumb.
Watch Out: If you see streaks of flour that won’t disappear, you’ve over‑mixed. Stop mixing immediately and move on; the cupcakes will still rise, but the texture may be denser.Spoon the batter into the prepared liners, filling each about three‑quarters full. The batter should sit in the tin like a dark, glossy puddle, ready to puff up. Tap the tin lightly on the counter to release any trapped air bubbles; you’ll hear a soft “pop” that signals a smoother crumb.
Bake for 18‑22 minutes, or until a toothpick inserted into the center comes out with just a few moist crumbs. The tops will have a slight domed shape and a faint crackle—this is the moment of truth. Rotate the tin halfway through baking for an even rise; the oven’s heat can be mischievous.
While the cupcakes cool, whip up the cream cheese frosting and vanilla buttercream. For the cream cheese frosting, beat softened cream cheese with powdered sugar, a pinch of salt, and a splash of vanilla until fluffy. For the buttercream, cream butter, powdered sugar, and vanilla until light and airy.
Kitchen Hack: Chill the butter for 10 minutes before beating; it will hold peaks better and give a smoother frosting.Once the cupcakes are completely cool (touch them; they should feel room temperature), pipe a generous swirl of cream cheese frosting, then finish with a light dollop of vanilla buttercream on top. The two frostings should mingle at the edges, creating a marbled effect that looks as good as it tastes. Serve immediately or store as instructed below.
That’s it — you did it. But hold on, I’ve got a few more tricks that’ll take this to another level…
Insider Tricks for Flawless Results
The Temperature Rule Nobody Follows
Never bake cupcakes straight from the fridge. Let the batter sit at room temperature for five minutes before pouring it into the tin. This small pause equalizes the batter’s temperature, ensuring the edges don’t set before the center has a chance to rise. One friend tried to skip this step and ended up with cupcakes that had a “crusty” rim—definitely not the melt‑in‑your‑mouth experience we’re after.
Why Your Nose Knows Best
When the cupcakes are about 15 minutes into baking, open the oven briefly and inhale. You should catch a faint, toasted chocolate aroma; if you smell nothing, the oven may be too cool, and you’ll need to bump the temperature up by 10 °F. Trust your nose—it's the most reliable timer in the kitchen.
The 5‑Minute Rest That Changes Everything
After removing the cupcakes from the oven, let them rest in the tin for exactly five minutes before transferring them to a wire rack. This short rest allows the steam to finish the cooking process gently, preventing a soggy bottom while keeping the crumb airy. Skipping this step often leads to cupcakes that crumble when you try to frost them.
Frosting Fusion Technique
When piping the two frostings, start with the cream cheese layer and, before it sets, swirl in the vanilla buttercream using a small offset spatula. This creates a marbled ribbon that looks professional without the need for a fancy piping bag. I tried a “clean‑cut” approach once, and the result was a stark division—less appealing.
The Final Cool‑Down
If you’re planning to serve the cupcakes within an hour, place the frosted cupcakes in a low‑heat oven (about 150°F) for ten minutes. This gentle warming sets the frosting and brings out the chocolate aroma even more. It’s a pro tip that makes the cupcakes feel like they’ve just come out of a boutique bakery.
Creative Twists and Variations
This recipe is a playground. Here are some of my favorite ways to switch things up:
Espresso Explosion
Add one tablespoon of instant espresso powder to the dry ingredients. The coffee deepens the chocolate flavor and adds a subtle bitterness that balances the sweet frostings. Perfect for a brunch where you need a caffeine kick.
Cherry Velvet
Fold in ½ cup of chopped dried cherries into the batter before baking. The tartness of the cherries contrasts beautifully with the rich chocolate, and the bursts of fruit make each bite exciting.
Nutty Crunch
Stir in ¼ cup of toasted, finely chopped hazelnuts or almonds. The nuts add a pleasant crunch and a buttery note that pairs wonderfully with the cream cheese frosting.
Spiced Velvet
Add a pinch of ground cinnamon, a dash of nutmeg, and a tiny pinch of cayenne pepper to the dry mix. The warm spices give the cupcakes a cozy, autumnal feel without overwhelming the chocolate.
White Chocolate Swirl
Melt ½ cup of white chocolate and swirl it into the batter just before filling the liners. The ribbons of white chocolate create a visual contrast and a sweet surprise that melts in the mouth alongside the dark chocolate.
Storing and Bringing It Back to Life
Fridge Storage
Place frosted cupcakes in an airtight container and store them in the refrigerator for up to five days. The frosting will stay firm, and the cupcakes will retain moisture. Before serving, let them sit at room temperature for 20 minutes to soften the frosting.
Freezer Friendly
Unfrosted cupcakes freeze beautifully. Wrap each cupcake individually in plastic wrap, then place them in a zip‑top freezer bag. They’ll keep for up to three months. To thaw, move them to the fridge overnight, then bring to room temperature and frost.
Best Reheating Method
When you need to reheat a frosted cupcake, place it on a microwave‑safe plate, add a tiny splash (about a teaspoon) of water around the base, and microwave for 10‑12 seconds. The steam revives the crumb, and the frosting softens without melting.