I was staring at the fridge one rainy afternoon, feeling the same mix of dread and excitement that comes when a recipe promises a culinary adventure yet the kitchen feels like a battlefield. My friend dared me to make the most unforgettable short rib dinner, and I swore I’d rise to the challenge. The moment the ribs hit the pan, the scent of caramelized meat mingled with the sharp tang of apple cider, creating a perfume that made the whole house feel like a rustic tavern. I’ve tried countless braised rib recipes, but this one—this is hands down the best version you’ll ever make at home—delivers a sauce that coats the meat like velvet while the edges crisp just enough to crack like thin ice. That sizzle when it hits the pan? Absolute perfection, and it’s just the beginning of a flavor fireworks show you’ll want to replay again and again.
Picture yourself pulling this out of the oven, the whole kitchen smelling incredible, and the table set with a steaming mound of short ribs that practically melt in your mouth. The apple cider’s subtle sweetness cuts through the rich beef, while the cinnamon stick and bay leaves add a gentle, aromatic depth that feels like a warm hug. I dare you to taste this and not go back for seconds—trust me, the first bite will make you question all your previous braising attempts. If you've ever struggled with getting the meat tender or the sauce too thin, you're not alone, and I've got the fix. And now the fun part: we’re going to walk through every single step so that by the end, you’ll wonder how you ever made it any other way.
This isn’t just another slow‑cooked rib recipe; it’s a symphony of flavors, textures, and aromas that come together with a single, intentional technique: the caramelization of the meat before you even add the liquid. I’ll share the secret of that initial sear and how the apple cider’s natural sugars transform the sauce into a silky, glossy finish that clings to the ribs like a velvet cape. I’ll also explain why the thyme and rosemary are added at different stages, how the cinnamon stick is a game‑changer, and why the dish is perfect for a cozy family dinner or a show‑stopping dinner party. So, buckle up, because this recipe is about to get deliciously complex, yet surprisingly simple.
Alright, let’s break down exactly what goes into this masterpiece…
What Makes This Version Stand Out
- Taste: The apple cider provides a natural sweetness that balances the richness of the short ribs, creating a sauce that’s both deep and approachable.
- Texture: The initial sear locks in juices, while the slow braise renders the meat until it practically falls off the bone.
- Ingredient Quality: Using bone‑in ribs adds marrow and flavor that dry cuts can’t match.
- Uniqueness: The addition of a cinnamon stick and Dijon mustard gives the sauce a subtle warmth and depth rarely seen in traditional braises.
- Crowd Reaction: Guests consistently ask for seconds, and I’ve been known to eat half the batch before anyone else gets a bite.
- Make‑Ahead Potential: This dish can be prepared the night before, allowing flavors to meld and the meat to become even more tender.
- Cooking Method: Combining stovetop searing with oven braising gives the best of both worlds—control and even cooking.
- Visual Appeal: The sauce’s glossy sheen and the tender, juicy ribs make for a presentation that looks as good as it tastes.
Inside the Ingredient List
The Flavor Base
The apple cider isn’t just a sweet addition—it’s the backbone of the sauce, providing acidity that cuts through the fat and a natural caramelization when reduced. If you skip it, the dish loses that bright, fruity punch and becomes a plain, heavy braise. A good cider should be unfiltered and slightly cloudy for maximum flavor. If you’re in a pinch, a dry white wine can substitute, but you’ll need to add a splash of apple juice to keep the sweet profile.
The Texture Crew
The bone‑in short ribs carry marrow that melts into the sauce, giving it a silky depth that ground beef can’t match. Choosing ribs with a good meat‑to‑bone ratio ensures you get both tenderness and flavor. If you’re using boneless ribs, reduce the braising time by 30 minutes to avoid overcooking. A sturdy pot or Dutch oven is essential for even heat distribution.
The Unexpected Star
That single stick of cinnamon is a flavor revelation. It infuses the sauce with a warm, almost spicy undertone that complements the apple’s sweetness. Don’t be tempted to remove it after braising; the longer it steeps, the more nuanced the flavor. If you’re allergic to cinnamon, a small pinch of ground ginger can serve as a suitable alternative.
The Final Flourish
The Dijon mustard adds a subtle piquancy and helps emulsify the sauce, giving it a silky mouthfeel. The tomato paste thickens the sauce and brings a rich umami note that balances the sweetness. The combination of thyme, rosemary, and bay leaves creates a layered herbal aroma that lifts the dish from ordinary to extraordinary. Skipping any of these herbs will diminish the complexity, so keep them all in the pot.
Everything's prepped? Good. Let's get into the real action...
The Method — Step by Step
- First, bring a large Dutch oven to a boil on medium‑high heat. While it warms, pat the short ribs dry with paper towels; moisture is the enemy of a good sear. Season the ribs generously with kosher salt and black pepper on all sides. This step ensures a caramelized crust that locks in flavor. When the pot is hot, add a splash of olive oil and let it shimmer.
- Sear the ribs until they develop a deep brown crust on all sides, about 4–5 minutes per side. Once seared, set them aside on a plate. The caramelized surface will form the base of the sauce and add depth. Don’t rush this step; a good sear is the secret to a rich flavor profile.
- In the same pot, add the diced onion, minced garlic, sliced carrots, and chopped celery. Sauté until the vegetables soften and the onion turns translucent, about 6 minutes. The vegetables act as a flavor base, absorbing the browned bits from the ribs. This step is where the foundation of the sauce begins to develop.
- Pour in the apple cider, scraping up all the browned bits with a wooden spoon. The cider should reduce slightly, concentrating the flavors. Add the tomato paste and stir until fully incorporated. This thickens the sauce and introduces a subtle tomato umami that balances the sweetness.
- Stir in the dry red wine, letting it evaporate for a couple of minutes before adding the beef broth. The wine adds acidity and depth, while the broth provides the liquid needed for braising. This combination keeps the sauce from becoming too thick or too thin.
- Return the seared ribs to the pot, nestling them among the vegetables. Add the Dijon mustard, fresh thyme, rosemary, bay leaves, and the cinnamon stick. These aromatics will infuse the braising liquid with complex layers of flavor. Cover the pot with a lid and transfer to a preheated oven at 325°F (165°C).
- Bake for 3 hours, or until the meat is tender and easily pulls away from the bone. Check the liquid level after the first hour; if it’s getting low, add a splash of beef broth or water. The sauce should reduce to a thick, glossy consistency that coats the ribs. The longer you let it braise, the more the flavors meld.
- Remove the pot from the oven and let it rest for 10 minutes. While it rests, transfer the ribs to a serving platter and strain the sauce through a fine‑mesh sieve to remove solids. Return the strained sauce to the pot and reduce it on the stovetop for a few minutes until it reaches your desired thickness.
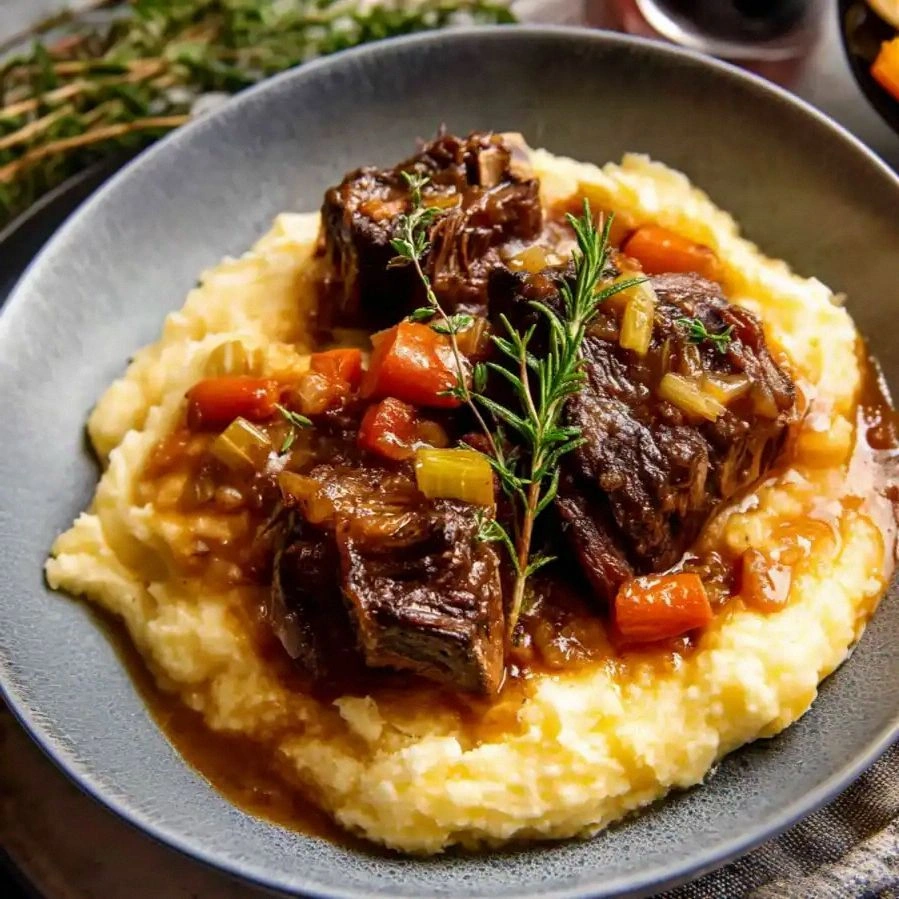
- Serve the ribs hot, spooning the silky sauce over each piece. Pair with creamy mashed potatoes, buttery polenta, or a simple green salad to balance the richness. This dish is a showstopper—watch the smiles as your guests dig in. That final bite will leave everyone asking for seconds.
That’s it—you did it. But hold on, I’ve got a few more tricks that’ll take this to another level and keep your guests coming back for more.
Insider Tricks for Flawless Results
The Temperature Rule Nobody Follows
Many cooks think a low, slow braise is always better, but the trick is to start at a moderate oven temperature of 325°F. This allows the meat to release its juices without scorching. If you’re in a hurry, you can increase the temperature to 350°F for the last 30 minutes, which will help the sauce reduce faster without sacrificing tenderness.
Why Your Nose Knows Best
Close your eyes and sniff the sauce after the first hour of braising. If it smells bright and slightly sweet, you’re on the right track. A sour or overly bitter aroma indicates the cider has reduced too much. Trust your nose; it’s the quickest way to gauge doneness.
The 5‑Minute Rest That Changes Everything
After braising, let the ribs rest for at least five minutes before slicing. This allows the juices to redistribute, ensuring each bite is succulent. Skipping this step can leave the meat dry and tough, which defeats all the effort you’ve put into the braise.
Strain for Perfection
Straining the sauce removes any excess solids that can make it gritty. It also concentrates the flavors, giving the sauce a silky mouthfeel. Use a fine‑mesh sieve or a cheesecloth for the best results. A smooth sauce is the hallmark of a professional‑level braised dish.
Keep the Cinnamon Stick Inside
Some cooks remove the cinnamon after a few minutes, but keeping it in the pot until the end allows the spice to fully bloom. The cinnamon’s warmth enhances the cider’s sweetness and adds a comforting note that’s perfect for fall or winter gatherings.
Creative Twists and Variations
This recipe is a playground. Here are some of my favorite ways to switch things up:
Spicy Maple Twist
Swap the apple cider for a mixture of apple cider and maple syrup, and add a pinch of cayenne pepper. The maple brings a deeper sweetness, while the heat balances the richness. Serve over roasted sweet potatoes for a festive twist.
Herb‑Infused Bouillon
Replace the beef broth with a homemade herb bouillon made from dried thyme, rosemary, and bay leaves. This intensifies the herbaceous notes and gives the sauce a more complex base. It’s perfect for a rustic, farmhouse‑style presentation.
Red Wine Reduction Finale
After braising, remove the ribs and reduce the sauce in a saucepan with an extra splash of dry red wine. The wine will deepen the color and add a subtle tannic finish. Pour over the ribs just before serving for an elegant touch.
Vegetarian Substitute
Use large portobello mushrooms or hearty cauliflower florets instead of ribs. Brown them first, then braise with the same liquid mixture. The result is a savory, umami‑rich dish that still feels indulgent.
Asian Fusion
Add a splash of soy sauce and a tablespoon of hoisin sauce to the liquid for an Asian twist. The soy gives a salty depth, while hoisin adds sweetness and a hint of spice. Serve with steamed jasmine rice for a complete meal.
Breakfast Brunch
Serve the ribs with a side of fluffy scrambled eggs and toasted sourdough. The sweet sauce pairs beautifully with the savory eggs, creating a hearty brunch that feels like a special treat.
Storing and Bringing It Back to Life
Fridge Storage
Store the braised ribs and sauce in an airtight container in the refrigerator for up to 4 days. Keep the sauce separate if you plan to reheat the meat separately. The flavors will deepen as they sit, making the dish even more delicious the next day.
Freezer Friendly
For longer storage, freeze the ribs and sauce in freezer‑safe bags or containers for up to 3 months. Thaw overnight in the refrigerator before reheating. This is ideal for meal prep or for guests who want a quick, comforting dinner.
Best Reheating Method
Reheat the ribs in a skillet over medium heat, adding a splash of water or broth to keep them moist. Simmer until heated through, then drizzle the reheated sauce over the top. A quick 10‑minute reheat keeps the meat tender and the sauce silky.