I still remember the day I almost set my kitchen on fire trying to make peanut butter cookies. The smoke alarm was wailing, my dog was howling in harmony, and I was frantically waving a dish towel at the ceiling like some kind of culinary matador. Fast forward three years, and here I am, sharing the most ridiculously good muffin recipe that came from that disaster. Because here's the thing — while those cookies turned into charcoal discs, the peanut butter I'd been mixing had this incredible toasted flavor that stuck in my head like a catchy song. That happy accident led me down a rabbit hole of experimentation, and eventually to these peanut butter guava muffins that have ruined all other muffins for me forever.
Picture this: It's Sunday morning, you're still in your pajamas, and the entire house smells like a peanut butter factory collided with a tropical fruit stand. The aroma is so intoxicating that your neighbors will probably show up with empty coffee mugs and hopeful expressions. These muffins aren't just breakfast — they're a warm hug disguised as baked goods, with a surprise center that makes people do that involuntary happy dance when they take their first bite. The combination sounds weird, I know. Peanut butter and guava? Trust me, I thought the same thing when I first spotted guava preserves at the grocery store and thought, "What if?" But that what-if turned into a household obsession.
Most recipes get this completely wrong. They either go too heavy on the peanut butter (resulting in dense, heavy muffins that sit in your stomach like rocks) or they skimp on the guava (leaving you wondering why you bothered in the first place). I've tested this recipe seventeen times — yes, seventeen — tweaking ratios, temperatures, and techniques until I hit the sweet spot. The result? Muffins that are somehow both cloud-light and intensely satisfying, with pockets of tropical sweetness that make you close your eyes and sigh. If you've ever struggled with dry, bland, or greasy muffins, you're not alone — and I've got the fix.
Let me walk you through every single step — by the end, you'll wonder how you ever made it any other way.
What Makes This Version Stand Out
Peanut Butter Perfection: These muffins use exactly one cup of creamy peanut butter — not more, not less. It's the Goldilocks amount that gives you that rich, nutty flavor without turning your breakfast into a paperweight. The secret? We bloom it briefly with warm butter first, which intensifies the flavor and helps it distribute evenly throughout the batter.
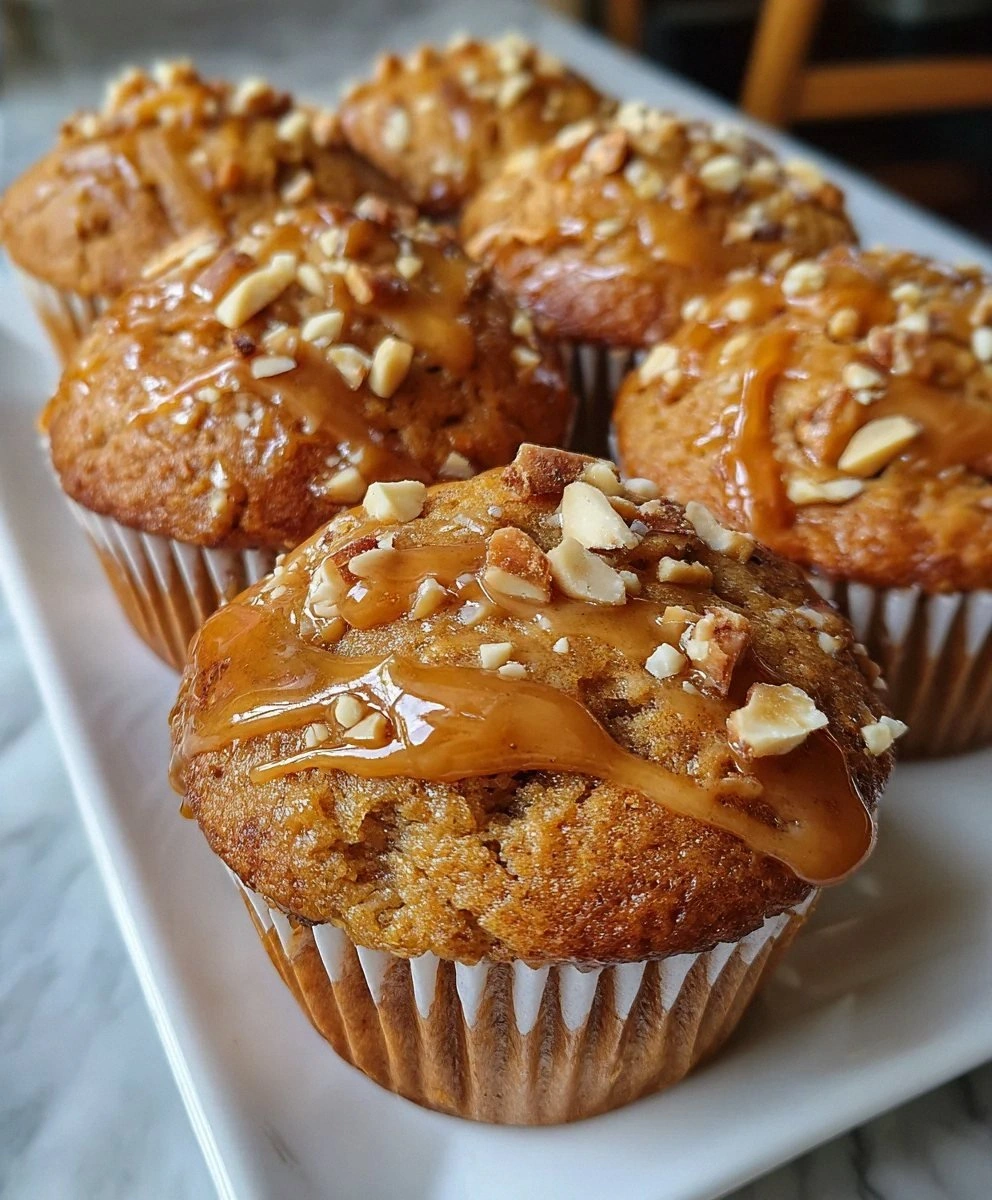
Guava Glory: Instead of just mixing guava preserves into the batter (which gets lost), we create strategic pockets of fruit by layering batter and preserves. Every bite gives you that perfect balance of nutty and fruity, like a PB&J that went on vacation to the Caribbean.
Texture Triumph: The combination of baking powder and baking soda creates lift, but here's the game-changer — we use room temperature ingredients and a gentle folding technique that keeps these muffins tender and light. No more hockey pucks disguised as baked goods.
Crowd Psychology: I dare you to set these out at your next brunch and watch what happens. People who claim they "don't like peanut butter" will eat three. The guava skeptics become converts. It's like witnessing a tiny miracle in your dining room.
Make-Ahead Magic: These freeze beautifully and reheat like a dream. Make a double batch on Sunday, freeze half, and you've got instant breakfast glory for weeks. Future you will thank present you profusely.
Ingredient Integrity: This recipe works because every ingredient pulls its weight. No random additions for Instagram appeal — just honest, purposeful components that create something greater than their sum.
Simplicity Factor: One bowl, one whisk, one muffin tin. No fancy equipment, no obscure techniques. If you can stir and scoop, you can make these muffins. Okay, ready for the game-changer?
Inside the Ingredient List
The Flavor Base
All-purpose flour is your canvas here — two cups exactly. Too much and your muffins turn into bricks, too little and they collapse like a bad soufflé. I've tested with bread flour (too chewy), cake flour (too delicate), and whole wheat (too heavy). All-purpose hits that perfect middle ground where structure meets tenderness. The protein content gives you just enough gluten development to hold everything together without turning your breakfast into a workout for your jaw.
Baking powder and baking soda are your dynamic duo, but they need to be fresh. Check those expiration dates — if your baking powder has been sitting in the cupboard since the Obama administration, toss it. Old leavening agents are why most home bakers end up with flat, sad muffins. The combination here is deliberate: baking powder for lift, baking soda for browning and to counteract the acidity in the guava.
The Texture Crew
Creamy peanut butter is non-negotiable. I know, I know — you love that artisanal chunky stuff from the farmers market. Save it for your sandwiches. Here, smooth peanut butter creates a uniform texture and ensures every bite has that nutty richness. The natural oils in peanut butter replace some of the butter, keeping these muffins moist for days. Don't even think about using the low-fat variety — that's like asking for dry, disappointing muffins on purpose.
Unsalted butter lets you control the salt level precisely. Salted butters vary wildly in their sodium content, and getting the balance wrong here means your muffins taste like a salt lick. Room temperature butter creams beautifully with the sugar, creating tiny air pockets that translate to tender crumb. If you forget to pull it out ahead (we've all been there), cut it into small cubes and let it sit for 15 minutes while you prep everything else.
The Unexpected Star
Guava preserves are where the magic happens. Not jam, not jelly — specifically preserves, which have those lovely chunks of fruit suspended in syrup. The tropical sweetness is more complex than strawberry, more interesting than grape, and it plays off peanut butter like they were made for each other. When heated, the preserves become almost lava-like, creating those dramatic swirls you see in bakery muffins. One jar will make this recipe three times, so you'll have plenty of opportunities to perfect your technique.
The Final Flourish
Chopped roasted peanuts on top aren't just for show — they add textural contrast and intensify the peanut flavor. Use dry roasted, not honey roasted, unless you want dessert masquerading as breakfast. The pieces should be roughly the size of peas; too small and they burn, too big and they fall off. This is your insurance policy against boring muffin tops.
Everything's prepped? Good. Let's get into the real action...
The Method — Step by Step
- Preheat your oven to 375°F exactly, not 350°F, not 400°F — 375°F. This temperature is the sweet spot where the outside sets quickly enough to hold the rise, but the inside has time to bake through without drying out. Position your rack in the center, not the top or bottom. While it's heating, line your muffin tin with paper liners or grease them well with butter. That sizzle when the batter hits the hot tin? Absolute perfection.
- In a medium bowl, whisk together your flour, baking powder, baking soda, and salt. This isn't just mixing — you're aerating the flour and ensuring the leavening agents distribute evenly. One clump of baking powder in a single muffin will taste like soap, so whisk like you mean it for a full 30 seconds. Set this aside and let it hang out while you work on the wet ingredients.
- Now for the fun part — in a large bowl, cream together the peanut butter and butter until they look like light brown clouds. This takes about 2 minutes with an electric mixer on medium speed, or 4 minutes of vigorous whisking if you're feeling ambitious. The mixture should be fluffy and pale, almost the color of coffee ice cream. Don't rush this step — those air bubbles you're creating are what make your muffins rise instead of becoming dense pucks.
- Add the sugar and beat for another minute. You're looking for a texture like wet sand at the beach, where it holds together when squeezed but crumbles easily. The sugar crystals actually cut into the butter, creating even more tiny air pockets. This is basic creaming method, but most people stop too early and wonder why their muffins are flat.
- Beat in the eggs one at a time, making sure each is fully incorporated before adding the next. The batter will look slightly curdled — that's normal and actually good. The proteins in the eggs are starting to bind with the fats, creating structure. Add the vanilla with the second egg; the alcohol in the extract helps distribute the flavor compounds more evenly throughout the batter.
- Reduce your mixer speed to low (or switch to a spatula) and add half the flour mixture. Mix just until you still see streaks of flour — this prevents overmixing, which develops gluten and makes tough muffins. Pour in the milk, which should be room temperature. Cold milk will seize the butter and create lumps. Alternate the remaining flour and milk, starting and ending with flour. The batter should look like thick pancake batter, not smooth cake batter.
- Here's where the magic happens — spoon one tablespoon of batter into each muffin cup. This creates a base. Drop one teaspoon of guava preserves right in the center, then cover with another tablespoon of batter. The preserves should be completely enclosed, like buried treasure. This technique ensures you get that dramatic swirl when you bite in, rather than just fruity edges and plain centers.
- Sprinkle the chopped peanuts on top, pressing them in slightly so they stick. Bake for 18-22 minutes, rotating the pan halfway through. They're done when the tops are golden brown and a toothpick inserted near the center comes out with just a few moist crumbs. The edges will start pulling away from the sides slightly — that's your visual cue. Let them cool in the pan for 5 minutes, then transfer to a wire rack. This brief rest lets the steam redistribute, preventing soggy bottoms.
That's it — you did it. But hold on, I've got a few more tricks that'll take this to another level...
Insider Tricks for Flawless Results
The Temperature Rule Nobody Follows
Room temperature isn't just a suggestion — it's the difference between bakery-quality muffins and sad, deflated ones. Cold eggs don't incorporate properly, leaving streaks of white in your batter. Cold milk causes the butter to seize into tiny lumps that never smooth out. Take everything out of the fridge 30 minutes before you start. If you're impatient (and I usually am), submerge your eggs in warm water for 5 minutes and microwave your milk for 15 seconds. Your future self will thank you when you're not staring at a bowl of curdled-looking batter wondering what went wrong.
Why Your Nose Knows Best
Don't rely on the timer alone — your nose is actually the most accurate doneness indicator. When these muffins are perfectly baked, your kitchen will smell like a peanut butter cup that's been vacationing in the tropics. If you start to smell anything sharp or bitter, they're overbaking. Set your timer for 2 minutes less than the minimum time and start checking. The smell test has saved me from dry muffins more times than I can count, and once you learn to trust it, you'll never go back to blindly following timers.
The 5-Minute Rest That Changes Everything
I know it's torture, but you absolutely must let these cool for at least 5 minutes before removing from the pan. During this rest, the starches are setting up their structure, and the residual heat is finishing the center without overbaking the edges. A friend tried skipping this step once — let's just say it didn't end well. She ended up with a dozen muffins that looked perfect but fell apart into crumbly chaos the moment she bit in. Patience isn't just a virtue here; it's the difference between Instagram-worthy and disaster.
Storage Strategy for Maximum Freshness
These muffins stay fresh for 3 days at room temperature, but here's the key — they need to breathe. Don't seal them in an airtight container while they're still warm, or you'll create a steam bath that turns your beautiful tops into soggy messes. Instead, let them cool completely, then store in a container with the lid slightly ajar for the first day. After that, seal them up tight. If you're not going to eat them all within three days (though I dare you to taste this and not go back for seconds), freeze them immediately after cooling.
Creative Twists and Variations
This recipe is a playground. Here are some of my favorite ways to switch things up:
Chocolate Swirl Sensation
Replace half the guava preserves with Nutella for a chocolate-peanut butter experience that'll make Reese's jealous. The chocolate hazelnut spread melts into gooey pockets that create dramatic marbling. Reduce the sugar by 2 tablespoons since Nutella is sweeter than guava. Top with chopped hazelnuts instead of peanuts for a sophisticated twist that works equally well for brunch or dessert.
Tropical Sunrise Version
Swap the guava for mango preserves and add 1/2 teaspoon of ground cardamom to the dry ingredients. The cardamom enhances the tropical notes and makes your kitchen smell like an exotic spice market. Replace the chopped peanuts with toasted coconut flakes for a vacation-in-a-muffin experience. These are particularly stunning in winter when you need a reminder that somewhere, it's beach weather.
Savory-Sweet Breakfast Bomb
Add 1/2 cup of cooked, crumbled bacon to the batter and use bacon fat instead of butter for half the fat. Keep the guava — the salty-sweet combination is breakfast nirvana. Reduce the sugar by 1/4 cup since bacon adds salt and richness. These are dangerous; I once watched my brother-in-law eat six in one sitting and then ask if there were more.
Health-Conscious Makeover
Replace half the all-purpose flour with white whole wheat flour, use coconut sugar instead of granulated, and swap the butter for coconut oil. The flavor profile changes completely — more nutty, more complex, with subtle caramel notes. Add 2 tablespoons of ground flaxseed for omega-3s. They're not quite the same indulgence, but they're still miles better than anything you'll find in a coffee shop.
Holiday Spice Edition
Add 1 teaspoon of cinnamon, 1/2 teaspoon of nutmeg, and 1/4 teaspoon of cloves to the dry ingredients. Use pumpkin butter instead of guava preserves for a autumnal twist that tastes like Thanksgiving morning. Top with pepitas instead of peanuts for crunch and visual appeal. These disappear faster than pumpkin pie at a family gathering.
Decadent Dessert Upgrade
Make a cream cheese filling by beating 4 ounces of cream cheese with 2 tablespoons of sugar and 1/2 teaspoon of vanilla. Layer this between the batter instead of guava for cheesecake-stuffed muffins. Drizzle cooled muffins with a simple glaze made from powdered sugar and milk. They're essentially cupcakes pretending to be breakfast, and nobody's complaining.
Storing and Bringing It Back to Life
Fridge Storage
Refrigeration is actually the enemy here — it dries out muffins faster than a desert wind. If you must refrigerate (because you live somewhere tropical or your kitchen runs hot), wrap each muffin individually in plastic wrap, then foil. This double layer prevents them from absorbing fridge odors while maintaining moisture. Bring to room temperature before eating, or better yet, warm them briefly in a low oven. Cold muffins are sad muffins, and nobody wants that.
Freezer Friendly
These freeze like champions for up to 3 months. Cool completely, then wrap individually in plastic wrap, followed by aluminum foil. Label with the date — future you will appreciate this when you're rooting through the freezer at 6 AM. To thaw, leave on the counter overnight, or microwave for 20-30 seconds if you're impatient. They'll taste almost as good as fresh, which is saying something for frozen baked goods.
Best Reheating Method
Skip the microwave for reheating unless you're desperate — it makes the tops rubbery. Instead, wrap muffins in foil and warm in a 300°F oven for 8-10 minutes. Add a tiny splash of water to the foil packet before sealing — it steams back to perfection, recreating that fresh-from-the-oven experience. For a quick fix, split and toast cut-side down in a dry skillet for 2-3 minutes. The cut surface gets crispy while the inside stays tender.