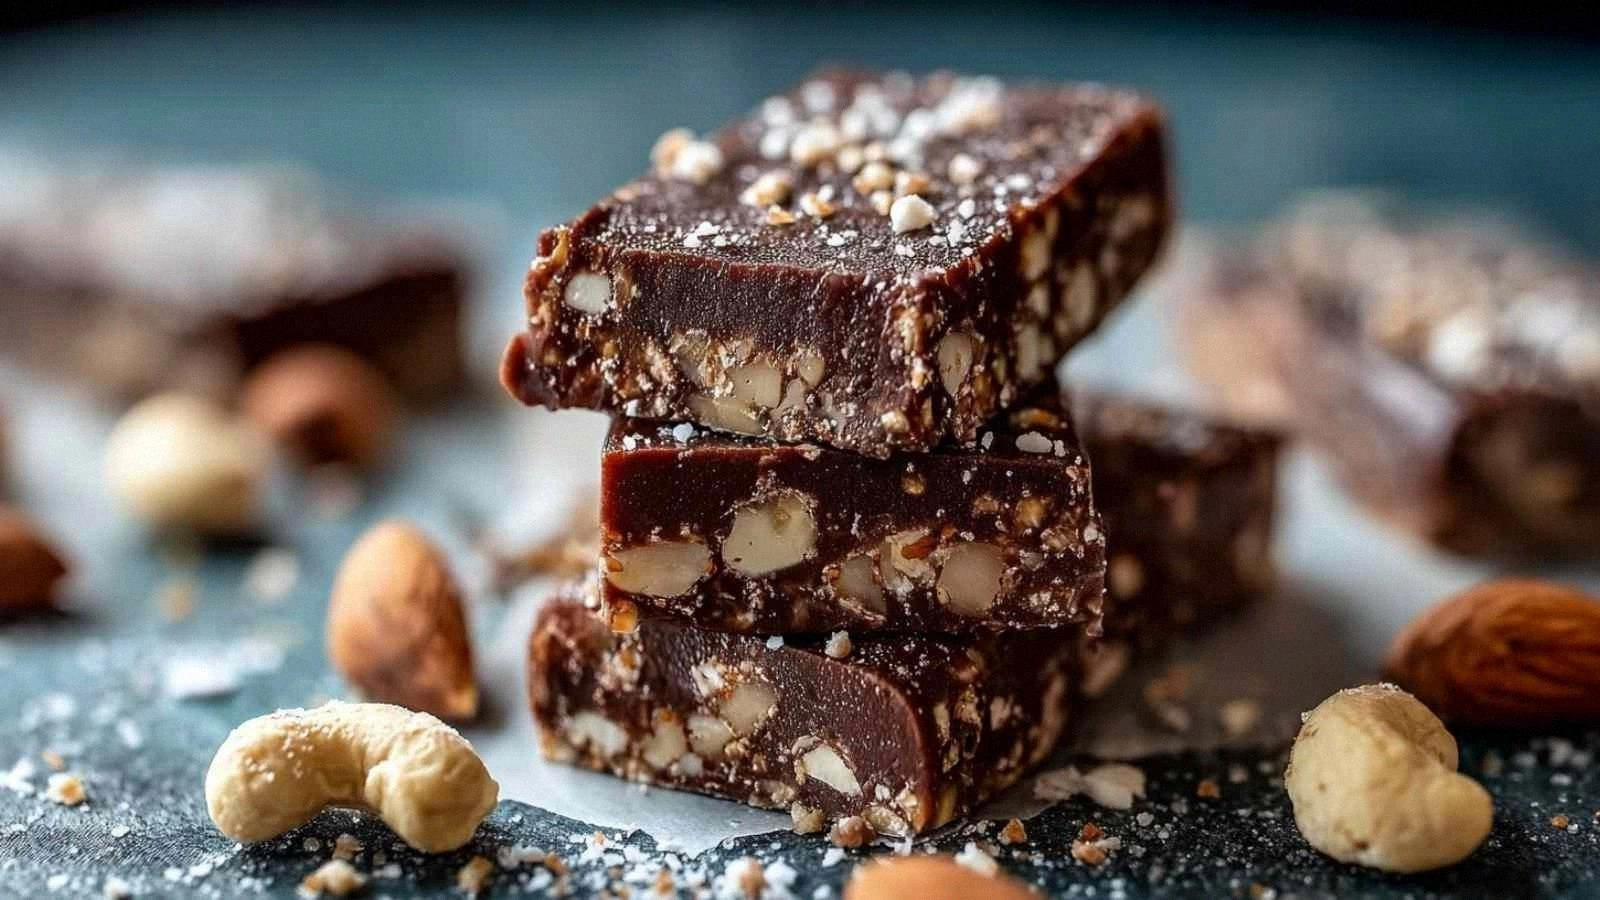
Picture this: I’m standing in a cramped kitchen, the counter cluttered with a handful of protein powder packets, a jar of nut butter that’s been sitting in my fridge for a while, and a half‑sized bag of rolled oats that has somehow survived the apocalypse of my last baking experiment. I’m staring at the recipe book that’s been teasing me for weeks, promising “easy, 75‑minute protein bars” that taste like a gym‑junkie’s dream and a sweet treat’s secret. I can almost taste the crunchy, chewy texture that will make my taste buds do a happy dance. The aroma of toasted oats and vanilla is already swirling in my head, making me feel like I’m about to discover the next big thing in snack‑time. I’m not just cooking; I’m about to unleash a batch that will have everyone begging for a second bite.
Let’s be honest—most protein bar recipes are a mess. They’re either dry and crumbly, like a broken cookie, or sticky and gummy, like a bad fondue. This version is a revelation because it balances protein, carbs, and healthy fats in a way that feels indulgent, not indulgent. I dare you to taste this and not go back for seconds; the flavor profile is so satisfying that it will feel like a reward after a long workout. And the best part? It’s made in less than an hour, so you can get your protein fix without sacrificing taste or time.
The secret sauce behind this recipe is the combination of a crunchy oat base, a silky nut butter‑honey blend, and a dash of cinnamon that brings everything together. The oats give structure, the nut butter adds richness, and the honey provides that sweet, sticky glue that keeps the bars intact. Vanilla extracts a warm, aromatic note that rounds off the flavor, while the cinnamon adds a subtle spice that lingers on the palate. It’s a symphony of textures and flavors that will make you wonder why you’ve ever settled for store‑bought bars. By the end, you’ll be convinced that homemade is the way to go.
I’ll walk you through every single step, from the first stir to the final slice. By the time you’re done, you’ll wonder how you ever made protein bars any other way. So grab your bowl, your spoon, and let’s get started.
What Makes This Version Stand Out
- Flavor: The blend of vanilla, cinnamon, and honey creates a depth that feels like a dessert, not a gym snack. The nut butter’s natural sweetness balances the protein powder’s slight bitterness. The result is a bar that satisfies sweet cravings while keeping you energized.
- Texture: The oats provide a satisfying chew, while the honey and nut butter create a moist, cohesive bite. The bars hold together without crumbling, making them ideal for on‑the‑go snacking. The slight crunch from the nuts adds an extra layer of delight.
- Ease: No baking required—just a gentle simmer and a quick chill. The recipe is straightforward, even for beginners, and the ingredients are pantry staples. The only tools needed are a saucepan, a bowl, and a spatula.
- Nutrition: Each bar delivers a balanced mix of protein, carbs, and healthy fats, making it a perfect pre‑ or post‑workout treat. The use of natural ingredients keeps added sugars to a minimum. It’s a wholesome snack that won’t leave you feeling bloated.
- Make‑ahead: The bars can be made in bulk and stored for up to a week in the fridge or frozen for months. This makes them ideal for meal prep or for feeding a hungry crew. They’re as convenient as they are delicious.
- Versatility: The base can be tweaked to suit dietary needs—gluten‑free oats, dairy‑free nut butter, or a vegan protein powder. The recipe’s flexibility allows for endless variations. It’s a blank canvas waiting for your creativity.
Alright, let's break down exactly what goes into this masterpiece...
Inside the Ingredient List
The Flavor Base
Rolled oats are the backbone of this recipe. They provide a mild, nutty flavor that grounds the sweetness of the honey. If you skip the oats, the bars will crumble and lack structure. Use high‑quality, whole‑grain oats for the best texture and nutritional profile. The oats also add a subtle chew that makes each bite satisfying.
The Texture Crew
Natural nut butter is the secret to a creamy, cohesive mix. It coats the oats and protein powder, preventing them from drying out. If you use a low‑fat nut butter, the bars will be drier and less flavorful. For extra moisture, warm the nut butter slightly before mixing. The honey or maple syrup adds a sticky sweetness that binds everything together.
The Unexpected Star
Protein powder brings the protein punch without compromising taste. A neutral‑flavored whey or plant‑based powder works best, as it won’t overpower the natural flavors. If you’re vegan, choose a pea or brown rice protein for a clean finish. The powder also adds density, giving the bars a satisfying bite.
The Final Flourish
Chopped nuts or seeds add crunch and a nutty aroma. They also boost healthy fats and protein content. If you’re allergic to nuts, substitute with seeds like pumpkin or sunflower for a similar crunch. Vanilla extract enhances the overall flavor, while cinnamon provides a warm, spicy undertone. Together, they elevate the bars from simple to unforgettable.
Everything’s prepped? Good. Let’s get into the real action...
The Method — Step by Step
- In a large bowl, combine 2 cups rolled oats, 1 cup protein powder, ½ tsp ground cinnamon, and a pinch of salt if desired. Mix until evenly blended; the mixture should feel like a dry, slightly gritty flour. This step is crucial for a uniform texture. Keep the bowl aside while you warm the wet ingredients. The dry mix will absorb the liquid later.
- In a saucepan over medium heat, warm 1 cup natural nut butter and ½ cup honey (or pure maple syrup) until smooth. Stir constantly to avoid scorching. The mixture should be glossy and pourable. Add 1 tsp vanilla extract and stir to combine. Let it cool slightly before adding to the dry mix.
- Pour the wet mixture over the dry mixture and stir until fully incorporated. The batter should be thick but spreadable. If it’s too dry, add a splash of milk or water. If too wet, add more oats. This step is the glue that holds the bars together.
- Fold in ½ cup chopped nuts or seeds. The nuts add crunch and flavor. Ensure they are evenly distributed throughout the batter. This also boosts protein content. Let the batter rest for 5 minutes to allow flavors to meld.
- Line a 9x13 inch pan with parchment paper. Press the batter firmly into the pan. The edges should be flat and even. Use a spatula or your palms. This ensures uniform bars.
- Chill the pan in the refrigerator for 30 minutes. This step sets the bars. The batter will firm up. Watch Out: Do not over‑chill, or the bars will become too hard. If you prefer a softer bite, chill for 15 minutes.
- Remove from the pan and cut into bars with a clean knife. The bars should hold together. If they crumble, let them rest another 10 minutes. This gives them a perfect shape. The knife should glide smoothly through the bars.
- Store in an airtight container at room temperature. They can last up to a week. For longer storage, freeze them in a freezer bag. Let them thaw before eating. Enjoy the crunch and flavor.
That’s it — you did it. But hold on, I’ve got a few more tricks that will take this to another level...
Insider Tricks for Flawless Results
The Temperature Rule Nobody Follows
Never let the nut butter and honey mixture boil; a gentle simmer preserves the natural oils and prevents bitterness. If you overheat, the flavor profile shifts and the bars taste metallic. Use a low‑heat setting and stir continuously. Keep an eye on the mixture’s color; it should remain a warm amber. This small step can make a big difference.
Why Your Nose Knows Best
Smell the batter as it cools. A sweet, toasted aroma indicates the perfect balance of honey and oats. If the scent is too raw or overly sweet, give it a few more minutes. Your nose is a reliable guide to the right texture. Trust it, and you’ll avoid over‑cooked or under‑cooked bars.
The 5-Minute Rest That Changes Everything
After folding in the nuts, let the batter sit for exactly five minutes. This allows the oats to absorb moisture and the flavors to meld. It also makes the batter easier to press into the pan. Skipping this step can result in a crumbly texture. The rest period is a small price for a big payoff.
The Secret to Even Bars
Use a wet spatula or lightly oil your palms when pressing the batter. This prevents sticking and ensures a smooth surface. If you press too hard, the bars can become compact and dense. A gentle, even press yields bars that are chewy yet firm. This technique is often overlooked but essential.
The Quick Chill Trick
If you’re short on time, place the pan on a cold plate or use a freezer tray for a rapid chill. This sets the bars faster than a regular refrigerator. Watch out for condensation, which can make the bars soggy. Pat dry any excess moisture before cutting. Quick chilling is a game‑changer for busy mornings.
Creative Twists and Variations
Chocolate Swirl Surprise
Add ¼ cup unsweetened cocoa powder to the dry mix and fold in ½ cup dark chocolate chips. The chocolate adds a rich, bittersweet flavor that pairs beautifully with the nutty base. This variation is perfect for chocolate lovers and makes for a great gift. The bars will have a chocolatey center that melts in your mouth.
Citrus Burst
Incorporate zest from one orange and one lemon into the batter. The citrus adds a bright, refreshing note that cuts through the sweetness. You can also add a splash of orange juice for extra moisture. This version is especially refreshing on hot days.
Spiced Apple
Dice a small apple and mix it into the batter along with ¼ tsp nutmeg. The apple provides natural sweetness and a subtle tartness. The nutmeg adds warmth and depth. This variation feels like a fall dessert in a bar form.
Trail Mix Edition
Swap the nuts for a mix of dried cranberries, raisins, and pumpkin seeds. This adds a chewy texture and a burst of flavor. The dried fruit brings natural sweetness, while the seeds provide crunch. It’s a perfect snack for hikers or anyone needing a quick energy boost.
Almond Joy
Replace the natural nut butter with almond butter and fold in shredded coconut. The coconut gives a tropical twist, while the almond butter keeps the bars creamy. Add a drizzle of dark chocolate on top before chilling for an extra indulgent touch. These bars are a delightful treat for any time of day.
Storing and Bringing It Back to Life
Fridge Storage
Store the bars in an airtight container in the refrigerator for up to 7 days. The cool environment keeps them firm and fresh. Keep the container sealed to prevent moisture from affecting the texture. If you notice any sogginess, simply pat the bars dry before eating.
Freezer Friendly
Wrap each bar individually in parchment paper and place them in a freezer bag. Freeze for up to 3 months for the best quality. When you’re ready to eat, let them thaw at room temperature for 10 minutes. The bars retain their flavor and crunch even after freezing.
Best Reheating Method
To revive a frozen or chilled bar, microwave on medium power for 15–20 seconds. Add a tiny splash of water before reheating; this steams the bar back to perfection. Alternatively, place the bar in a preheated oven at 300°F for 5 minutes. The result is a warm, chewy treat that’s almost like fresh.