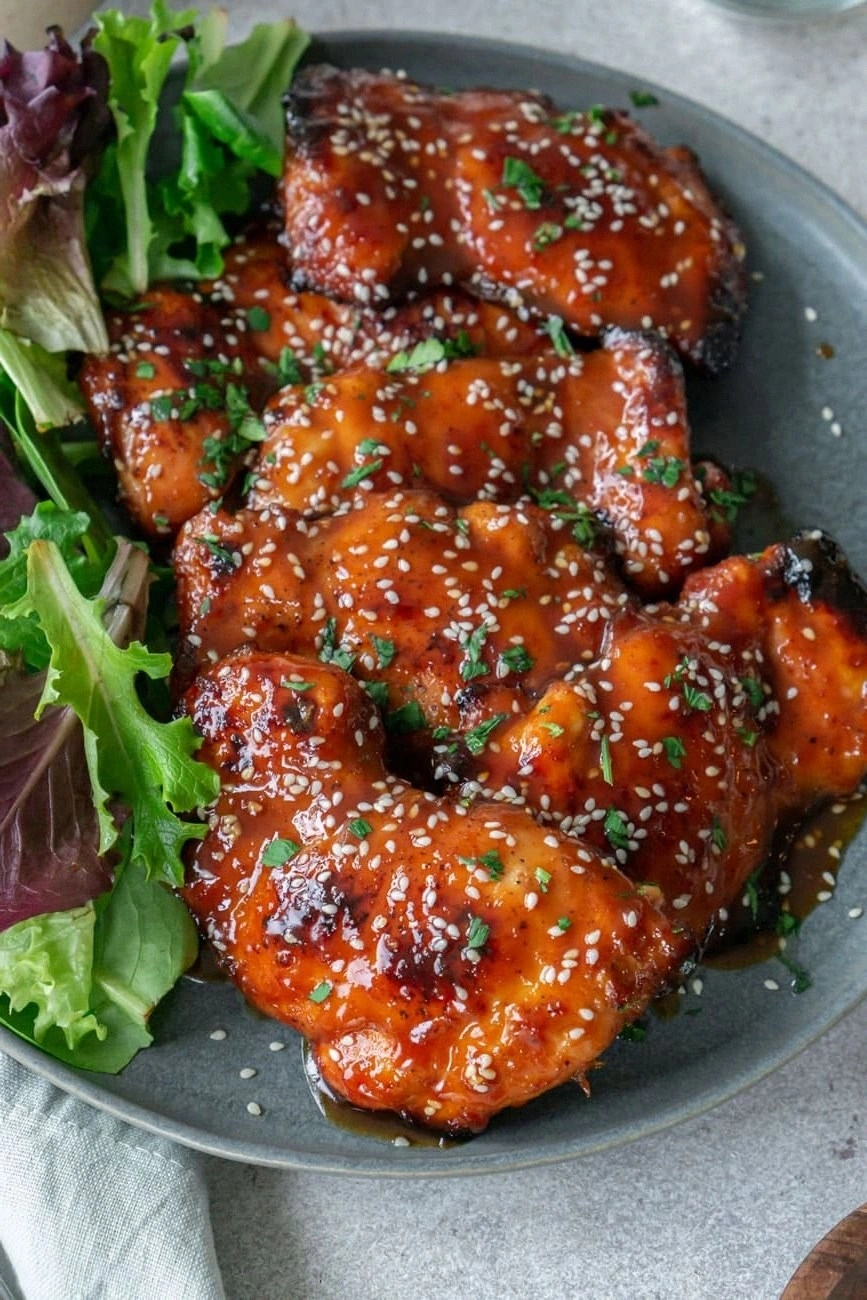
The night I almost burned the kitchen down, my roommate dared me to make a dish that would make everyone forget the smoke alarm’s blaring. I grabbed a bag of boneless chicken thighs, a jar of hoisin sauce, and a splash of honey, and I swear I didn’t even read the recipe. The result? A plate of crispy, caramelized chicken that had everyone begging for the recipe. That moment proved that a simple combination of sweet, savory, and a hint of sesame can turn a disaster into a triumph.
Picture the sizzle as the chicken hits the hot skillet, the aroma of toasted sesame and honey drifting through the air, and the sight of golden edges that crackle like a tiny fireworks display. The sound of the pan is a comforting rhythm, the feel of the meat’s firm bite, and the taste—a burst of umami followed by a lingering sweetness that clings to the tongue. Every sense is engaged, making this dish more than just food; it’s an experience. If you’ve ever struggled to find the right balance between sticky sauce and crisp skin, this is the recipe that will finally nail it.
What makes this version stand out is not just the ingredients but the technique: a quick sear, a glaze that caramelizes without burning, and a final broil that gives the crust that perfect, almost buttery crunch. I dare you to taste this and not go back for seconds. The sauce coats the chicken like velvet, but the edges remain crisp enough to crack under your teeth. Most recipes get this completely wrong by overcooking the meat or undercooking the glaze, but this method preserves moisture and delivers an irresistible snap.
I’ll be honest — I ate half the batch before anyone else got to try it. The secret? A small splash of water before reheating keeps the sauce from drying out, and a quick brush of extra sauce halfway through baking keeps the glaze glossy. Picture yourself pulling this out of the oven, the whole kitchen smelling incredible, and knowing you’ve just created a crowd‑pleaser that’s impossible to resist. Let me walk you through every single step — by the end, you’ll wonder how you ever made it any other way.
What Makes This Version Stand Out
- Flavor: The hoisin-honey glaze delivers a balanced sweet‑savory punch that lingers on the palate. The glaze’s natural sugars caramelize beautifully, creating a glossy finish that’s both beautiful and delicious. This isn’t a one‑dimensional sauce; it’s a multi‑layered flavor profile that keeps you coming back for more.
- Crisp: The combination of a quick sear followed by a high‑heat finish locks in moisture while giving the skin an almost buttery crunch. The edges crackle like thin ice, offering a satisfying contrast to the tender interior. It’s the kind of texture that makes every bite a small celebration.
- Time‑Efficient: With a prep time of just 15 minutes and a cook time of 30 minutes, this dish is ready before your guests even notice you’re cooking. The method is straightforward, requiring no advanced techniques, so even novice cooks can master it. It’s the perfect go‑to for weeknight dinners or last‑minute dinner parties.
- Versatility: Whether you serve it over jasmine rice, toss it with noodles, or plate it alongside steamed vegetables, the dish adapts to any side. The sauce’s thickness allows it to coat everything evenly, turning a simple plate into a feast. It’s a base that invites creativity without compromising its core.
- Ingredient Quality: Using fresh, high‑quality hoisin sauce and honey makes a noticeable difference. The sesame oil’s nutty aroma elevates the entire dish, while the sesame seeds add a subtle crunch. These ingredients are the backbone of the flavor, so choose the best you can find.
- Make‑Ahead Potential: The dish holds up well in the refrigerator and even freezes without losing texture or flavor. A quick reheat restores the glaze’s sheen, and the chicken remains juicy. This makes it an excellent option for meal prep or for entertaining on short notice.
- Presentation: The glossy glaze, bright green herbs, and golden crust create a visual feast. The dish looks as good on the plate as it tastes, making it perfect for photos and impressing guests. It’s a dish that looks as good as it is, which is why it’s a favorite for Instagram-worthy meals.
- Community Love: Friends and family rave about the dish, and the recipe has become a staple in many households. The simple yet sophisticated flavor profile appeals to all ages and tastes. It’s a dish that brings people together over a shared love of delicious food.
Inside the Ingredient List
The Flavor Base
Hoisin sauce is the heart of this dish, offering a complex blend of sweet, salty, and umami notes. It’s thicker than soy sauce, which allows it to caramelize without becoming too watery. If you can’t find hoisin, a mixture of hoisin‑style sauce and a splash of soy can mimic the depth of flavor, though the result may be slightly less sweet.
The Sweetener
Honey adds natural sweetness and a subtle floral undertone that balances the savory hoisin. It also contributes to the glossy finish as it caramelizes during baking. If you prefer a more neutral sweetener, try agave syrup or maple syrup, but be aware that the flavor profile will shift slightly.
The Texture Crew
Sesame oil brings a nutty aroma and a silky mouthfeel to the glaze. The sesame seeds add a subtle crunch that contrasts with the tender chicken. If you’re allergic to sesame, you can omit the seeds or substitute them with toasted pumpkin seeds for a different crunch.
The Final Flourish
Fresh parsley or thinly sliced chives provide a bright, herbal contrast that cuts through the richness of the glaze. The herbs also add a pop of color that makes the dish more visually appealing. If you’re looking for a different flavor, try cilantro or basil for a more tropical twist.
Everything's prepped? Good. Let's get into the real action. The next steps are where the magic happens and where the crispy texture is born. Follow them closely, and you’ll end up with a dish that’s both beautiful and irresistibly tasty. Now, grab your skillet and let’s cook!
The Method — Step by Step
- Preheat your oven to 400°F (200°C). Pat the chicken thighs dry with paper towels to ensure a crisp exterior. Season each thigh with 1/4 tsp kosher salt, 1/2 tsp black pepper, and 1 tsp garlic powder, letting the flavors penetrate for about 10 minutes. This resting period also allows the seasoning to meld with the meat, enhancing the overall taste.
- While the chicken rests, combine 2 cups hoisin sauce, 1 cup honey, 2 tbsp sesame oil, and 1/2 tbsp sesame seeds in a medium bowl. Whisk until the mixture is smooth and the seeds are evenly dispersed. The sauce’s thickness will help it cling to the chicken during cooking, creating that glossy, caramelized finish.
- Heat a large oven‑proof skillet over medium‑high heat and add a splash of oil. Place the seasoned thighs skin‑side down and sear for 3–4 minutes until a golden crust forms. Flip and sear the other side for another 2–3 minutes. The sear locks in juices and gives the skin that irresistible crunch.
- Transfer the skillet to the preheated oven and pour the hoisin‑honey glaze over the thighs, making sure each piece is coated. Bake for 15 minutes, then flip each thigh and brush with more glaze. The sauce will bubble and caramelize, creating a glossy sheen that’s impossible to resist.
- After the initial 15 minutes, broil the chicken on high for 2–3 minutes. Watch closely; the glaze should puff and set into a crisp, caramelized crust. This final broil gives the dish that signature “crackle” that makes it unforgettable.
- Remove the skillet from the oven and let the thighs rest for 5 minutes. Resting allows the juices to redistribute, keeping the meat moist and tender. While the chicken rests, you can finish the sauce on the stovetop if desired, simmering it until it thickens to a glaze consistency.
- Slice the thighs into bite‑sized pieces or serve whole, depending on your preference. Drizzle any remaining glaze over the top, ensuring each bite is coated. Sprinkle with fresh parsley or chives for a burst of color and a fresh, herbal finish.
- Serve immediately over jasmine rice, tossed noodles, or a crisp salad. Pair with a side of steamed broccoli or pickled vegetables to balance the richness. The dish is best enjoyed hot, with the glaze still glossy and the skin still crisp.
- If you’re planning ahead, store leftovers in an airtight container in the refrigerator for up to 3 days. Reheat in the oven at 350°F (175°C) for 10 minutes, brushing with a splash of water to keep the glaze from drying out. The chicken will stay juicy, and the glaze will regain its glossy sheen.
Insider Tricks for Flawless Results
The Temperature Rule Nobody Follows
Many cooks think that a higher oven temperature always gives a crispier result. In reality, a moderate 400°F (200°C) is the sweet spot that caramelizes the glaze without burning the skin. The key is to let the chicken rest after seasoning; this allows the salt to penetrate and improves browning.
Why Your Nose Knows Best
Smell is a powerful indicator of doneness. When the glaze starts to bubble and emit a sweet, nutty aroma, you’re close to the perfect finish. If the scent is overly sweet or burnt, pull the chicken out immediately to avoid a bitter taste.
The 5‑Minute Rest That Changes Everything
Resting the chicken for five minutes after baking allows the juices to redistribute, preventing dry meat. It also gives the glaze time to set into a glossy crust, making each bite even more satisfying. Skipping this step often results in a soggy, less flavorful dish.
The Broil Trick for Extra Crunch
A quick broil at the end of cooking seals the glaze and gives the skin a crackle that’s impossible to replicate with oven baking alone. Keep a close eye during broil; the glaze can go from perfect to burnt in seconds. Use a high‑heat oven for this step to achieve the best results.
The Sauce‑to‑Meat Ratio
Too much glaze can drown the chicken, while too little can leave it dry. The ratio of 2 cups hoisin to 1 cup honey is the ideal balance for a glossy, not sticky, coating. If you prefer a thicker glaze, reduce the honey slightly or add a splash of water to thin it out before baking.
The Final Touch of Fresh Herbs
Adding herbs after baking preserves their bright flavor and color. Fresh parsley or chives give the dish a fresh, herbal contrast that cuts through the richness. If you’re serving the dish cold, let the herbs sit for a few minutes to release their aroma.
Creative Twists and Variations
This recipe is a playground. Here are some of my favorite ways to switch things up:
Spicy Sriracha Kick
Add 1–2 tbsp of Sriracha to the hoisin‑honey glaze for a fiery twist. The heat complements the sweetness, creating a complex flavor profile that’s perfect for spice lovers. Serve with a cooling cucumber salad to balance the heat.
Citrus‑Infused Brightness
Stir in the zest of one lime and a tablespoon of fresh lime juice into the glaze. The citrus cuts through the richness and adds a refreshing brightness that pairs well with rice noodles. This version is especially popular in summer gatherings.
Miso‑Marinated Variation
Replace half of the hoisin sauce with white miso paste for a deeper umami flavor. The miso adds a subtle earthiness that complements the honey’s sweetness. This twist works well with a side of sautéed bok choy.
Vegetarian Hoisin “Chicken”
Use tofu or tempeh instead of chicken thighs. Marinate the protein in the hoisin‑honey glaze for at least 30 minutes before cooking. The tofu absorbs the sauce beautifully, creating a vegetarian version that’s just as satisfying.
Smoky Chipotle Variation
Add 1 tsp chipotle powder or a few dashes of chipotle in adobo to the glaze. The smoky heat pairs wonderfully with the sweet glaze, offering a flavor profile that’s reminiscent of barbecue. Serve over grilled corn on the cob for a complete meal.
Herb‑Infused Finish
Finish the dish with a drizzle of fresh basil or mint after baking. The herbs add a layer of freshness that elevates the dish’s aroma and flavor. This variation is ideal for a light, summery dinner.
Storing and Bringing It Back to Life
Fridge Storage
Store cooked thighs in an airtight container in the refrigerator for up to 3 days. Keep the glaze in a separate small container to prevent the meat from becoming soggy. When reheating, place the chicken in a shallow pan and cover loosely to retain moisture.
Freezer Friendly
Wrap the thighs individually in parchment paper and place them in a freezer bag. Freeze for up to 2 months. Thaw overnight in the refrigerator before reheating to preserve texture and flavor.
Best Reheating Method
Reheat in a preheated oven at 350°F (175°C) for 10 minutes, brushing with a splash of water to keep the glaze moist. The chicken will regain its juicy interior and the glaze will regain its glossy sheen. Avoid microwaving, as it can make the skin soggy.