Picture this: it’s a Saturday morning, the sun is just beginning to peek over the horizon, and you’re standing in your kitchen, clutching a bottle of champagne that’s been chilling for weeks. The air is thick with the promise of bubbles, but your mind is racing, wondering how to turn that sparkling liquid into something that feels both celebratory and approachable for the whole family. I remember the first time I tried a classic mimosa at a brunch, and the sheer disappointment of a bland, flat drink that tasted like it had been forgotten in the back of the fridge. That moment sparked a mission: to reinvent the mimosa into a drink that sings with citrus brightness, effervescence, and a touch of elegance that makes you feel like you’re at a five‑star rooftop brunch.
From the first clink of the glass to the final sip, this version of the classic mimosa is a sensory roller coaster. The first thing you notice is the glossy sheen of chilled champagne, its bubbles dancing like tiny fireworks against the glass. The second is the citrus aroma that rises, a fresh orange scent that feels like a breath of spring. The third, the first sip, delivers a balanced sweet‑tart punch that lingers on the palate, followed by a subtle effervescence that tickles the tongue. And the last, the aftertaste of a perfectly balanced citrus finish that invites you to take another sip, a feeling that makes the drink feel like a tiny celebration in a glass.
I dare you to taste this and not go back for seconds. The secret is simple: it’s about precision in the ratio, freshness of the orange juice, and the right glassware to showcase the bubbles. Most recipes get this completely wrong, using bottled orange juice that’s too sweet or too thick, or pouring the champagne last and losing the delicate foam. But here, we’ll pour the champagne first, then add the juice to preserve the carbonation, and finish with a garnish that adds a pop of color and aroma. The result? A drink that feels like a toast to the day, a sip that feels like a hug in a glass.
Let me walk you through every single step — by the end, you’ll wonder how you ever made it any other way. Whether you’re a seasoned mixologist or a brunch‑in‑training, this recipe will elevate your morning routine, impress your guests, and give you that confidence to create cocktails that feel effortless and sophisticated. So grab your shaker, your favorite flute, and let’s dive into the world of the classic mimosa, reimagined for today’s palate.
What Makes This Version Stand Out
- Proportional Precision: Unlike the vague “3 parts champagne to 1 part juice” rule of thumb, this recipe uses exact measurements to ensure the perfect balance every time.
- Freshness Factor: The use of freshly squeezed orange juice eliminates the artificial sweetness and acidity found in store‑bought mixes.
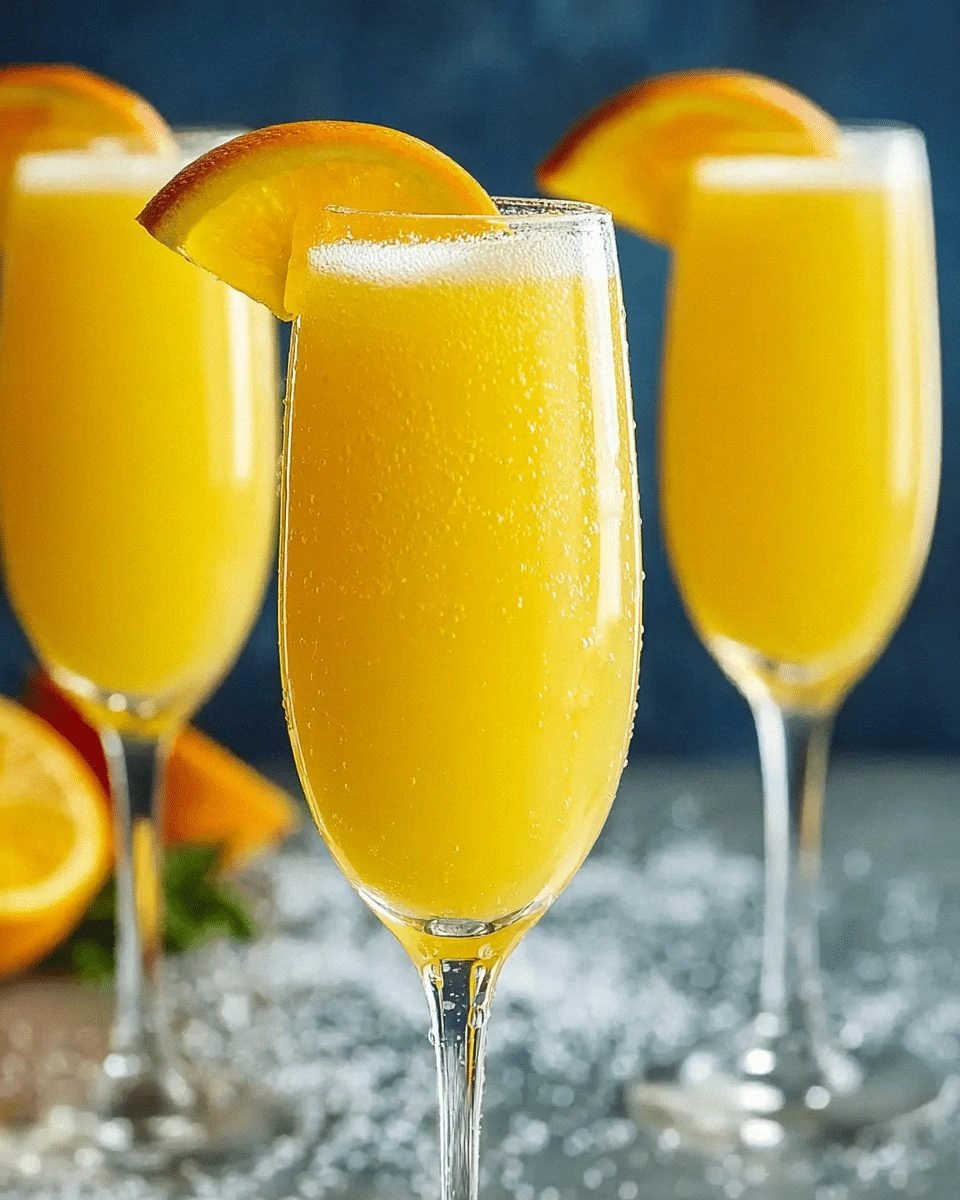
- Glassware Matters: Serving in flute glasses amplifies the visual appeal and keeps the bubbles alive longer, turning the drink into a showstopper.
- Optional Garnish: A thin orange slice or zest twist not only adds a pop of color but also releases essential oils that elevate the aroma.
- Time‑Saving Trick: Chill the glasses in advance and use pre‑measured portions, so you can serve instantly without compromising quality.
- Make‑Ahead Friendly: The ingredients can be pre‑mixed and kept in a sealed container for a few hours, making it ideal for brunch parties.
- Low‑Calorie Option: By using a simple ratio and skipping added sugars, you get a refreshing drink that’s mindful of your calorie count.
- Versatility: The base can be tweaked with a splash of elderflower or a hint of ginger for seasonal variations.
Alright, let's break down exactly what goes into this masterpiece...
Inside the Ingredient List
The Flavor Base
At the heart of every great mimosa lies the champagne. Choose a brut or extra brut for a dry, crisp foundation that won’t overpower the citrus. The champagne should be well‑chilled at 45°F (7°C) to maintain its effervescence. If you’re using a rosé, the subtle fruitiness adds an extra layer of complexity. The key is to avoid champagne that’s been stored at room temperature for extended periods, as the bubbles will have dissipated, leaving a flat taste. If you’re short on time, a high‑quality prosecco can substitute, but it will bring a sweeter profile.
The Citrus Component
Freshly squeezed orange juice is the secret weapon that sets this mimosa apart. A single medium orange yields about ½ cup of juice, so you’ll need roughly three to four oranges to reach 1½ cups. The juice should be strained to remove pulp, ensuring a silky texture that doesn’t clump in the glass. Avoid bottled orange juice, which often contains added sugars and preservatives that muddy the flavor. If you’re in a pinch, a 100% natural, no‑added‑sugar juice works, but it’s best to use fresh for authenticity. The juice’s natural acidity brightens the champagne, creating a harmonious balance that feels both refreshing and indulgent.
The Unexpected Star
While the champagne and orange juice form the core, a subtle addition of a pinch of sea salt or a dash of orange zest can elevate the drink into a new dimension. The salt enhances the sweetness and balances the tartness, while the zest releases essential oils that intensify the aroma. If you prefer a sweeter finish, a teaspoon of simple syrup can be added, but keep in mind it will slightly reduce the overall alcohol content per sip. This small tweak transforms a standard mimosa into a layered experience that surprises the palate with each sip.
The Final Flourish
Garnishes are more than decoration; they’re the final touch that completes the experience. A thin slice of orange or a twist of zest placed on the rim adds a visual cue and a subtle fragrance. For a more playful twist, a sprig of fresh mint or a dash of edible gold dust can be used, especially for brunch parties. The garnish should be added right before serving to preserve its aroma and avoid dampening the bubbles. Remember, the garnish is optional but highly recommended to elevate the drink’s aesthetic and sensory appeal.
Everything’s prepped? Good. Let’s get into the real action...
The Method — Step by Step
- Step 1: Chill Everything. Place your champagne flutes in the freezer for at least 10 minutes before you start. The cold glass will keep the bubbles from collapsing and make the drink feel more luxurious. If you don’t have a freezer, you can also wrap the glasses in a damp towel and place them in the fridge for a quick chill.
- Step 2: Juice the Oranges. Slice each orange in half and use a manual citrus squeezer or a hand-held juicer to extract the juice. Strain through a fine mesh to remove pulp and seeds. This step ensures a silky texture that won’t clump in the glass. If you’re short on time, pre‑squeeze and store the juice in an airtight container in the fridge.
- Step 3: Measure the Champagne. Using a measuring cup, pour 4 cups (950 ml) of champagne into a large mixing jug. The ratio is key; too much champagne and the drink becomes watery, too little and the citrus will dominate. Keep the jug in the fridge to maintain the temperature.
- Step 4: Add the Orange Juice. Pour 1½ cups (355 ml) of freshly squeezed orange juice into the jug. Stir gently with a long spoon to combine, but avoid vigorous stirring that could cause the champagne to lose its carbonation. The gentle swirl will mix the flavors while preserving the bubbles.
- Step 5: Optional Sweetness. If you prefer a sweeter mimosa, add 1 teaspoon of simple syrup. Stir lightly until dissolved. Remember, each additional sugar reduces the overall alcohol per sip, so use sparingly.
- Step 6: Add a Pinch of Salt. A pinch of sea salt can enhance the citrus brightness. Sprinkle just enough to taste; you want a subtle lift, not a salty aftertaste. This step is optional but highly recommended for a more nuanced flavor profile.
- Step 7: Pour into Flutes. Gently pour the mixture into each chilled flute, filling each about two‑thirds full. The liquid should cascade over the rim, creating a small foam head. This visual cue signals that the drink is ready.
- Step 8: Garnish and Serve. Place a thin slice of orange or a zest twist on the rim of each glass. For a festive touch, add a sprig of mint or a pinch of edible gold dust. Serve immediately, and enjoy the effervescence that fizzles like a champagne bubble burst.
That's it — you did it. But hold on, I've got a few more tricks that'll take this to another level...
Insider Tricks for Flawless Results
The Temperature Rule Nobody Follows
Most people think any chilled glass will do, but the temperature of the glass can make or break the experience. A glass that’s too cold can cause the champagne to lose carbonation rapidly, while a glass that’s too warm will let the bubbles dissipate. The ideal glass temperature is around 40°F (4°C). If you’re short on a freezer, a quick dip in a bowl of ice water for a minute works wonders. This trick ensures that every sip is a perfect balance of fizz and flavor.
Why Your Nose Knows Best
When you’re about to pour, pause for a moment and inhale. A subtle citrus scent indicates that the orange juice is fresh, while a faint yeasty aroma signals that the champagne is still lively. If the smell is flat or metallic, it’s a sign the drink may need a quick stir or a fresh pour. Trusting your nose can prevent you from serving a sub‑par mimosa.
The 5‑Minute Rest That Changes Everything
After mixing the champagne and orange juice, let the mixture rest for exactly five minutes before pouring. This short period allows the flavors to meld, and the bubbles to settle into a stable foam. Skipping this step can result in a drink that’s either too sharp or too flat. The five‑minute rest is the secret to a smooth, balanced mimosa that tastes like it’s been crafted by a professional.
Keep It Simple, Keep It Fresh
Never add extra flavors unless you’re aiming for a specific twist. The beauty of a classic mimosa lies in its simplicity. By keeping the ingredients minimal, you allow the champagne’s nuanced flavors to shine through. If you’re experimenting, consider adding a splash of elderflower liqueur or a pinch of ginger for a seasonal twist.
Presentation Is Everything
Serve your mimosa in a crystal flute with a sleek rim. The glass should be spotless, with no fingerprints or dust, as these can detract from the visual appeal. Add a small garnish like an orange slice or a sprig of mint to elevate the look. The presentation can turn a simple drink into an unforgettable experience.
Creative Twists and Variations
This recipe is a playground. Here are some of my favorite ways to switch things up:
Ginger Mimosa
Add a splash of fresh ginger juice or a thin slice of ginger to the mix for a warm, spicy kick. This variation pairs wonderfully with brunch dishes that have a bit of heat, such as spicy sausage or jalapeño‑infused eggs.
Elderflower Elixir
Incorporate 1 tablespoon of elderflower liqueur into the mix for a floral, aromatic twist. The elderflower complements the citrus, creating a drink that feels like a garden in a glass.
Berry Bliss
Blend a handful of fresh strawberries into the orange juice for a colorful, sweet variation. The berries add a subtle sweetness and a burst of color that’s perfect for a spring brunch.
Lavender Lullaby
Infuse the champagne with a few lavender buds for a floral note that lingers on the palate. This subtle addition turns the mimosa into a sophisticated, calming beverage.
Minty Fresh
Add a handful of fresh mint leaves to the orange juice before mixing. The mint adds a refreshing, cooling effect that’s ideal for hot summer mornings.
Chocolate Mimosas
For a decadent twist, rim the glasses with cocoa powder and add a splash of dark chocolate liqueur. This variation is a treat for chocolate lovers and makes for a striking presentation.
Storing and Bringing It Back to Life
Fridge Storage
Store the pre‑mixed mimosa in a sealed container in the refrigerator for up to 2 hours. Keep the container upright to prevent the champagne from settling too quickly. When ready to serve, give it a gentle swirl to redistribute the bubbles.
Freezer Friendly
Freezing a mimosa is not recommended, as the carbonation will collapse. However, you can freeze individual glasses filled with champagne and orange juice separately and assemble them when needed. This method preserves the bubbles and flavor profile.
Best Reheating Method
Do not reheat a mimosa. If you need to bring it back to temperature, gently warm it in a bowl of warm water for a minute. Add a splash of cold water or a few ice cubes to maintain the chill. A tiny splash of water before reheating steams back to perfection, ensuring the drink remains lively.