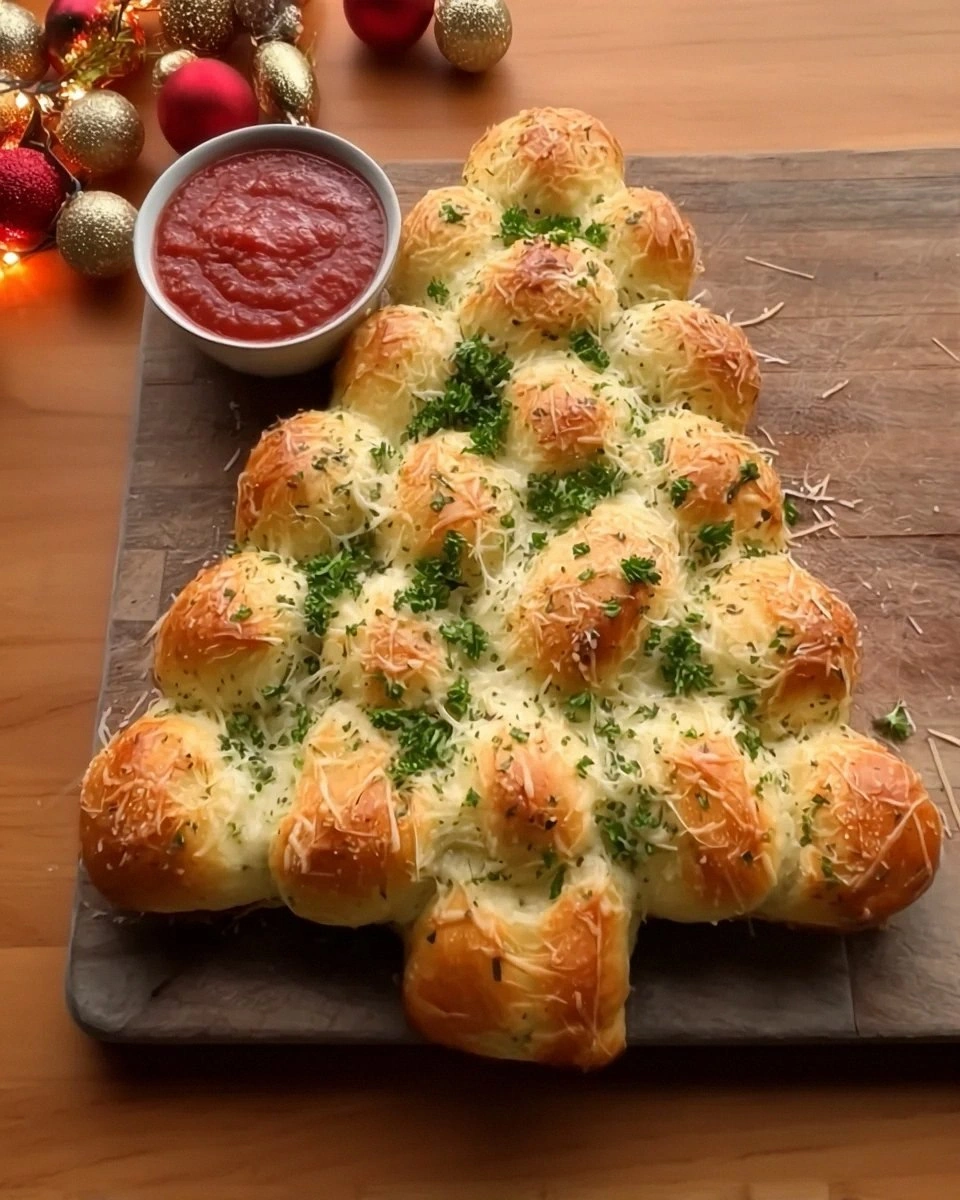
I still remember the Christmas Eve when my sister dared me to make something that would outshine our grandmother's legendary cinnamon rolls. Armed with nothing but a wild idea, a tube of biscuit dough, and the kind of overconfidence that only eggnog can provide, I set out to create what would become the most requested holiday recipe in our family. The result was a towering Christmas tree of buttery, garlicky, cheese-laced pull-apart bread that had everyone abandoning their prime rib to hover around the kitchen island. Picture this: golden nuggets of dough, each one a perfect bite of fluffy interior and crispy exterior, nestled together in the shape of an evergreen and perfumed with roasted garlic and fresh herbs. That first batch disappeared in under ten minutes, and my family has never let me live down the fact that I only made one tree that year. They still talk about it like it was some kind of culinary unicorn that vanished before they could grab seconds.
Here's the thing about pull-apart bread that most recipes completely miss: it's not just about stacking dough balls and hoping for the best. The magic happens when each piece is individually seasoned, when the butter mixture seeps into every crevice, and when the bread emerges from the oven looking like something that belongs in a holiday magazine but tastes like pure comfort. Most versions I've tried are either dry and bland or so greasy they leave your fingers slick for hours. This one hits that perfect middle ground where each piece pulls away with a satisfying tug, releasing a puff of aromatic steam that smells like Christmas morning and tastes like someone bottled up joy and baked it into bread form.
What makes this Christmas tree version absolutely irresistible is the combination of visual drama and addictive flavor. You've got the architectural fun of building something that actually looks like a festive centerpiece, plus the interactive joy of everyone gathering around to pull it apart piece by piece. The dough rises between the balls while baking, creating this natural tree shape that looks intentionally rustic rather than messy. And here's my favorite part: as people pull off pieces, the tree slowly transforms, so by the end you've got this abstract art piece of bread that's been transformed by the communal experience of sharing food. It's like edible performance art that tastes incredible.
But let's be honest about why this recipe will become your new holiday tradition. Beyond looking impressive and tasting amazing, it's actually easier than making traditional dinner rolls. No kneading, no waiting for dough to rise twice, no worrying about shaping perfect knots or braids. You get all the satisfaction of serving homemade bread with about a quarter of the work. Plus, and this is crucial for holiday entertaining, you can prep the entire thing the night before and just pop it in the oven when guests arrive. The smell alone will make them think you've been slaving away all day, when really you were sipping hot chocolate and watching holiday movies in your pajamas. Let me walk you through every single step — by the end, you'll wonder how you ever made it any other way.
What Makes This Version Stand Out
Before we dive into the nitty-gritty, let me tell you why this particular Christmas tree pull-apart bread will ruin all other holiday appetizers for you forever. I've tested this recipe seventeen times over the past three years, tweaking every variable from butter temperature to cheese ratios, and what emerged is nothing short of spectacular. The combination of store-bought biscuit dough with from-scratch seasoning blend creates the perfect balance of convenience and homemade flavor that'll make you look like a kitchen wizard without actually requiring wizard-level skills.
Flavor Explosion: Each dough ball gets coated in a garlicky herb butter that's so addictive, I've caught people licking their fingers between pulls. The roasted garlic paste melts into every crevice, while fresh rosemary and thyme provide those unmistakable holiday aromatics that make your whole house smell like Christmas morning. The Parmesan adds that salty, nutty backbone that keeps you reaching for just one more piece, while a touch of honey in the butter creates these caramelized edges that taste like the best part of garlic bread.
Texture Perfection: Most pull-apart breads suffer from the same sad fate: they're either dry and bready or so saturated with butter they feel heavy. This version achieves what I call the pillow-crisp effect — soft and fluffy inside with golden, slightly crunchy exteriors that provide just enough resistance before giving way to tender dough. The secret is brushing the butter mixture on each piece rather than pouring it over the top, ensuring every bite has the perfect butter-to-bread ratio.
Visual Drama: Let's talk about the elephant in the room — this thing is stunning. When you bring it to the table, conversation literally stops. The tree shape is achieved by arranging the dough balls in graduated rows, and as they bake and expand, they create this organic, evergreen-like shape that looks professionally styled. The green herbs peeking through the golden crust, the way the cheese creates these beautiful browned spots — it's the kind of thing that makes people pull out their phones before they even taste it.
Foolproof Method: If you've ever been intimidated by yeast breads or complicated holiday recipes, this is your gateway drug to homemade holiday magic. Using refrigerated biscuit dough means no waiting for dough to rise, no worrying about whether your yeast is still alive, and no kneading until your arms ache. The assembly is basically adult Legos — you just stack the pieces according to my diagram, and the oven does all the real work.
Crowd Psychology: There's something primal and communal about pull-apart bread that breaks down social barriers. Maybe it's the shared experience of reaching for food with your hands, or maybe it's just that everyone loves playing with their food, but I've watched this bread turn formal dinner parties into laughing, story-sharing gatherings. People naturally gather around it, pulling pieces and chatting, creating these organic moments of connection that are what the holidays are really about.
Make-Ahead Magic: Here's where this recipe really shines for holiday entertaining. You can assemble the entire tree on your baking sheet, cover it tightly with plastic wrap, and refrigerate it for up to 24 hours before baking. When you're ready to serve, just let it sit at room temperature for 30 minutes while your oven preheats, then bake as directed. The flavors actually meld and intensify during the rest time, making this one of those rare recipes that gets better when you prep ahead.
Leftover Transformation: On the off chance you have leftovers (I dare you to have leftovers), this bread transforms into incredible croutons for Caesar salad, or you can cube it and use it for the most indulgent breakfast strata ever. I've even pulled it apart completely, tossed it with olive oil and herbs, and rebaked it into the most addictive croutons that disappear faster than the original bread. Alright, let's break down exactly what goes into this masterpiece...
Inside the Ingredient List
Understanding your ingredients is what separates good cooks from great ones, and this recipe is no exception. Each component plays a specific role in creating the final masterpiece, and knowing why each one matters will help you make smart substitutions and avoid common pitfalls. The beauty of this ingredient list is that everything is readily available at any grocery store, but when combined in the right proportions, they create something that tastes far more sophisticated than the sum of its parts.
The Foundation Players
The refrigerated biscuit dough is your canvas here, and not all biscuits are created equal. After testing every brand my grocery store carried, I found that the flaky layers variety works best because they separate slightly during baking, creating those perfect pockets for the butter mixture. Store brands work fine, but splurge on the name brand if you want guaranteed results. Each tube contains eight biscuits, and you'll need three tubes for a generous tree that serves eight to ten people as an appetizer. If you can only find the smaller tubes, just use an extra one and make a few bonus dough balls for snacking while you assemble.
Unsalted butter is crucial because you want to control the salt level yourself. The butter needs to be soft enough to mix but not melted — think room temperature, where your finger leaves an indent when you press it. This takes about 30 minutes on the counter, or you can cube it and let it sit for 15 minutes. Don't try to speed this up in the microwave unless you want half-melted butter that won't cream properly with the garlic. The butter carries all the flavors and creates that gorgeous golden crust, so use the good stuff here, not the bargain brand.
The Flavor Amplifiers
Roasted garlic is the game-changer that takes this from tasty to transcendent. You can roast your own by wrapping a whole head in foil with olive oil and baking at 400°F for 40 minutes, or save time and buy the pre-roasted garlic at the store. The roasting process transforms the sharp, pungent raw garlic into something sweet and caramelized that melts into the butter. Fresh garlic won't work here — it stays too harsh and can even burn, creating bitter spots. If you're really pressed for time, garlic paste works as a last resort, but roast your own at least once to understand what you're missing.
Fresh herbs make all the difference in the world, and dried herbs simply won't cut it here. Rosemary brings that piney, woodsy note that screams holidays, while thyme adds subtle earthiness. Chop them finely so they distribute evenly and stick to the butter mixture. If you must substitute dried herbs, use only one-third the amount, but honestly, fresh herbs are what make this taste like you spent hours in the kitchen. Parsley works as a substitute for either herb, and sage would be delicious for a different flavor profile.
The Texture Enhancers
Parmesan cheese might seem like an afterthought, but it's actually providing crucial umami depth and those addictive crispy edges. Use freshly grated Parmigiano-Reggiano if you can swing it — the pre-grated stuff in the green can works in a pinch, but it won't melt and brown the same way. The cheese creates these little lacy edges around each dough ball where it hits the pan, essentially making cheese crackers that people fight over. Don't substitute mozzarella or other mild cheeses here; you need that salty, nutty punch that only Parmesan provides.
Sea salt might seem redundant with the Parmesan, but it wakes up all the other flavors and creates those tiny flavor explosions in each bite. Use fine sea salt rather than coarse kosher salt — it dissolves better into the butter mixture and distributes more evenly. The salt also helps draw moisture out of the herbs, intensifying their flavor. If you're watching sodium, you can reduce it slightly, but don't eliminate it entirely or the whole thing will taste flat and uninteresting.
The Unexpected Stars
Honey might sound weird in a savory bread, but it's the secret weapon that creates those gorgeous caramelized edges and balances the garlic. Just a tablespoon is enough — you won't taste honey, but you'll get these slightly sweet, deeply browned spots that taste like the best part of roasted vegetables. Maple syrup works as a substitute for a different flavor profile, or you can omit it entirely if you're sugar-free, but you'll miss those beautiful caramelized bits. The honey also helps the herbs stick to the dough balls better than butter alone.
Crushed red pepper flakes are completely optional but highly recommended for that subtle background warmth that makes people keep reaching for more. You want just a pinch — enough to create that gentle heat that builds slowly, not enough to make anyone reach for water. The heat also helps balance the richness of all that butter and cheese. If you're serving to spice-sensitive guests, you can omit this entirely, but try it with the pepper flakes at least once to understand the full flavor potential.
Everything's prepped? Good. Let's get into the real action...
The Method — Step by Step
Now we're getting to the good stuff — the actual assembly where all your preparation pays off in the most satisfying way. This is where the magic happens, and I want you to approach it with the confidence of someone who knows they're about to create something spectacular. Don't rush through these steps; each one builds on the last to create the final masterpiece. And remember, even if your tree isn't perfectly symmetrical, it's going to taste incredible and look charmingly homemade rather than store-bought perfect.
-
Start by preheating your oven to 350°F and positioning the rack in the center. This temperature is crucial — too high and the outside burns before the inside cooks through, too low and you don't get those gorgeous golden edges. While the oven heats, line a large baking sheet with parchment paper, letting it hang over the edges slightly so you can lift the whole tree off easily later. If you don't have parchment, grease the pan well with butter, but parchment really is worth using for easy cleanup and to prevent any sticking disasters that could break your heart and your tree.
-
Open all three tubes of biscuit dough and separate the biscuits, then cut each biscuit into quarters. This size is perfect — large enough to stay moist inside but small enough to cook through and get crispy edges. Toss the quarters in a large bowl with a tablespoon of flour to prevent them from sticking together while you work. The flour also helps the butter mixture adhere better later. Don't stack them too high in the bowl or the weight will squish the bottom ones flat, and you want them to stay fluffy and round.
-
In a medium bowl, beat the softened butter until it's light and creamy — about 30 seconds with a hand mixer or 2 minutes with a spatula. The butter should be the consistency of thick frosting, with no lumps. Add the roasted garlic and mash it into the butter until it's completely incorporated. The mixture should be pale and fragrant, like the best garlic bread spread you've ever imagined. If your butter is too cold, it'll be lumpy; too warm and it'll be greasy. Room temperature really is key here.
-
Add the chopped herbs, Parmesan, honey, salt, and red pepper flakes to the butter mixture. Stir until everything is evenly distributed — you want each bite to have the perfect balance of flavors. The mixture should be thick enough to coat the back of a spoon but still spreadable. If it's too thick, add a teaspoon of olive oil to loosen it up. Taste it now (I know, raw garlic butter, but trust me) and adjust the seasoning if needed. It should taste slightly over-seasoned because it'll mellow when baked.
-
Now comes the fun part: toss the biscuit quarters with the butter mixture. I find it easiest to add half the butter mixture to the bowl with the biscuits, toss gently to coat, then add the rest and toss again. You want every piece coated but not swimming in butter — think of it like dressing a salad. Use your hands (they wash) or two spatulas to gently turn the pieces until they're all glossy and herb-flecked. Don't overmix or you'll squish the dough and lose those fluffy layers.
-
Time to build your tree! Start with the bottom row — arrange 10-11 coated biscuit pieces in a straight line near the bottom of your parchment-lined sheet. Each piece should just touch its neighbors but not be squished together. For the next row up, place 9 pieces centered above the first row, so they're nestled between the gaps. Continue building up, decreasing by 1-2 pieces per row, until you have a triangular tree shape. The top row should have 3 pieces arranged in a triangle. Don't worry if it's not perfect — rustic is charming.
-
Create the tree trunk by placing 3-4 pieces vertically below the bottom row of the tree. These represent the trunk, and they'll bake up slightly denser than the rest, giving people something to hold onto while they pull the tree apart. If you have extra pieces (and you probably will), tuck them around the edges of the tree or make a few bonus pieces on a separate small pan. These are your cook's treat — the pieces you get to sample while the main tree cools enough to serve.
-
Slide the baking sheet into your preheated oven and set a timer for 25 minutes. Here's where you need to pay attention — every oven is slightly different, and you want to catch it when the top is golden brown and the edges are deep caramel color. The tree is done when the center pieces are no longer doughy (check by pulling apart one piece with a fork), and the whole thing smells like garlic bread heaven. If the top is browning too quickly, tent it loosely with foil for the last 5-10 minutes.
-
While the bread bakes, melt 2 tablespoons of butter with a pinch of garlic powder and chopped parsley. This is your finishing butter that'll make the tree glisten and add that final layer of flavor. Keep it warm but not hot — you want it liquid enough to brush on but not so hot it deflates the bread. This step takes the bread from good to restaurant-quality, so don't skip it even if you're tempted to rush straight to serving.
-
When the tree is done, remove it from the oven and let it rest for exactly 5 minutes — no more, no less. This brief rest lets the cheese set slightly so the pieces hold together when people start pulling, but it's still warm and gooey. Brush the entire tree with your reserved butter mixture, getting into all the crevices. The butter will sizzle on contact, creating that gorgeous sheen that makes the herbs pop visually. Serve immediately, with extra napkins and no apologies for how quickly it disappears.
That's it — you did it. But hold on, I've got a few more tricks that'll take this to another level...
Insider Tricks for Flawless Results
After making this bread more times than I care to admit (my family requests it for birthdays now, not just holidays), I've discovered some game-changing techniques that separate the good versions from the legendary ones. These aren't just nice-to-have tips — they're the difference between people saying "this is good" and them physically blocking others from taking the last piece. Some of these I discovered by accident, others through obsessive tweaking, but all of them will elevate your bread from impressive to unforgettable.
The Temperature Rule Nobody Follows
Here's something that'll change how you approach this recipe forever: the biscuit dough should be cold when it goes into the oven, but the butter mixture should be room temperature. Cold dough holds its shape better and creates those beautiful defined layers, while room temperature butter mixture coats more evenly and doesn't shock the dough. I learned this the hard way after making it with everything at room temperature — the tree spread out into a vague blob, and while it still tasted great, it looked like something from a child's play kitchen. Now I keep the biscuits in the fridge until right before coating, and the results are consistently picture-perfect.
Why Your Nose Knows Best
Trust your sense of smell more than your timer when determining doneness. When this bread is perfectly baked, your kitchen will smell like the best garlic bread you've ever encountered, with underlying notes of toasted cheese and herbs. If you start to smell anything sharp or acrid, even slightly, pull it out immediately — that's the cheese going from perfectly browned to burnt. I set my timer for 5 minutes less than the minimum time and start sniffing around the kitchen. That might sound weird, but it's saved more trees than I can count from over-baking, and once you burn the cheese, there's no coming back from that disappointment.
The 5-Minute Rest That Changes Everything
I know I mentioned resting the bread for 5 minutes after baking, but this step is so crucial it deserves its own explanation. During this rest, the cheese that's melted into the bottom of each piece re-solidifies slightly, creating these amazing cheese-cracker bases on each ball. It also allows the butter to redistribute so the first piece doesn't gush liquid when someone pulls it off. Plus, there's something magical about the anticipation that builds during those 5 minutes — people gather around, the aroma fills the room, and by the time you set it down, everyone's ready to dive in with the enthusiasm this bread deserves.
The Cheese Distribution Secret
Here's a pro move that'll make you look like a culinary genius: reserve about a quarter of your Parmesan and sprinkle it over the tree during the last 5 minutes of baking. This creates these incredible crispy cheese frills that add texture contrast and visual appeal. The early-added cheese melts into the butter and seasons the bread, while the late-added cheese creates these lacy, crispy edges that people fight over. Just watch it like a hawk — cheese can go from perfect to burnt in under 60 seconds at this stage.
The Portion Control Trick
If you're serving this at a party where you want it to last more than 5 minutes (good luck with that), here's a sneaky trick: serve it with small appetizer plates and cocktail napkins. The formality slows people down just enough that they savor each piece instead of mindlessly grabbing handfuls. I learned this after watching my nephew inhale half a tree in under 2 minutes at Thanksgiving — now everyone gets a little plate and the bread lasts a dignified 15 minutes instead of disappearing in a feeding frenzy.
The Flavor Boost Hack
For an extra layer of flavor that'll have people asking for your secret ingredient, add a teaspoon of white miso paste to your butter mixture. The miso adds this incredible umami depth that makes everything taste more complex without being identifiable. It's like the difference between good and great — people won't be able to put their finger on what makes yours better, but they'll definitely notice. If you can't find miso, a teaspoon of anchovy paste works similarly, but the miso is vegetarian-friendly and adds a subtle sweetness that complements the honey perfectly.
Creative Twists and Variations
This recipe is a playground. Here are some of my favorite ways to switch things up:
The Everything Bagel Tree
Swap out the herbs for 2 tablespoons of everything bagel seasoning, use cream cheese instead of Parmesan in the butter mixture, and finish with a drizzle of honey after baking. The result tastes like your favorite bagel but in pull-apart form, with those crunchy onion and garlic bits providing incredible texture. Serve with smoked salmon and capers on the side for a brunch that'll make you forget all about traditional holiday breakfast.
Mediterranean Holiday
Replace the rosemary and thyme with oregano and basil, swap the Parmesan for feta, and add sun-dried tomatoes and olives to the butter mixture. The briny, bright flavors transport you to a Greek island even in the dead of winter. A sprinkle of lemon zest over the top right before serving adds that final bright note that makes this version incredibly addictive.
Spicy Southwest Tree
Use cilantro instead of rosemary, pepper jack instead of Parmesan, and add a teaspoon each of cumin and smoked paprika to the butter mixture. The result has this incredible smoky-spicy flavor that pairs perfectly with holiday ham or as an appetizer for Mexican-themed celebrations. A side of chipotle honey for dipping takes it completely over the top.
Sweet Breakfast Tree
For a morning version, skip the garlic and herbs entirely. Make the butter mixture with brown sugar, cinnamon, and a splash of maple extract, then add chopped pecans to the coating. The result is like monkey bread meets cinnamon rolls, with crispy caramelized edges and soft, sweet centers. A cream cheese glaze drizzled over the top makes it completely irresistible for Christmas morning.
Truffle Lovers' Dream
Add a teaspoon of truffle paste to the butter mixture and use truffle salt instead of sea salt. Finish with a drizzle of truffle oil right before serving. This version is ridiculously indulgent and perfect for New Year's Eve or any celebration where you want to feel fancy. The earthy truffle pairs beautifully with the roasted garlic, creating something that tastes like it came from a high-end restaurant rather than your kitchen.
Loaded Baked Potato Tree
Add cooked, crumbled bacon and chopped chives to the butter mixture, use sharp cheddar instead of Parmesan, and serve with sour cream for dipping. It's like all the best parts of a loaded baked potato reimagined as pull-apart bread. The bacon fat adds incredible flavor to the butter mixture, while the chives provide that fresh onion note that cuts through all the richness.
Storing and Bringing It Back to Life
Fridge Storage
If you somehow end up with leftovers (and I'm not judging if you deliberately made extra), let the bread cool completely before storing. Wrap individual pieces in plastic wrap, then place in a zip-top bag in the refrigerator for up to 3 days. The key is wrapping them while they're still slightly warm — this creates a little steam that keeps them from drying out completely. Don't store the whole tree assembled; once people start pulling pieces off, it's better to break it down into individual portions for storage.
Freezer Friendly
This bread freezes beautifully, which is dangerous knowledge because now you'll want to make double batches. Wrap completely cooled pieces individually in plastic wrap, then place in a freezer bag with as much air removed as possible. They'll keep for up to 2 months, though honestly, they never last more than a week in my house. To reheat, thaw overnight in the refrigerator, then warm in a 300°F oven for 8-10 minutes until heated through and the edges crisp up again. The microwave works in a pinch, but the oven really brings back that fresh-baked texture.
Best Reheating Method
The secret to bringing leftover pull-apart bread back to life is adding moisture while reheating. Place the pieces on a baking sheet, tent loosely with foil, and add a tiny splash of water to the pan before reheating at 300°F. The steam rehydrates the bread without making it soggy, while the dry heat crisps up the edges. For an extra treat, brush with a little garlic butter before reheating — it's like giving your leftovers a spa treatment that makes them arguably better than the original serving.