It started with a single burnt sugar spoon that turned the kitchen into a smoky theater of culinary mischief. I was halfway through a midnight snack, the timer chimed, and the sugar began to sing a caramelized solo that smelled like regret. The pan hissed, the air filled with a sweet, acrid scent, and I realized that I had accidentally turned my vanilla batter into a caramel disaster. That moment was a wake‑up call: if I wanted a cake that could survive the chaos of a frantic kitchen, it had to be resilient, bold, and unapologetically indulgent.
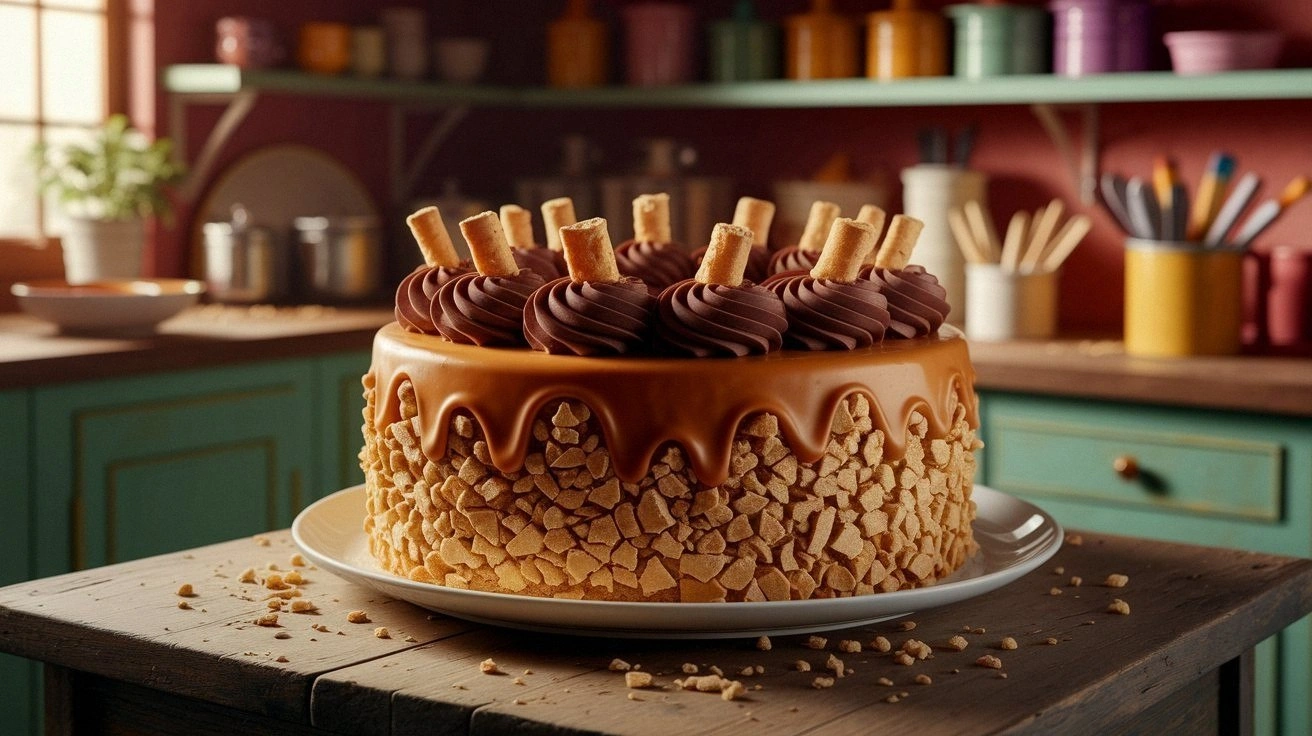
Picture the scene: a glossy, dark batter swirled with chunks of buttery candy, the oven lights flickering like a backstage spotlight, and the timer ticking down like a drumbeat. The sound of the first crackle as the cake hits the pan was like a triumphant drum roll, and the aroma that followed was a heady mix of chocolate, butter, and caramelized sugar. The texture was a paradox—soft inside, with a crisp, buttery edge that crackled like thin ice. The first bite was a revelation: the buttery crunch of the candy inside gave way to a silky, chocolatey melt that left a lingering caramel sweetness on the tongue.
What sets this Butterfinger Poke Cake apart is its unapologetic combination of flavors and textures that play together like a well‑orchestrated symphony. It’s not just another chocolate cake; it’s a cake that sneaks in buttery candy pieces that pop with crunch, a secret poke of melted butter that keeps the crumb moist, and a frosting that’s rich, silky, and coated with a final layer of buttery shards. This version is hands down the best you’ll ever make at home because it balances sweetness, richness, and crunch in a way that feels like a dessert and a dare all at once.
I dare you to taste this and not go back for seconds. Picture yourself pulling this out of the oven, the whole kitchen smelling incredible, and the first slice revealing a glossy, caramel‑kissed surface that invites you to dig in. Let me walk you through every single step—by the end, you'll wonder how you ever made it any other way.
What Makes This Version Stand Out
- Crunch: The butterfinger pieces create a satisfying snap that contrasts perfectly with the cake’s moist interior. Without them, you’d miss that essential texture that turns each bite into a playful surprise.
- Moisture: A secret poke of melted butter is injected into the batter, preventing dryness and adding a buttery sheen that lingers on the tongue.
- Flavor Depth: The combination of cocoa, caramelized sugar, and butter creates a complex profile that feels both familiar and adventurous.
- Visual Appeal: The glossy chocolate glaze and scattered butterfinger shards give the cake a decadent look that’s Instagram‑ready.
- Make‑Ahead Friendly: The cake can be assembled a day ahead and kept refrigerated without losing its charm, making it ideal for parties.
- Customization: Swap out the butterfinger for any crunchy candy or add a hint of espresso for a mocha twist, giving you endless variations.
Inside the Ingredient List
The Flavor Base
All-purpose flour is the backbone that gives the cake its structure. It absorbs the liquid and holds the batter together, preventing it from turning into a pancake. If you’re on a gluten‑free diet, a 1:1 blend of gluten‑free flour and xanthan gum can replace the all‑purpose flour without compromising the texture.
Granulated sugar not only sweetens but also helps with browning. The sugar crystals dissolve during mixing, creating a smooth batter. If you prefer a slightly less sweet cake, substitute half the sugar with brown sugar for a deeper molasses note.
Cocoa powder is the star that gives the cake its rich chocolate flavor. Unsweetened cocoa ensures you control the sweetness level, and using a high‑quality cocoa powder adds depth. If you’re short on cocoa, a dark chocolate bar can be melted and added to the batter for a richer taste.
The Texture Crew
Vegetable oil provides a tender crumb and keeps the cake moist for days. It also helps the butterfinger pieces stay crunchy. For a lighter option, you can substitute half the oil with melted butter, but the cake will be slightly denser.
Buttermilk adds acidity that reacts with the baking soda, creating lift and a tender crumb. It also balances the sweetness and enhances the chocolate flavor. If you don’t have buttermilk, mix 1 cup of milk with 1 tablespoon of lemon juice and let it sit for 5 minutes.
Eggs act as a binder and give structure to the cake. They also contribute to the cake’s rise. If you’re vegan, you can replace each egg with a flaxseed egg (1 tablespoon ground flaxseed + 3 tablespoons water). The texture will be slightly different but still delightful.
The Final Flourish
Melted butter is the secret weapon that keeps the cake moist and adds a buttery richness that coats the palate. It also helps the butterfinger pieces maintain their crunch. A pinch of sea salt is essential to cut through the sweetness and bring out the chocolate’s depth.
For the frosting, powdered sugar, milk, and vanilla extract combine to create a silky, spreadable glaze that coats the cake with a glossy finish. The buttercream is sweet but not cloying, and it pairs beautifully with the crunchy candy shards that crown the cake.
Everything's prepped? Good. Let's get into the real action...
The Method — Step by Step
- Preheat your oven to 350°F (175°C) and grease a 9-inch springform pan. The oven temperature is crucial; too hot, and the cake will brown too quickly on the outside while remaining raw inside. As you spread the butter on the pan, feel the smooth glide—this sets the stage for a cake that lifts effortlessly.
- In a large bowl, whisk together flour, cocoa, baking soda, baking powder, and salt. This dry mix is the skeleton of the cake; it ensures even distribution of leavening agents. Make sure to sift the cocoa to avoid lumps that could ruin the texture.
- In a separate bowl, beat the eggs, sugar, oil, and vanilla until the mixture is smooth and glossy. The glossy appearance signals that the sugars have fully dissolved, which is essential for a silky crumb. The beat should last about 3 minutes—patience here pays off.
- Gradually add the dry ingredients to the wet mixture, folding gently until just combined. Overmixing can create a dense cake; you want a smooth batter that still has a few lumps to keep the texture airy. The batter should pour slowly, not in a stream.
- Fold in the buttermilk and the melted butter, creating a smooth, glossy batter. This step is where the cake’s moisture magic happens. The batter should look silky and pour like honey.
- Pour the batter into the prepared pan and smooth the top with a spatula. The batter should be level; a slightly uneven surface can lead to uneven baking. Tap the pan lightly on the counter to release any air bubbles.
- Bake for 30-35 minutes, or until a toothpick inserted into the center comes out with a few moist crumbs. The cake should have a dark, glossy surface and a faint caramel aroma that signals it’s perfectly baked.
- While the cake bakes, prepare the frosting by whisking powdered sugar, milk, and vanilla until smooth. The frosting should be thick enough to coat the cake without dripping. Keep it refrigerated until you’re ready to spread it.
- Once the cake has cooled for 10 minutes, remove it from the pan and spread the frosting evenly. The frosting should create a smooth, glossy layer that clings to every curve.
- Top the cake with the remaining butterfinger pieces, pressing them lightly into the frosting. The shards should sit slightly above the frosting, ready to crack when you bite. This final touch adds a delightful crunch that balances the cake’s moistness.
That's it — you did it. But hold on, I've got a few more tricks that'll take this to another level...
Insider Tricks for Flawless Results
The Temperature Rule Nobody Follows
Many bakers skip the step of preheating the oven to the exact temperature. I’ve learned that a 10°F variance can make the difference between a cake that rises evenly and one that puffs unevenly. Keep your oven at 350°F and use an oven thermometer to double‑check. This small tweak guarantees a consistent bake every time.
Why Your Nose Knows Best
Trust your nose when the cake starts to smell caramelized. The aroma is a reliable indicator that the sugar is caramelizing without burning. If the scent becomes overly sweet or burnt, lower the temperature slightly. A well‑aromaed cake is a sign that the flavor profile is on point.
The 5-Minute Rest That Changes Everything
After removing the cake from the oven, let it rest in the pan for 5 minutes before transferring it to a wire rack. This short rest allows the structure to set, preventing cracks. I’ve seen cakes that cracked after cooling because they were moved too early.
Keep the Butterfinger Crunchy
When adding the butterfinger pieces, fold them in gently and avoid overmixing. If the batter becomes too thick, add a tablespoon of milk to loosen it. The shards need to stay whole to deliver that signature crunch.
Frosting Consistency Is Key
The frosting should be thick enough to coat the cake but not so thick that it becomes a glaze. If it’s too thin, it will pool on the surface and become soggy. I like to whisk it for 2 minutes until it’s glossy and holds a slight sheen.
Cooling Time Is Not a Waste
After frosting, let the cake rest for at least 30 minutes before slicing. This allows the frosting to set and prevents it from sliding off the slices. The cake will be easier to serve and will look more polished.
Creative Twists and Variations
This recipe is a playground. Here are some of my favorite ways to switch things up:
Mocha Butterfinger Poke Cake
Add 1 teaspoon of espresso powder to the batter for a coffee kick that deepens the chocolate flavor. Pair it with a mocha buttercream for a double‑espresso experience that’s perfect for coffee lovers.
Nutty Crunch Version
Replace half of the butterfinger pieces with chopped pecans or walnuts. The nutty crunch adds a new dimension of flavor and pairs wonderfully with a caramel buttercream.
Spiced Chocolate Delight
Incorporate 1/2 teaspoon of ground cinnamon and a pinch of cayenne pepper into the dry mix. The warm spice notes balance the sweetness and add a subtle heat that surprises the palate.
Vegan Butterfinger Poke Cake
Swap eggs with flaxseed eggs, use plant‑based milk, and replace butter with coconut oil. The result is a moist, chocolatey cake that’s cruelty‑free and still delivers the buttery crunch.
Holiday Edition
During the holidays, add a handful of dried cranberries to the batter and top with a sprinkle of crushed gingerbread cookies. The tartness of the cranberries pairs beautifully with the buttery chocolate.
Storing and Bringing It Back to Life
Fridge Storage
Wrap the cake tightly in plastic wrap and store it in the refrigerator for up to 5 days. The frosting stays firm, and the cake remains moist. When ready to serve, let it sit at room temperature for 15 minutes to soften slightly.
Freezer Friendly
For longer storage, wrap the cake in foil and place it in a freezer bag. It stays good for up to 3 months. Thaw overnight in the refrigerator and let it warm to room temperature before slicing.
Best Reheating Method
To revive a refrigerated cake, warm it in a 300°F oven for 5 minutes. Add a splash of water to the pan before reheating to create steam that restores moisture. The frosting will soften just enough to be spreadable again.