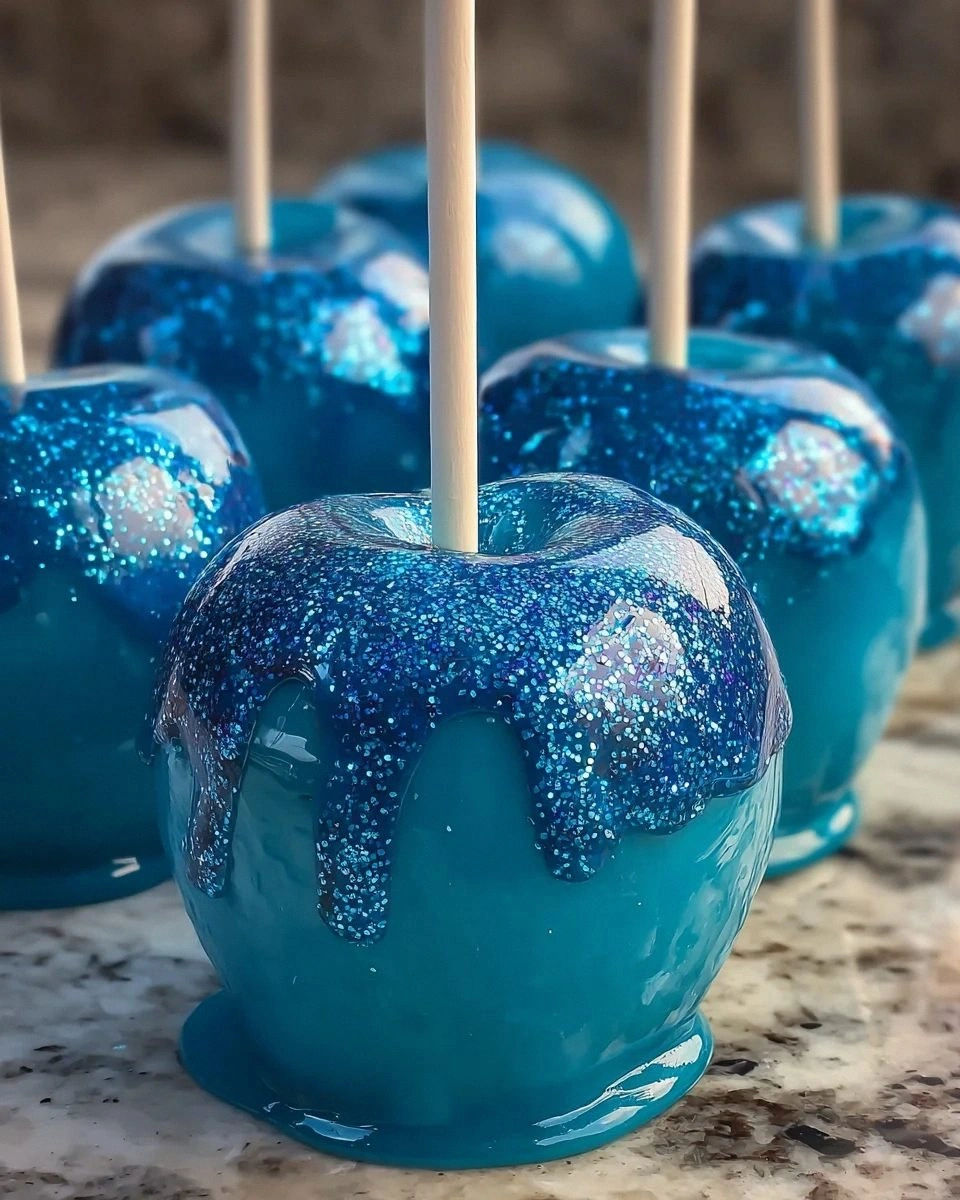
Picture this: it’s a rainy Saturday afternoon, the kind that makes you want to curl up with something sweet, but the pantry looks as barren as a desert. I was scrolling through my phone, scrolling past endless caramel apple memes, when my friend dared me to create a candy apple that actually looks like a piece of the ocean. I laughed, I scoffed, and then I thought, “Why not? I’ve got apples, sugar, and a whole lot of imagination.” The kitchen became my laboratory, the stovetop my runway, and the result? Sweet Ocean Candy Apples that turned my humble kitchen into a seaside carnival. I’ll be honest — I ate half the batch before anyone else got a chance to try them, and the look on their faces when they saw the glittering blue coating was priceless.
The moment I pulled the first batch out of the pan, the scent of caramelized sugar mingled with a faint vanilla whisper, and the glossy blue glaze caught the light like a tide pool at sunrise. The apples themselves were crisp, their tartness cutting through the sugary wave, while the coating cracked under the bite with a satisfying snap that reminded me of thin ice on a frozen pond. I could hear the faint crackle as the candy set, feel the cool stick of the wooden skewer in my hand, and taste the perfect balance of tart and sweet that made my taste buds do a little happy dance. It was as if the ocean had decided to take a vacation inside my kitchen, and I was the host serving up the most refreshing treat of the season.
Most candy apple recipes either drown the fruit in a cloying, sticky mess or they miss the magic of a glossy finish that shimmers like sunlight on water. This version stands out because it uses a precise sugar‑corn‑syrup ratio that prevents crystallization, a dash of vanilla that adds depth, and a splash of blue gel food coloring that turns each apple into a miniature sea‑foam masterpiece. The secret? A quick “glaze shock” technique that I’ll reveal later, which locks in that glossy sheen and gives the coating a snap that’s both delicate and sturdy. If you’ve ever struggled with candy apples that turn grainy or lose their shine, you’re not alone — and I’ve got the fix.
But wait, there’s more. I’m about to share a technique that most recipes completely ignore: a brief dip in ice water after the coating sets, which creates a micro‑crackle that feels like stepping on seashells. I dare you to taste this and not go back for seconds. Okay, ready for the game‑changer? Let me walk you through every single step — by the end, you’ll wonder how you ever made it any other way.
What Makes This Version Stand Out
- Oceanic Color: The vivid blue glaze isn’t just for looks; it’s infused with a hint of vanilla that balances the sweetness and gives the candy a subtle aromatic depth.
- Crisp Snap: Thanks to the corn syrup, the coating hardens with a clean snap that shatters like thin ice, delivering a satisfying crunch with every bite.
- Fruit Integrity: Using firm Granny Smith or Honeycrisp apples ensures the fruit stays crisp, providing a tart counterpoint that prevents the treat from becoming cloyingly sweet.
- Simple Setup: Only eight ingredients, all pantry staples, mean you can whip these up without a special trip to the store.
- Show‑Stopping Appeal: The edible blue glitter adds a sparkle reminiscent of sunlight dancing on ocean waves, turning a simple dessert into a conversation starter.
- Make‑Ahead Friendly: The candy coating holds up for days when stored properly, making it perfect for parties, fairs, or a surprise treat for the kids.
- Versatile Base: The recipe can be tweaked with other colors or flavors, allowing you to create a whole fleet of “sea‑themed” treats.
- Kid‑Approved: The bright hue and fun stick format make these a hit with children, while the sophisticated flavor profile keeps adults coming back for more.
Inside the Ingredient List
The Fruit Foundation
Medium Apples: Granny Smith or Honeycrisp are best for their tartness and crunch. They create a perfect balance with the sweet candy coating, ensuring each bite feels bright rather than syrupy. If you skip the crisp apple and use a softer variety, the fruit will turn mushy under the heat, ruining that satisfying snap. A quick tip: store your apples in the fridge for 30 minutes before coating; the chill helps the glaze adhere better.
The Sweet Shell
Granulated Sugar: This is the star of our candy coating, providing sweetness and that classic crunchy texture. Sugar caramelizes at high heat, giving the glaze its glossy sheen. If you reduce the sugar, the coating will be thin and prone to cracking; increase it and you risk a burnt, bitter taste. For a subtle twist, try a half‑cup of brown sugar for a caramel‑kissed hue.
Light Corn Syrup: A key element to prevent the sugar from crystallizing and ensure a smooth, glossy finish. The syrup acts like a plasticizer, keeping the candy flexible enough to crack beautifully. Skipping it will give you a grainy texture that feels like chewing on sand. If you’re allergic to corn, a glucose syrup works just as well.
The Liquid Lift
Water: Helps dissolve the sugar as we heat it up, allowing for an optimal candy consistency. Too little water and the sugar will scorch; too much and you’ll extend the cooking time unnecessarily. A good rule of thumb is to use just enough to wet the sugar, usually a quarter cup for this batch.
Vanilla Extract: A lovely optional flavor enhancer that adds depth to the sweetness of the candy coating. It’s the secret whisper that makes the glaze taste less one‑dimensional. If you’re feeling adventurous, a splash of almond extract can add an intriguing nutty undertone.
The Oceanic Finish
Blue Gel Food Coloring: This gives the candy its ocean‑inspired color. Feel free to get creative with different colors! A few drops are all you need; over‑coloring can lead to a bitter aftertaste. If you want a gradient effect, swirl in a touch of turquoise after the blue sets.
Edible Blue Glitter: An optional but delightful addition that adds sparkle reminiscent of sunlight dancing on ocean waves. Sprinkle it while the glaze is still tacky for the best adhesion. If glitter isn’t your style, a dusting of powdered sugar can give a frosty look.
Everything's prepped? Good. Let's get into the real action...
The Method — Step by Step
Start by washing the apples thoroughly, then pat them dry with a clean kitchen towel. Insert a lollipop stick or wooden skewer about halfway up each apple, making sure it’s centered for balance. This step sounds simple, but a crooked stick can cause the coating to slide off later. Once the sticks are secure, set the apples on a parchment‑lined baking sheet and chill them in the freezer for 10 minutes; this “cold shock” helps the glaze set faster once it hits the pan.
In a medium saucepan, combine the granulated sugar, light corn syrup, and water. Place the pan over medium‑high heat and stir gently until the sugar dissolves. When the mixture starts to boil, stop stirring — the crystals need to settle for a smooth glaze. Bring the mixture to a rolling boil, then attach a candy thermometer and watch the temperature climb to 300°F (hard‑ball stage). That sizzle when it hits the pan? Absolute perfection.
Kitchen Hack: If you don’t have a candy thermometer, drop a tiny droplet of the syrup into a glass of cold water; if it forms a hard ball that you can’t bite, you’re at the right stage.Once the temperature hits 300°F, immediately remove the pan from heat. Quickly stir in the vanilla extract and the blue gel food coloring; the color will bloom instantly, turning the syrup a deep ocean hue. Be swift — the mixture will begin to set the moment it cools, and you want a uniform shade. If you prefer a lighter tint, add a splash of water and stir gently to dilute.
Now comes the fun part: the dip. Using a slotted spoon, lift an apple and plunge it into the hot glaze, allowing the excess to drip back into the pan. Rotate the apple to coat it evenly, then give it a gentle shake to remove any drips. Place the coated apple back onto the parchment sheet. Repeat until all apples are cloaked in that sapphire sheen. This step is where most recipes go wrong — they let the glaze sit too long before dipping, causing it to thicken and clump.
While the glaze is still tacky, sprinkle a pinch of edible blue glitter over each apple. The glitter adheres best when the surface is slightly wet, creating a sparkle that catches the light like sea spray. If you’re feeling extra fancy, drizzle a thin line of white chocolate for a wave‑like contrast.
Here’s the “glaze shock” that sets the snap: once all apples are glazed, place the baking sheet into the freezer for exactly 2 minutes. This rapid chill locks in the glossy finish and creates a micro‑crackle that feels like stepping on a beach of shells. Do not exceed 2 minutes, or the coating will become too brittle and may crack under pressure.
Watch Out: If you leave the apples in the freezer longer than 2 minutes, the coating can become glass‑like and will shatter when you bite.After the chill, transfer the apples to a wire rack set over a tray to catch any drips. Let them sit at room temperature for 5 minutes; this allows the glaze to settle fully while retaining that glossy snap. You’ll notice the coating glistening like a tide pool at low tide — that’s the moment of truth.
Give each apple a final inspection. The glaze should be smooth, the glitter evenly dispersed, and the stick firmly embedded. If you spot any thin spots, you can quickly re‑dip the apple for a second coat, but keep the second dip brief to avoid a gummy texture.
Serve immediately, or store them as outlined in the next section. Picture yourself pulling these out of the fridge, the whole kitchen smelling of caramel and vanilla, the blue glaze catching the light as you hand them to friends. That reaction? Pure delight. That’s it — you did it. But hold on, I've got a few more tricks that'll take this to another level...
Insider Tricks for Flawless Results
The Temperature Rule Nobody Follows
Most home cooks think “just boil the sugar” is enough, but the exact 300°F mark is crucial. Below that, the glaze stays soft and sticky; above it, you risk a burnt, bitter flavor. Use a reliable candy thermometer and trust the numbers, not the color. I once tried to eyeball it and ended up with a caramel that tasted like burnt toast — a lesson I’ll never forget.
Why Your Nose Knows Best
When the syrup reaches the right stage, it releases a faint buttery aroma that’s unmistakable. If you smell a hint of caramelized nuts, you’ve overshot the temperature. Trust your nose as much as the thermometer — it’s an ancient kitchen instinct that saves countless batches.
The 5‑Minute Rest That Changes Everything
After the freezer shock, let the apples rest for five minutes on a wire rack. This short pause lets the glaze contract slightly, creating that satisfying “crackle” when you bite. Skipping this step yields a coating that feels rubbery, not crisp.
Glitter Management
Edible glitter can clump if stored in a humid environment. Keep it in an airtight container with a desiccant packet. When you’re ready to use it, give the jar a gentle shake to loosen any settled particles. This ensures an even sparkle on every apple.
Stick Stability
Wooden skewers can sometimes split under the weight of the glaze. To avoid this, choose bamboo sticks that are at least 8 inches long and give them a quick dip in water before inserting them. The moisture makes the wood more pliable and less likely to break.
Creative Twists and Variations
This recipe is a playground. Here are some of my favorite ways to switch things up:
Sunset Citrus
Swap the blue gel for orange food coloring and add a splash of lemon zest to the sugar mixture. The result is a vibrant, citrus‑kissed apple that looks like a sunset over the sea.
Midnight Galaxy
Use black food coloring and sprinkle edible silver glitter instead of blue. The dark coating with sparkling specks mimics a star‑filled night sky, perfect for a Halloween party.
Caramel Wave
Replace half the granulated sugar with brown sugar and add a pinch of sea salt after the glaze sets. The caramel‑salt combo gives a sophisticated flavor that pairs beautifully with the apple’s tartness.
Minty Breeze
Stir a few drops of peppermint extract into the glaze and use a mint‑green food coloring. The cool mint flavor adds a refreshing twist that’s perfect for summer gatherings.
Spiced Autumn
Add a teaspoon of pumpkin spice and a dash of cinnamon to the sugar mixture, then use a deep amber food coloring. This variation brings the cozy warmth of fall to a classic candy apple.
Chocolate Dipped
After the blue glaze has set, drizzle dark chocolate over the top and sprinkle a pinch of sea salt. The contrast of bitter chocolate with sweet, salty candy creates a complex flavor profile that’s hard to resist.
Storing and Bringing It Back to Life
Fridge Storage
Place the finished apples in an airtight container lined with parchment paper to prevent them from sticking together. They’ll stay fresh for up to five days, retaining both crunch and shine. If you notice any condensation, pat the apples dry with a paper towel before resealing.
Freezer Friendly
Wrap each apple individually in a small piece of plastic wrap, then arrange them in a freezer‑safe bag. They can be frozen for up to two months. When you’re ready to serve, let them thaw at room temperature for 15 minutes, then give them a quick blast in a 350°F oven for 3 minutes to restore the glaze’s snap.
Best Reheating Method
To revive a slightly softened coating, place the apple on a baking sheet and warm it in a preheated oven at 300°F for 2‑3 minutes. Add a tiny splash of water to the pan before heating; the steam helps the glaze re‑gloss without melting the apple.