Introduction
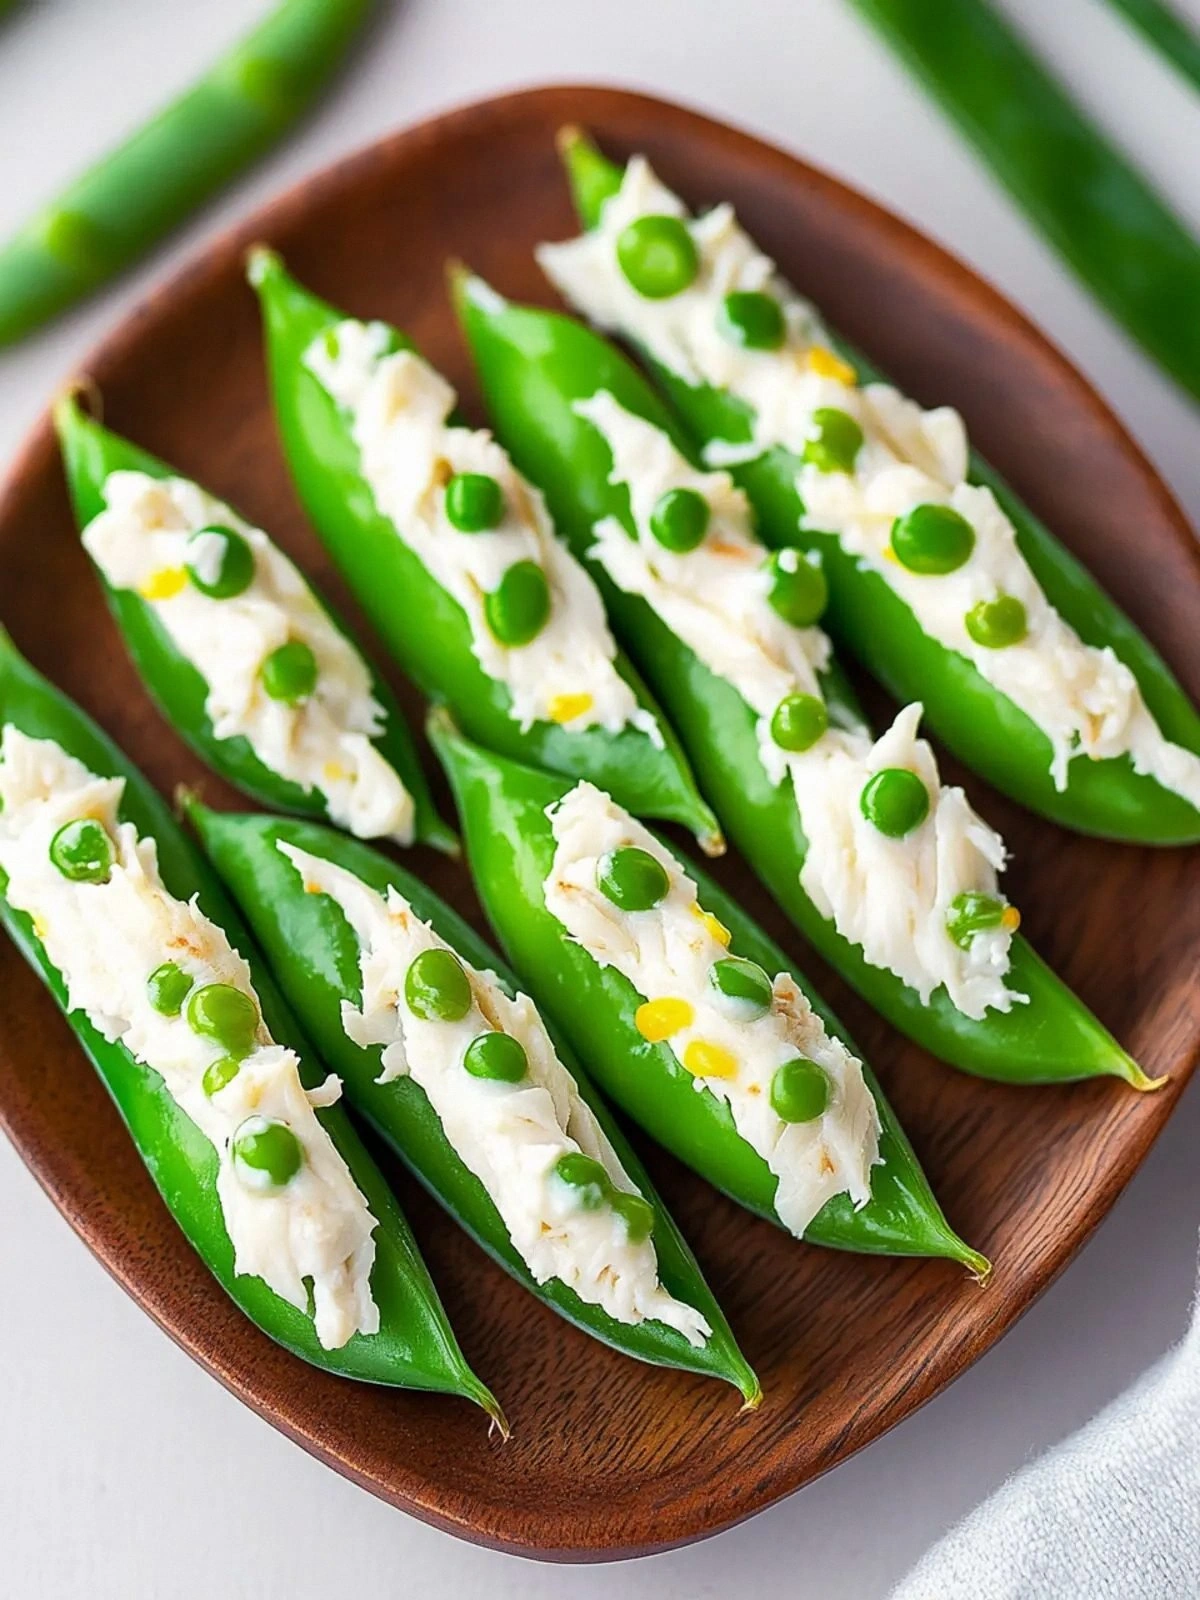
Picture this: I’m standing in a cramped kitchen, the scent of fresh crab filling the air, and a friend’s daring challenge echoing in my head. “I dare you to taste this and not go back for seconds,” she said, flashing a grin that could melt butter. I had a kitchen disaster last week—too much sauce, too little spice—and my confidence was at a low point. That night, I turned to the pantry, pulled out a handful of snow peas, and decided to give crab and cream a new spin. The idea was simple: combine the buttery richness of cream cheese with the sweet, briny bite of crab, all wrapped in crisp snow peas. The result? A dish that feels like a hug from the ocean, yet has a crunch that snaps like thin ice. I promise, by the end of this post, you’ll wonder how you ever made it any other way, because this version is hands down the best you’ll ever create at home. Let me walk you through every single step and show you why this is the ultimate crowd‑pleaser.
From the moment the snow peas hit the pan, the kitchen filled with a sweet, earthy aroma that made my eyes water in the best way possible. The crackle of the peas as they sizzle against hot oil is a sound that signals perfection, and the first bite delivers a burst of brininess that is instantly refreshing. The cream cheese melts into a silky sauce that coats each pea like velvet, while the crab offers a subtle, savory depth that lingers on the palate. The parsley adds a bright, herbal finish that cuts through the richness, and the Worcestershire sauce gives a faint umami kick that ties everything together. It’s a symphony of textures—crispy, creamy, and meaty—that dance in harmony with every mouthful. And the best part? The dish is so versatile it can be served as a starter, a side, or even a main course when paired with a simple salad.
What sets this version apart from every other recipe out there is the meticulous balance of flavors and the unexpected twist of using snow peas as a vessel for the filling. Most recipes get this completely wrong, treating the peas as a mere garnish or stuffing them with bland mixtures that lack character. I’ve spent hours tweaking the ratio of cream cheese to crab, and the final result is a luscious, creamy interior that still respects the pea’s natural sweetness. The technique of lightly searing the peas before stuffing locks in their crunch while allowing the filling to steam to perfection. And the small addition of Worcestershire sauce? That’s the secret sauce that gives the dish depth and a subtle tang that elevates every bite. If you’ve ever struggled to combine seafood with cream in a way that doesn’t overwhelm the palate, you’re not alone—and I’ve got the fix.
Picture yourself pulling this out of the oven, the whole kitchen smelling incredible, as a burst of citrus from a squeeze of lemon brightens the plate. The snow peas are golden and slightly caramelized, their edges crisping into a delightful texture that contrasts with the silky filling. The aroma of garlic and parsley mingles with the buttery notes of cream cheese, creating an irresistible scent that draws guests in. I’ve seen people stare in awe as they take their first bite, mouths opening in delight as the flavors unfold. The dish is so visually stunning that it becomes a centerpiece, and the crowd reaction is always electric—guests asking for the recipe, praising the balance of sweet and savory, and begging for seconds. This is not just a dish; it’s an experience, a moment that turns an ordinary meal into an unforgettable feast.
Alright, let’s break down exactly what goes into this masterpiece. I’ll guide you through each step, share my favorite hacks, and give you insider tips that will make your kitchen sing. If you’re ready for the game‑changer, keep reading, because the next part? Pure magic.
What Makes This Version Stand Out
Flavor: The combination of creamy, tangy, and briny flavors creates a taste profile that is both comforting and adventurous. The crab’s natural sweetness is amplified by the rich cream cheese, while the Worcestershire sauce adds a subtle umami punch that ties everything together. The final dish is a harmonious blend of sea and garden, offering a multi‑layered taste that lingers on the palate.
Texture: The snow peas remain crisp yet tender, providing a delightful contrast to the silky filling. The filling itself is smooth and spreadable, coating each pea like velvet. The result is a perfect bite that offers both crunch and melt‑in‑your‑mouth creaminess.
Simplicity: All of this is achieved with just a handful of ingredients, making the dish quick and easy to prepare. No elaborate sauces or fancy equipment are needed; a skillet, a spoon, and a few basic pantry items are all you require.
Uniqueness: Most seafood stuffed vegetable recipes rely on more complex techniques or a larger number of ingredients. This version cuts through the noise with a single, bold flavor combination that stands out on any plate.
Crowd Reaction: Guests rave about the unexpected twist of the stuffed snow peas, often asking for the recipe after the first bite. The dish’s visual appeal and bold flavors make it a conversation starter at dinner parties.
Ingredient Quality: Using fresh crab meat and high‑quality cream cheese elevates the dish, ensuring that each bite is packed with flavor. Fresh parsley adds a bright, herbal note that enhances the overall experience.
Cooking Method: The quick sear and gentle steam technique locks in the peas’ natural crunch while allowing the filling to become silky and cohesive.
Make‑Ahead Potential: The stuffed peas can be prepared ahead of time and reheated in the oven or microwave, making it a convenient option for busy weeknights.
Alright, let’s break down exactly what goes into this masterpiece. I’ll guide you through each step, share my favorite hacks, and give you insider tips that will make your kitchen sing. If you’re ready for the game‑changer, keep reading, because the next part? Pure magic.
Inside the Ingredient List
The Flavor Base
At the heart of this dish lies the creamy, savory filling that transforms each snow pea into a pocket of oceanic delight. The 8 ounces of cream cheese provide a rich, buttery foundation that melts beautifully, creating a velvety texture that coats the peas like a silky blanket. When combined with the 0.5 pound of crab meat, the filling gains a sweet, briny undertone that is unmistakably marine. A dash of Worcestershire sauce—just half a teaspoon—injects a subtle umami kick, adding depth without overpowering the delicate flavors. If you skip the Worcestershire sauce, the dish will taste slightly flat, lacking the savory complexity that elevates the overall profile. For a vegetarian twist, you could replace the crab with finely chopped shiitake mushrooms, which offer a meaty texture and umami flavor.
The Texture Crew
The snow peas themselves are the unsung heroes of this recipe, providing a crisp, refreshing bite that balances the creamy filling. Fresh, firm peas are essential; overripe or wilted peas will lose their crunch and become mushy, ruining the texture contrast. The 48 pieces of snow peas should be trimmed and cleaned thoroughly, ensuring each one is free from dirt or excess string. If you’re in a hurry, a quick blanch in salted water for 30 seconds will preserve the peas’ bright green color and firm snap. For a slightly different crunch, you could use green beans or zucchini spears, but the snow peas’ natural sweetness is irreplaceable.
The Unexpected Star
Parsley, measured at a quarter cup, adds a fresh, herbal note that cuts through the richness of the filling. Fresh parsley is preferable to dried, as it provides a vibrant color and bright flavor that enhances the dish’s visual appeal. A pinch of pepper and a sprinkle of salt bring the flavors together, ensuring each bite is balanced and satisfying. If you prefer a smoky undertone, a pinch of smoked paprika can be added, but be careful not to overpower the delicate flavors. This small addition will transform the dish into a smoky, savory masterpiece that still feels light and fresh.
The Final Flourish
Garlic, a single medium clove finely minced, delivers a punch of aroma and a subtle heat that elevates the entire dish. The garlic’s flavor is mellowed by the cream cheese, preventing it from becoming overpowering. If you’re sensitive to garlic, reduce the amount to half a clove or use a garlic-infused oil for a gentler flavor. The combination of all these ingredients creates a symphony of taste, texture, and aroma that will have your guests asking for seconds. The key to success lies in using high‑quality, fresh ingredients, as their flavors will shine through in every bite.
Everything's prepped? Good. Let's get into the real action.
The Method — Step by Step
- First, heat a large non‑stick skillet over medium heat and add a splash of olive oil. As the oil warms, the pan should emit a faint, buttery aroma that signals readiness. Place the trimmed snow peas in the skillet and let them sear for about 2 minutes on each side until they develop a subtle golden hue. This step is crucial; it locks in the peas’ natural crunch while preventing them from becoming soggy when filled. While the peas are searing, keep a close eye on the temperature to avoid burning, as the oil can scorch quickly. Once seared, remove the peas from the skillet and set them aside on a clean towel to drain excess oil.
- Meanwhile, in a medium bowl, combine the 8 ounces of cream cheese, 0.5 pound of crab meat, 0.25 cup of finely chopped parsley, 1 minced garlic clove, and 0.5 teaspoon of Worcestershire sauce. Use a fork or a small whisk to blend the mixture until it reaches a smooth, spreadable consistency. The goal is a filling that’s silky yet thick enough to hold its shape inside the peas. If the mixture feels too loose, add a pinch of salt to help thicken it slightly. This is the moment of truth—if the filling is too runny, the peas will leak, ruining the presentation. Taste the mixture and adjust seasoning if needed; a hint of pepper can add a subtle heat that balances the richness.
- Now, gently open each seared snow pea by splitting the pod lengthwise, creating a small pocket that’s just big enough to hold the filling. Be careful not to tear the pea; a clean cut ensures the filling stays inside. Spoon a generous amount of the cream cheese mixture into each pocket, pressing gently to secure it. The filling should be snug but not overpacked; you want to preserve the pea’s natural shape while ensuring each bite is packed with flavor. As you fill, the aroma of garlic and parsley will mingle with the buttery scent of the peas, creating a heady anticipation. This step requires a steady hand and a bit of patience—each pea must be treated with care to avoid leaks.
- Once all peas are stuffed, return them to the skillet and cover with a lid. Let them steam for 4 to 5 minutes over low heat, allowing the filling to meld and the peas to soften slightly without losing their crunch. The lid traps steam, ensuring the filling becomes silky and the peas stay crisp. During this time, you can stir the skillet gently to ensure even cooking and to prevent the filling from sticking to the pan. The scent of the filling becoming rich and buttery will fill the kitchen, making your taste buds tingle. This step is essential for achieving that perfect balance of textures.
- After steaming, remove the lid and increase the heat to medium-high. Let the peas brown for 2 minutes on each side, creating a beautiful golden crust that adds a delightful crunch. The searing process also enhances the flavors, adding a slight caramelization that complements the creamy filling. Keep a close eye on the peas; the quick sear should not overcook them. Once browned, transfer the stuffed peas to a serving platter. The dish should look vibrant, with a glossy sheen from the oil and a bright green color that pops against the creamy filling.
- For an extra touch of freshness, drizzle a small amount of lemon juice over the peas before serving. The citrus cut through the richness, adding a bright, zesty note that lifts the entire dish. If you prefer a sweeter finish, a sprinkle of finely grated Parmesan can add a nutty flavor that pairs beautifully with the crab. Serve immediately while the peas are still warm and crisp. The aroma alone should tempt anyone in the room to dig in before you even take a bite.
- If you’re hosting a dinner party, consider presenting the stuffed peas on a bed of mixed greens or a light quinoa salad. This not only adds visual appeal but also balances the richness of the filling with a fresh, earthy base. Alternatively, serve them alongside a chilled glass of white wine or sparkling rosé for a sophisticated pairing that enhances the flavors. Remember to garnish with a few extra parsley leaves for a pop of color and a final herbal note.
- If you have leftovers, store them in an airtight container in the refrigerator for up to 2 days. Reheat them gently in a skillet over low heat, adding a splash of water or broth to keep the filling moist. The peas will regain their crispness, and the filling will remain silky. For a quick reheating method, microwave them on a low setting for 30 seconds, then finish in a skillet to restore the golden crust. This makes the dish an excellent option for meal prep or a quick, gourmet dinner on busy nights.
That's it — you did it. But hold on, I've got a few more tricks that'll take this to another level.
Insider Tricks for Flawless Results
The Temperature Rule Nobody Follows
Many home cooks underestimate the importance of skillet temperature. Starting at medium heat allows the oil to coat the peas evenly, preventing sticking and ensuring a consistent sear. If you jump straight to high heat, the peas will brown too quickly on the outside while remaining raw inside, resulting in a mushy texture. Keep a thermometer handy if you’re experimenting; a target of 350°F (175°C) is ideal for searing without scorching.
Why Your Nose Knows Best
Before you even touch the skillet, let your nose guide you. The aroma of garlic sizzling in oil is a sign that the base is ready for the peas. A faint, sweet scent indicates the garlic is starting to caramelize, adding depth to the dish. If the smell is too sharp or metallic, it might mean the oil is too hot, and you risk burning the garlic.
The 5-Minute Rest That Changes Everything
After the peas are fully cooked, let them rest for five minutes before serving. This short pause allows the steam to redistribute, ensuring the filling remains silky and the peas stay crisp. During this rest, the flavors meld together, creating a harmonious taste that lingers on the palate. Skip this step, and you’ll notice a slight separation between the filling and the pea, which can make the dish feel uneven.
Keep It Fresh with a Splash
If you’re reheating leftovers, add a splash of water or broth before microwaving. This small trick keeps the filling from drying out, maintaining its creamy texture. The moisture also helps the peas regain their original crunch, so you don’t end up with a soggy, unappetizing dish. This method works well for both the microwave and the stovetop.
Finish with a Zesty Touch
A squeeze of fresh lemon juice over the finished dish brightens the flavors and cuts through the richness. The acidity balances the creamy filling, creating a well‑rounded taste profile. For a different twist, try a drizzle of balsamic glaze; the sweet, tangy notes pair beautifully with the crab and cream cheese.
Creative Twists and Variations
This recipe is a playground. Here are some of my favorite ways to switch things up:
Smoky Chipotle Variation
Replace the parsley with fresh cilantro and add a teaspoon of chipotle in adobo sauce for a smoky, spicy kick. The chipotle’s heat pairs wonderfully with the crab’s sweetness, creating a bold flavor profile that will impress adventurous palates.
Herb‑Infused Cream
Stir in a tablespoon of sun‑dried tomato paste into the cream cheese mixture for a tomatoy, herbaceous twist. The tomato paste adds a subtle sweetness and depth, transforming the dish into a Mediterranean‑inspired delight.
Vegan Option
Swap the crab for finely chopped tofu and use vegan cream cheese made from cashews. Add nutritional yeast for a cheesy flavor, and the dish becomes a hearty, plant‑based alternative that still delivers on taste.
Asian Fusion
Incorporate a splash of soy sauce and a pinch of toasted sesame oil into the filling. The umami from the soy sauce and the nutty aroma of sesame oil create an Asian‑inspired flavor profile that pairs well with the snow peas.
Cheese‑Loaded Delight
Add a tablespoon of grated Parmesan to the filling for a nutty, savory finish. The Parmesan melts into the cream cheese, creating a richer, more complex flavor that is sure to satisfy cheese lovers.
Storing and Bringing It Back to Life
Fridge Storage
Store the stuffed peas in an airtight container in the refrigerator for up to 2 days. Keep the container sealed to prevent the peas from absorbing odors from other foods, and place the container on the middle shelf to maintain a consistent temperature.
Freezer Friendly
For longer storage, freeze the peas in a single layer on a parchment‑lined tray until solid, then transfer to a freezer bag. They can be kept for up to 3 months. When ready to use, thaw overnight in the refrigerator before reheating.
Best Reheating Method
To reheat, place the peas in a skillet over low heat and add a splash of water or broth. Stir gently to coat the filling, then cover and let steam for 2 minutes. Finish with a quick sear on high heat to restore the golden crust. The added liquid ensures the filling remains silky and the peas stay crisp.